Module 3: Customized Design with JavaScript, HTML, & CSS
- Acquire basic Javascript skills for presenting randomized stimuli, debugging, and recording responses
- Describe how HTML, CSS, and JavaScript relate
- Identify the differences between JavaScript libraries and how they affect coding strategies
- Compare and contrast the efficiency and coding of different sample JavaScript scripts
Why learn JavaScript, HTML, and CSS? Well, if you need to manipulate variables at a deeper level than can be done in a survey platform, you may want to do this yourself. You may want to learn how to code your own website. You may need to scrape a website or deal with a large amount of information from social media sites (e.g., studies that look at what people are tweeting). You may want to collect reaction time data in a more consistent manner than some other survey platforms do. Whatever the reason, you've now ended up here on the Module aimed at teaching basic skills for these languages that are the basis of world wide web pages.
Of note, there are a LOT of additional resources for HTML, CSS, and JavaScript. Every time I look at Google on my phone, it knows that I've been writing about JavaScript, HTML, and CSS and suggests some article to that effect - there are entire communities that focus on creating packages and functionality within these languages. Here are some resources for you to peruse:
- Chapter 9 of Matthew Crump's "Programming for Psychologists" goes over programming for Web Experiments and Chapter 8 goes over another site that helps generate source code for you to run online experiments.
- Code Academy has an Introduction to JavaScript.
- May I recommend yet another JavaScript tutorial and set of videos oriented to giving you a project using JavasScript? Similarly, there is an entire set of video tutorials for beginners on CSS, and an intro to HTML and CSS video for beginners in thinking about websites generally.
- W3Schools is your friend. Every time I forget a particular element for code, I search on Google for what I need, and the most frequent site that pops up with the answer is undoubtedly W3Schools. They have a tutorial on HTML, CSS, and JavaScript. The MDN Web Docs are also your friend: Mozilla has open-source resources on these languages for web developers at all stages of expertise. Similarly, StackOverflow and StackExchange are your friends when you're coding. Someone else has likely had the same issue you've had and posted their error to StackOverflow, where other kind folks will respond with crowdsourced solutions. Make sure to be specific in your Google Search for what you're looking for, and then you'll likely find a solution (unless you're doing something highly, highly specialized, like creating your own package or library).
- Raphael Geddert in the Egner Lab also compiled a list of resources on JavaScript, HTML, and CSS; some are already listed here.
- If you're a Duke student, you can also access the "Programming Foundations with JavaScript, HTML, and CSS" coursera and the co-lab roots courses on the Web Development track, which include courses on HTML and CSS, with an aim towards creating your own website.
This course differs from those resources in that we're taking an applied perspective. If you want to know the fundamentals from a computer science perspective, you may be better off looking through the coursera or going through the other tutorials that have a more of a strict programming lens. My perspective is that of an applied scientist: I understand what is going on with the code, and I am teaching you the basics and how people use the basics to create experiments. I will not comment on whether certain scripts have the "right" structure or formatting. In other words, I don't care if you get the right answer within 100 lines of code or 10: I care that you know what your code is doing and have checked and tested the code properly, but anything else will be beyond the scope of this course. Using 100 lines of code will of course take longer to load than 10, but with the tools you'll learn in bugging and testing, you can see whether your code formatting will pose an issue for the User Experience.
Of course, one other question that you might have is whether you even need to code your experiment in JavaScript, HTML, and CSS. For example, if you have already coded your experiment in PsychoPy (a Python-based framework), you should check out Pavlovia, a tool to help convert your already existing code. Similarly, you may find that some of the experiments (within psychology) that you're looking for are already coded, via the Expfactory Github. But, if you're not among that group...
For the purpose of this module and writing code using JavaScript, HTML, and CSS, you will need a good text editor. Some options include: Notepad++, Atom, Brackets, and Textwrangler. (Undoubtedly, there are more, like Sublime, but here is a small selection). I personally use Notepad++ because it has a very simple interface, and I like that when I'm coding. Atom has additional packages that can color each language (show when you're using HTML vs. JavaScript vs. CSS), auto-indent and oraganize your code, and link directly to Github, and to my knowledge, Textwrangler also does this. Brackets has that functionality, but also employs the ability to live test your HTML out, because it creates a local copy that can get published for a 'preview.' Moreover, Brackets employs a JavaScript library (that we'll go over in Module 4) that checks your code for what it thinks are errors. Outside of Brackets, you can also preview what your code looks like using places like JSFiddle, Glitch, JSBin, and CodePen. So, the simplest option is Notepad++, then Atom or Textwrangler, and then Brackets. (If you really want the local testing of Bracekts but to use another text editor, you can set up your own local testing server). Once you've gotten your text editor program downloaded, and presuming you've already got version control in place after Module 2, then join me on the journey to get into the basics of these languages!
Basics of HTML, CSS, and JavaScript
When you load a webpage, your browser looks at the code and renders web content according to its internal guidelines. If you want to see what I mean by the latter, you can load this exact webpage in both Chrome and Firefox. It looks a little different, right? It's the same code, but the way each browser interacts with the code differs.
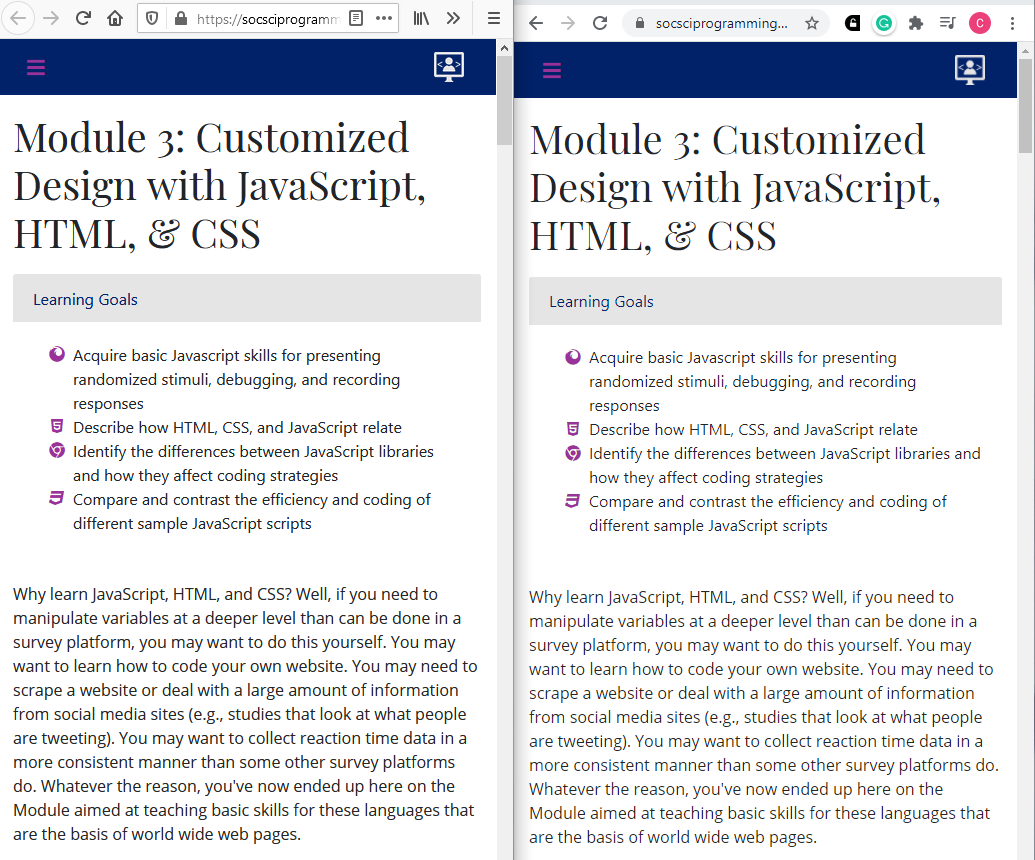
In the example above, Firefox is on the left and Chrome is on the right, loading the initial view of this webpage on the same exact screen at the same browser size, and yet you can notice a slight difference between the two. But isn't that also the genius of the code? No matter what browser this code is read on, it looks almost exactly the same. So, let's define what HTML, CSS, and JavaScript even are.
HTML stands for Hyper Text Markup Language. As a Markup language, HTML will process certain "tags" (elements) that will communicate with the browser. All browsers can recognize HTML and have been designed to do so: HTML is the foundation and structure of the content that you will see on websites. As the Mozilla Developer Guide says, HTML can "give [pieces of text] different meaning in a document (Is it a paragraph? Is it a bulleted list? Is it part of a table?), structure a document into logical sections (Does it have a header? Three columns of content? A navigation menu?), and embed content such as images and videos into a page." If you were to look at the code for Module 3 - which we will do in more detail below - you would see a whole lot of HTML with our website content and a standard structure. HTML files naturally have the extension ".html".
CSS stands for Cascading Style Sheet. It is a styling language, used primarily to impose display rules and properties on the HTML content of websites, changing their layout and look (e.g., font, color and size of any element, spacing, animations, columns for content, etc.). In the sections below, we will also look at the custom CSS sheet used for this module. CSS files naturally have the extension ".css". While learning HTML and CSS, people will often move back and forth between the two languages because they work well together, and you can get by on a webpage without using JavaScript, but typically use HTML and CSS together for any webpage.
Finally, JavaScript is a programming language that is primarily used to interact with the HTML (and CSS) - it runs on its own (in response to events on the page), runs computations (e.g., operations on text), controls the behavior of the website, etc. At the bottom of this tutorial site, there is an up arrow colored in purple. When you click the up arrow, it will scroll you all the way back to the top of the site via JavaScript. It also uses an interactive element called a "tooltip" that will appear when you hover on the arrow, the hover being a "trigger event" that is dictated by JavaScript. JavaScript helps a webpage do more than display static information. JavaScript files have the extension ".js".
So, now let's more fully explore how HTML provides the structure and content that is styled by CSS and that interacts with JavaScript.
Providing structure and content with HTML
As a markup language, HTML is made of elements that are composed of opening and closing tags marked by these carrot keypresses: < and >. In both the opening and closing tag, you'll wrap the name of the element (p for paragraph text, b for bold text, etc.) in these opening and closing carrot keypresses (or angle brackets), marking both where the element starts and ends. In short, an HTML element is the opening tag (<p>) + content (paragraph (p) text here!) + closing tag (</p>). Note that the closing tag is almost exactly like the opening tag, but includes a forward slash to indicte the end of the tag (and element).
If you only have an opening tag or only have a closing tag, your stuff may go haywire. For example, I sometimes forget to include a closing tag when I'm linking off site, and because of the styling rules on this site, all the text then turns purple or blue to indicate a link. That is, I broke the syntax of HTML by not including a closing tag, and the HTML tag will assume that the rest of the content is a part of the element until it reaches the next closing tag. Here's what this paragraph looks like in the code!
<p> If you only have an opening tag or only have a closing tag, your stuff may go haywire. For example, I sometimes forget to include a closing tag when I'm linking off site, and because of the styling rules on this site, all the text then turns purple or blue to indicate a link. That is, I broke the syntax of HTML by not including a closing tag, and the HTML tag will assume that the rest of the content is a part of the element until it reaches the next closing tag. Here's what this paragraph looks like in the code! </p>
Despite what I said about breaking HTML syntax, note that tags are case-insensitive, meaning that you can spell a tag like <span> or <SPAN> or <Span> or <SpAn>, etc. However, most folks use all lower-case for tags: this is what's consistent in other code and it's just more readable - all caps looks like you're shouting, and a mix of upper and lower case is confusing.
You can place elements within other elements, otherwise known as nesting. I can create a hyperlink to another site with an "a" tag within a paragraph text element. You're probably most familiar with nested elements with respect to bolding, strongly emphasizing the importance of something, italicizing, emphasizing, underlining, or striking through text.
<p> You can place elements within other elements, otherwise known as nesting. I can <a href="https://developer.mozilla.org/en-US/docs/Learn/HTML/Introduction_to_HTML/Creating_hyperlinks" class="copy-link"> create a hyperlink</a> to another site with an "a" tag within a paragraph text element. You're probably most familiar with nested elements with respect to <b>bolding</b>, <strong>strongly emphasizing the importance of something</strong>, <i>italicizing</i>, <em>emphasizing</em>, <u>underlining</u>, or <s>striking through</s> text. </p>
You may also wonder what's the difference between the <b> and <strong> tags, or <i> and <em> tags, if they essentially do the same thing? Well the <i> tag is meant to be used for traditional italicized things, like an academic journal you're citing, whereas <em> is meant for a kind of semantic emphasis. The same goes for <b> and <strong>: use <b> for traditionally bolded things, like keywords or lead sentences, and use <strong> for semantically stressing the importance of something.
It'd be impractical to go over all the HTML elements. To this day, I sometimes will still look up details of an HTML tag because it's hard keeping track of all the different details of each programming language you learn. Don't feel bad about Googling.
OK, so now you know the basic syntax of HTML and some HTML text fundamentals. What is each element like?
Each HTML element is contained within a box. We already talked about nesting elements - this nesting can actually create what's known as a parent-child relationship. For example, the bold, italics, etc. tags are children of the (parent) paragraph tag in the previous code block, and you can extrapolate that relationship to most of the structure provided by HTML. Within the boxes for each HTML element, you can create space within the box (padding, border) or outside the box (margin). See the following model - the code for which I took from W3 schools.
Margin, border, and padding can be modified on all axes - left, right, top, and bottom. One example of this very box model concept is demonstrated in these code blocks. Which do you think was modified to get the background to be fully grey, and which do you think was modified for the left aligned blue line? Can you see how these will be useful for you when coding an experiment? Of note, previously I mentioned that while designing this site, I recognized I had put a lot of text on one page, so I tried to compensate by... increasing the top and bottom padding for the paragraph (p) elements!
One other distinction that can be made about HTML elements refers to their default display. Are they considered block-level or inline elements? A typical inline element is contained within a block-level element, being a part of a line rather than causing a new line to appear (e.g., bolding text, creating hyperlinks). A block-level element is one that can create a new line and is often a structural element, like the paragraph text (p) element, headers, etc. You can still nest block-level elements, but they'd only be nested within more block-level elements (like all the p tags that are all nested here within the main text of this webpage!). Notably, recent updates to HTML suggest this kind of distinction may not survive future iterations/edits, but it's useful for now.
Remember how we established the basic syntax of HTML as opening tag + content + closing tag? Well, some HTML tags don't need a closing tag. These are special cases, called Empty/Void Elements. They often involve defining certain information associated with the webpage or embedding information. For example, here are some (but not all of the possible) Empty Elements...
<meta>, <img>, <link>, <hr>, <br>, <col>, <base>
Some of these you've actually already seen used here, like the hr (Horizontal Rule) element, which forms the thick grey line that I use to separate between Module sections. Images? You've already seen a number of images loaded on this site - and get this, HTML is so flexible that you can still include a closing tag. In my code, even though image is an Empty Element, there is still the </img> tag. Some of these other elements might be more obscure to you: col is for creating a column within a table; br is for creating a break/new line (would not suggest using this all the time! can use padding styling instead!). Meta refers to the metadata of a site, which includes Base and Link. Let's look at this with reference to our site:
						<base target='_blank'/>

						<meta charset="utf-8"/>

						<meta name="viewport" content="width=device-width, initial-scale=1, maximum-scale=1.0, user-scalable=0, shrink-to-fit=no"/>

						<meta name="description" content="An online course/workshop for learning how to program online social science experiments."/>

						<meta name="keywords" content="Social Science, JavaScript, HTML, CSS, Qualtrics, Amazon Mechanical Turk"/>


						...


						<title>Module 3 of Introductory Programming for Online Social Science Experiments</title>


						<!-- These are the HTML version of Comments: Favicons-->
						<link href="files/favi_icon_website.png" rel="icon" type="image/x-icon" />


						...


						<!--These comments do not impact the code: This is for those little thumbnails when the link is shared on twitter -->
						<meta name='twitter:card' content='summary'/>

						<meta name='twitter:creator' content='@chbejjani'/>

						<meta name='twitter:url' content='https://socsciprogramming.github.io/module3.html'/>

						<meta name='twitter:image' content='files/twittercard.png'/>

						<meta name='twitter:description' content='An online course/workshop for learning how to program online social science experiments.'/>

						<meta name='twitter:title' content='Introductory Programming for Online Social Science Experiments'/>


						<!-- But it is good practice to comment your code: Bootstrap core CSS -->
						<link href="css/bootstrap.min.css" rel="stylesheet">


						<!-- So that other people can understand what you're doing: Custom CSS -->
						<link href="css/allpages.css" rel="stylesheet">
There's a lot to process in this last little blurb. At the simple end, you now know how to "comment" in HTML code, and you can see that I interchangeably am using "" and ''. However, I am never mixing ' and " in the same phrase, because that would not render any code/would cause an error. Sometimes you might see something like <input required>, and that essentially means a "blank" value for required= instead of writing out required="" or required=''.
OK, but what is this metadata stuff? Well, you know how you can Google almost anything? The description meta tag above is what you would be shown as the description of this site, especially if you were Google searching the meta keywords that I defined. I'm essentially telling Search Engines this is what I think is important, this is how you should bookmark the site. Metadata is meant to help with Search Engine Optimization, much like how I even have meta tags here for what the twitter thumbnail and description should look like. Similarly, you know how each browser can have multiple tabs? Each tab has a title tag, like Accessibility Statement | The White House or Overview * Bootstrap. We define ours (which probably could be better, oops), and we also define the "favicon" (favorites icon, because it's used in the favorites/bookmarks lists) with the link tag; the favicon is the little picture logo/icon you can see representing the website in the browser tab. Some of this you might not need for an Experiment: you would for defining the CSS sheets (more below on CSS!) and probably the title tag in case your participants click out of your browser/tab and want to return, but some of the other information, maybe not.
But, what's the deal with that target= thing in the element? Haven't we seen this before... like with the hyperlink also showing href= (hypertext reference equals...) and class= ....?
Indeed you have! HTML elements also have predefined attributes. These can differentiate elements even without having any applied stylistic guidelines (like the id="" global attribute, which means you're giving that particular tag an identification). Often these attributes are used so you can apply particular rule or stylistic guidelines (via CSS and JavaScript).
In the above example, regarding attributes, as part of the base tag, I have set "default" to be that I want hyperlinks to open in a new tab, unless otherwise specified. The target attribute defines where to display the linked URL: in the same page (_self) or current context; a new tab (_blank), etc. "href" (hypertext reference) as an attribute refers to the explicit URL you want to link to; for example, you can include an email with mailto:... as the href= or a full URL or the way that I've referred to files, like css/allpages.css. It's understood from basic file organization that that means a folder CSS that is higher than where this module3.html file is and the allpages.css file within that CSS folder (something you should probably know if you have basic programming knowledge). If you do use the a tag to create links, you should make sure your link text is actually descriptive. And the class global attribute is one of the most frequently used attributes to indicate particular styling rules. I usually apply "copy-link" to all my links within these paragraph texts so that they'll be colored blue and underlined until you've visited or hovered over a link, at which point the link is colored purple, in line with the color branding of the site. Font size, text decorations, margins--so much can be altered with these classes! See the full list of attributes here.
OK, so we've gone over the syntax, the formatting, the display properties, and basic HTML elements and their attributes. What does the basic HTML structure look like? Here's what this website looks like:
						<!doctype html>

						<html lang="en">

						<head>

						<!--Within the head element tag, you typically load in
						CSS style sheets or other scripts... like: -->


						...


						<link href="css/bootstrap.min.css" rel="stylesheet">

						<script src="https://kit.fontawesome.com/25e7f7a6fa.js" crossorigin="anonymous"> </script>


						...


						</head>

						<body>

						<!--Within the body element tag, you typically put the content of the HTML document,
						first defined by a header across all the pages... -->


						<!--Usually for webpages, the navigation elements are shown next after you specify the body tag-->


						<nav class="navbar navbar-expand-md fixed-top bg-blue">

						<button class="navbar-toggler navbar-toggler-right" type="button" data-toggle="collapse" data-target="#navbarNavDropdown" aria-controls="navbarNavDropdown" aria-expanded="false" aria-label="Toggle navigation">

						<span class="fas fa-bars"> </span>

						</button>


						<!--One thing to note is that whitespace within an HTML element
						does not matter. As long as you're using the carrot/angular brackets, you're good        -->
						<div class="row" id="body-row"             >

						<div id="sidebar-container" class="d-none d-md-block col-2 bg-grey">


						<!--After the navigation bar, I define the sidebar on this site...

						and after that, we get to the main content... -->


						<div class="col py-3" id="page-content">

						<main>

						<section>

						<h1>Module 3: Customized Design with JavaScript, HTML, & CSS</h1>

						...

						<div>

						<p>Why learn JavaScript...</p>

						</div>

						</section>

						</main>

						</body>

						</html>
As you can see from the code above, the file starts out with an HTML tag, within which all other tags are nested. We then go to a head tag, define styling rules and load in other JavaScript (more below!) and then get into the body meat of the document. You can see even in this brief example the consistent use of id and class attributes. You can even see how each of these modules is structured, with a "nav" element showing how to navigate the site, a "main" element tag that then goes to each section, which has its own header (just like in a newspaper!), and then has a div element to group together all the paragraph text elements that are under that particular header... Oh, wow, that's a lot, huh? So let's look at the basics of one of these subsections in more detail, too:
<ul class="fa-ul"> <li> <span class="fa-li"> <i class="fas fa-star"> </i> </span> <h4 id="subsec31t1"> Providing structure and content with HTML </h4> </li> </ul>
This is the code that creates the subsection/tutorial header "Providing structure and content with HTML". UL stands for "unordered list" and is a type of HTML element used to create bullet-point lists. The class "fa-ul" is special, referring to the CSS package I load in from Font Awesome, which has an entire library of free icons that people can use on their webpages. We've already talked about the class attribute, and this class is "fa-ul", indicating it's the Font Awesome Unordered List (class). LI stands for "list item" and is often a bullet point within the "UL". Notably, you can also have "ordered lists" or OL (e.g., 1, 2, 3, 4, etc.) and menus, which are also composed of LI elements. Next up in the header code is "span", which doesn't necessarily stand for anything, but is often used to group together elements for styling in a particular line. (In this case, we're saying that the span element is of the "fa-li" class, or Font Awesome List Item (class); one thing to note here is that it's important to be able to read and mark other code, and the Font Awesome folks have made that possible: anything that is fa- or fas/fab is likely a Font Awesome styled element). So, after specifying the styling for the list element via the span element and its class, we use an "i" element, or idiomatic text element, which here is of the Font Awesome Solid and Font Awesome Star (classes), i.e., the star icon that you see next to the header. Essentially, I wanted to use a marker besides the indent that I have set (in CSS) for the header classes and thus created star bullet points to indicate each new subsection. After styling, we see the "h4" element, which stands for the 4th header element. There are h1, h2, h3, h4, h5, and h6 header elements, and they differ in designation, with 1 being the highest section level and 6 the lowest (often shown in differing sizes). On this site, I use the h1 element for the Module Title, the h2 element for each Section Title (e.g., Basics of JavaScript, HTML, and CSS), and the h4 element for any subsection/tutorial. It is particularly important to follow a sort of hierarchical designation as a means of ensuring accessibility: screen readers rely on sites being designated in a hierarchical fashion, with headers indicated by these h elements, sections indicated by section elements, navigation links indicated by nav elements, and paragraph elements like this text being indicated by p elements, which we discussed above. If you don't use this kind of structure, the HTML can appear as a kind of text chunk that is really hard to read. We put the header as part of the LI element and UL list to make sure that they're aligned at the same level (otherwise the code will not group together the elements). I also gave the header the id of subsec31t1, representing module 3, section 1, tutorial 1 and that it is a subsection. Each section or subsection has its own id so that if I wanted to link you there, I could easily do that, since ids should be unique to elements you'll navigate to.
And voila! That is one line of code within this particular site, and we've gone over the general site structure too. In your experiments, you may not really need to use bullet points (LI, UL, OL) - that probably depends on how you like to give instructions - but you should abide by standard guidelines for header and page elements, at the very least. Part of the reason you have this kind of organization is to be consistent in how you direct people's attention. It's like how when we read a newspaper, we see their headlines, and then the titles of the different articles, and where our eyes go will depend on how everything is laid out, right? And then there's also the accesibility part of this, too: some folks use screan readers to listen to how a webpage is rendered, and these screen readers rely on consistent structure like this to work well.
The last thing to know... How do you know when something has gone wrong? How can you debug HTML? There are two types of errors: syntax errors, where you have spelling errors in the code, or logic errors, where the code is not running how you've intended for whatever reason. A syntax error usually produces an error message of some kind, but HTML has what's known as "permissive" code so it'll still run, despite the spelling error. It will be very evident though that something has gone wrong. A logic error, you'll have to work through. For example, remember when I mentioned forgetting to close an "a" tag and having an entire paragraph underlined and in blue/purple, as though a link? If you've got your text editor program open, try typing some HTML. Try putting in an attribute, but don't close the tag. Do you see what happens to the code? Your text editor program - even if it's as basic as mine is, Notepad++ - will show different colors to indicate oh no! error! please fix the opening tag! I can't show you explicit errors on this webpage without messing up my formatting, so try this example out in your Text Editor.
Here are some error "types" you might run into:
- Unclosed elements: Make sure to CLOSE your tags, until you want the effects to spread to other elements...
- Badly nested elements: Remember our discussion of the subsection header with LI elements? What if you flipped around the elements?
- Unclosed attributes: Remember what I said about links? What if I linked to our site but forgot the second "?
Here are some examples of these errors (inspired by the debugging-example linked above) in the code section below!
						<h6> An error-related demo!</h6>


						<p> There are so many ways to have errors in HTML...


						<ul>

						<li> Unclosed elements: Make sure to CLOSE your <strong>tags, until you want the effects to spread to other elements...

						<li> Badly nested elements: Remember our discussion of <strong>strong <em>strong emphasised?</strong> and the subsection header with LI elements? What if you flipped around the titles?</em>

						<li> Unclosed attributes: Remember what I said about links? What if I linked <a href="https://socsciprogramming.github.io/>to our site</a> but forgot the second "? What do you see happening here?

						</ul>
When you're ready to publish your site, you can also run your HTML through the Markup Validation Service. It will output some error issues for you if they exist.
You've learned quite a lot about HTML! From the syntax to various elements to display properties, boxes, attributes, and file structure and more, we've gone at a pretty rapid pace--and would you believe me if I said that's not even the tip of the iceberg? But it should be enough for you to understand the basics and how we will manipulate these for our applied social science experiments.
Additional reading: The Mozilla Developer site has multiple tutorials on HTML. This may be more detail than you want, but if you really want to delve into HTML and web development, it's a great resource.
Designing and Styling with CSS
The first thing you might wonder is... do you need CSS? Maybe you've seen something like this before:
<div style="color:#1D6363; white-space: pre;"> <!--One thing to note is that whitespace within an HTML element does not matter. As long as you're using the carrot/angular brackets, you're good --> </div>
You might recognize this as one of the comments I wrote above in the HTML section on code for the website. I used styling within an HTML tag to color the comments green within the code block. You could do this kind of inline styling to any HTML element you want. So, what will CSS help in that case? Well, can you imagine how annoying it would be to put styling on every single HTML element you have? Already even on this one module page, we've got numerous lines of code, numerous paragraph elements for each tutorial, and I cannot tell you how bad it would be to have to repeat the styling every single time and to keep track of how I've styled every single in line element. That's one of the big benefits of CSS: a rule-based language invented to govern styling that's applied to elements or groups of elements, whether that's through a global attribute like a class, a particular ID you've given an element, or a specific tag like in the example above.
CSS follows a set of rules made of selectors and declarations (just as an HTML element is made of opening tag + content + closing tag). A selector comes in many forms, for example, the ID, class, or tag/type (i.e., the HTML element) that is going to be styled. After selecting that element, you declare what you're going to do: what property you want to target (color, font-size, font-family) and what value you want that property to take. Every statement has to end with a semi-colon. Let's look at a few simple examples from the styling of this website.
						h1, h2, h3, h4, h5, h6, .headerfont {font-family: "Playfair Display";}

						p, .mainfont, code, pre {font-family: "Open Sans";  color: #262626;}
In these first two lines of the custom CSS for the site, I select all the header elements (h1-h6) (i.e., "type" selector) and a new class that I am defining (.headerfont; "class selector") to have a serif font, "Playfair Display". The header elements are the selector; font-family is the property; Playfair Display is the value of that property; and together font-family and playfair display are the declaration that is enclosed in curly brackets and ends with a semi-colon. On the next line, I select the p/paragraph text element, a new class I'm defining (.mainfont), and the code and pre elements, and declare that I want these to show in a sans serif font, Open Sans, and that I want the color to be a kind of charcoal that is in the Duke colors brand guide. The fonts are consistent with the Duke typography brand guide. You may have noticed even in this example that you can select multiple "selectors" in your declaration statement all at once ("selector list"), with a comma between the different selectors.
You may have noticed just from this example that each property is going to have its own unique value. I could not put "Open Sans" as the value for color; color takes color values, like predefined names (blue, red, white, etc.) or hex codes (#262626) or RGB (red green blue) values, etc. Font-family takes the name of a particular font that you have to have loaded in your browser. And so on. In the second example, you may note that we even make 2 declarations with 2 different values for 2 different properties within the same set of curly brackets. You can make as many as you want, but sometimes it's not advantageous to have too many. If I wanted to apply this different elements, the more properties I have declared, the less flexible that class/element will be, given my styling rules. That is, I'm much more likely to then run into cases where I don't want particular properties on the header font and the main font, etc. It is also hard to remember all the different CSS properties; MDN has a CSS reference guide, and I personally Google whenever I can't remember a particular property.
OK, so how do you actually add CSS to an HTML document beyond styling inline elements? Do you remember our trusty HTML element "link" from the previous tutorial? Well, here it is again, within this module:
						<!doctype html>

						<html lang="en">

						<head>

						<!--Within the head element tag, you typically load in CSS style sheets
						or other scripts... like: -->


						...

						<!-- Bootstrap core CSS + font awesome JS for icons-->
						<link href="css/bootstrap.min.css" rel="stylesheet">

						<script src="https://kit.fontawesome.com/25e7f7a6fa.js" crossorigin="anonymous"> </script>


						<!-- Custom CSS -->
						<link href="css/allpages.css" rel="stylesheet">


						<!-- Loading fonts; pairing serif fonts in headers w/ sans serif for body-->
						...
						...


						</head>

						<body>

						...

						</body>

						</html>
CSS is typically specified within the head element of an HTML document. I link to a preestablished set of CSS (Bootstrap, which we will discuss again in Module 4), as well as the custom sheet of rules I've made for this website. I was able to do so with the link tag and its rel attribute marking that this is a stylesheet.
One thing you may have also noticed about this site is that when you load it for the first time, it takes a few seconds for the CSS to be applied. You may wonder, how did Firefox and Chrome render the same content in slightly different ways? Well, each browser also has its own set of default styles, and if I'm changing part of that - like a particular font - it will take a little for the browser to load in that information and change that style. The default font on Chrome is "Font size: 16; Standard font, Serif font: Times New Roman; Sans-serif font: Arial; Fixed-width font: Consolas." And here on this site, I change those default fonts. If you ever are curious about all the CSS properties and their defaults, you can take a look at the MDN guide.
But why exactly does that loading delay happen? Well, first the browser loads the HTML and then converts the HTML into a "Document Object Model". (Remember how we consider HTML as the structure of the webpage? Consistent with that, HTML is loaded first, before applying any styling or design rules). The DOM uses your computer's memory, as allocated to the browser you've loaded the site in. Remember what I said above, with link href=css sheet? Well, after converting the HTML into the DOM, the browser then looks at what you've loaded from elsewhere, like your linked CSS.
Remember when we were talking about parent-child relationships within HTML? Well, it turns out that's important here too. Now that the browser has loaded in your CSS, it looks to see what elements have each classes, whether certain parent-child relationships need to have particular styles applied - examines all the selectors, etc. All those changes are then rendered in an interactive way... And if there's something the browser doesn't understand within the CSS, it will just ignore this. Whether your line has a misspelled property or an invalid value, the valid lines will be applied and that invalid line ignored. (Notably, in terms of the CSS, what gets applied first is the default of the browser, then the custom settings of each user, then the custom settings you/developers write on the site, then anything that is declared to be important by you/developers or the user (more on that later). This is important to know when we talk about the "cascade" model of CSS.)
Earlier, I mentioned the CSS classes of "headerfont" and "mainfont." You can tell in the CSS that I'm referring to a class, because it's preceded by a period ("full stop character"). Each selector will have its own way of being selected - standard HTML elements (type selectors) like the paragraph text, p tag, can be selected without specifying the full stop character. We'll go over different selectors little by little. So, let's take a look at a class that has been applied to a lot of places. Here's the CSS code:
						.copy-link, .copy-link:link {color: #012169;}

						a.copy-link{text-decoration: underline;}

						.copy-link:visited, .copy-link:focus, .copy-link:hover, .copy-link:active {color: #993399;}
This means that whenever I call upon the class copy-link, it will be shown in blue, and look, a combination of the HTML element tag & a class (a.copy-link)! That means that all a elements/tags with the copy-link class will have the underline value assigned to the text-decoration property. And after that, I specify more: that is, I style based on "state" (:hover, :active, :focus, :visited, known as pseudo class selectors). When you hover over a link or have already visited it or focus on it via the keyboard or the link is in the process of being activated/clicked, the link will turn purple. And here's one small version of the HTML code.
<p>CSS is typically specified within the head element of an HTML document. I link to a preestablished set of CSS (Bootstrap, which we will discuss again in <a href="module4.html" class="copy-link" target="_self">Module 4</a>), as well as the custom sheet of rules I've made for this website, plus the fonts that I want to grab from <a href="https://fonts.google.com/" class="copy-link">Google's Fonts API</a>. I was able to do so with the link tag and its rel attribute marking that this is a stylesheet.</p>
As you can see in the HTML, applying a class is fairly easy - just like adding in the attributes we talked about (href, target, etc.) and making sure you've enclosed the class statement within quotations.
Another type of styling you can do is based on location in the HTML document. Here's another example from this website:
section div {padding-top: 0.7rem; padding-bottom: 0.7rem;}
Here I'm saying the (child) "div" HTML elements that are placed within a (parent) "section" HTML element should have a specific top and bottom padding (remember padding from our previous tutorial?). In this case, we're using a descendent combinator and specifically selecting a nested element. If you remember from the last tutorial, this site is styled so that each tutorial is its own section, and each tutorial section is subsumed within a subsection, and there are specific numbers of subsections that make up a module. And, within each section, I group together the p elements with a div element. That's why you get different spaces between the p elements and the headers between each section.
Along the lines of combining selectors in a declaration, you can indicate the location with a +. Like instead of targeting the div elements within a section, knowing that I'd be about to start a new section anyway with a header, I could've written a similar rule like h2 + p, h4 + p {padding...}. This would mean that any p element that came straight after a h2 or h4 element (i.e., the headers) had special values for their padding. The plus sign in this selector is known as an adjacent sibling combinator, selecting the second element (p) that follows the first (h2 or h4), with both sharing the same parent (div).
There are other types of combinators: a child combinator (h2 > p), indicating the p elements that are only direct children of the h2 elements; a general sibling combinator (h2 ~ p), indicating all iterations of the p element that follow the h2 element (as direct or indirect children while being of the same parent element); and the column combinator (col || p), indicating all p elements belonging to the col element selected on the left (but note that this combinator is "experimental" and may not be compatible with all browsers). The most frequently used of these combinators that I've seen is the child combinator, which as you can imagine, is more specific than the others and allows for precise targeting.
Let's go over what an attribute selector looks like.
						[data-toggle="collapse"].collapsed .if-not-collapsed {

						  display: none;

						}

						[data-toggle="collapse"]:not(.collapsed) .if-collapsed {

						  display: none;

						}
Here you can see that we're making a declaration based on when 1) the parent attribute data-toggle is exactly equal to collapse, then look for 2) all iterations of the pseudoclass :not (i.e., elements that don't match the .collapsed class) and the .collapsed class within that element with the data-toggle=collapse attribute value, then 3) look at the child elements with the class either .if-not-collapsed or .if-collapsed and 4) then don't display the element. Wow! The logic got more complex, huh? (Note that with attribute selectors, you can change the syntax to match whether you want the attribute to be equal to a specific value, just match the attribute at large, etc.). And here's the HTML that goes with this styling:
						<a href="#submenu3" target="_self" data-toggle="collapse" aria-expanded="true" class="list-group-item flex-column align-items-start">

						<div class="d-flex w-100 justify-content-start align-items-center">

						<span class="if-collapsed fas fa-angle-up mr-3"></span>

						<span class="if-not-collapsed fas fa-angle-down mr-3"></span>

						<span class="copy-link active">3: Customized Design with JavaScript, HTML, & CSS</span>

						</div>

						</a>
So, what's going on here? Our link in the sidebar has an href of #submenu3, which indicentally will be important to the "collapsing" behavior. (All elements within a div that have the ID submenu3 will be the focus of the data-toggle class attribute; this data-toggle attribute is defined within a CSS package called Bootstrap and makes the attribute 'aria-expanded' equal true or false based on whether you've tried to click and expand or click and hide the div elements and what the default is (i.e., collapsed)). You have a bunch of classes applied to this first-line a element, and you have two span classes that are positioned right next to the title of this Module beneath a div class that groups all 3 span elements together. The fa-angle-up is listed with the if-collapsed class, which is the "default" state of the Modules in the sidebar - you can't see each individual subsection until you've clicked the Module itself. The fa-angle-down class is listed with the if-not-collapsed class.
Believe it or not, we still haven't gone over all the selectors! We still have the basic "universal selector". For example, you could do *p and make a declaration that applies to all p elements. I suppose I could make entire site default to Open Sans with this selector and then just specify Playfair Display for header fonts, but I'm wary of using a selector that is not that specific and applies to all. There are also "pseudo-elements", which let you style specific parts of the element you select. I've most often seen this used in refence to element::before (pseudo-element referring to the first child of your selected element) and element::after (pseudo-element referring to the last child of the selected element). We were just talking about creating collapsible submenu icons; can you imagine a version of this, using the ::before and ::after pseudo-elements? (Here's one complicated thread; see below on the drop-down example for more uses of :before & :after).
Pretty much any of the combinations I've already talked about, you can do all at once if you really want to get specific about certain parts of your code.
						/* Submenu item - make the subsections indented left*/
						#sidebar-container .list-group .sidebar-submenu a {padding-left: 30px;}
This targets the HTML element with the id sidebar-container (ids selected with #) possessing the classes list-group and sidebar-submenu and the a tag within those. It then says, give 30 pixels of padding on the left side. Have you noticed how the items in the module sidebar are indented? And another thing to note is that making comments in CSS also differs slightly from HTML (that is, /* ... */ instead of the carrot/angles beside the exclamation mark and dashes to mark opening and closing tags).
OK, so I actually only showed you one way of linking to a stylesheet. That way was the 'external' stylesheet reference, and you already knew about inline styling. You can actually refer to the styling of an HTML document within internal tags as well. We also do it on this site for...
						<div class="w3-boxmodel mainfont">

							<div class="margin">

							  <div class="border">

								<div class="padding">

								  <div class="content"></div>

								 </div>

							  </div>

							</div>

						</div>


						<style>

							.w3-boxmodel {margin: 30px 0;}

							.w3-boxmodel .margin {background: #E5E5E5; padding: 45px; width: 100%; height: 100%; position: relative; border: 2px dashed #bbb;}

							.w3-boxmodel .margin:before {content: "Margin"; font-size: 1.4em; position: absolute; left: 0; top: 1.8%; width: 100%; text-align: center;}

							.w3-boxmodel .border {background: #B5B5B5; padding: 45px; width: 100%; height: 100%; position: relative;}

							.w3-boxmodel .border:before {content: "Border"; font-size: 1.4em; color: black; position: absolute; left: 0; top: 2.5%; width: 100%; text-align: center;}

							.w3-boxmodel .padding {color:black; padding: 45px; width: 100%; height: 100%; position: relative; background: #E5E5E5;}

							.w3-boxmodel .padding:before {content: "Padding"; font-size: 1.4em; position: absolute; left: 0.5%; top:3.7%; width: 100%; text-align: center;}

							.w3-boxmodel .content {padding: 20px; width: 100%; height: 100%; position: relative; background: white; border: 2px dashed #bbb;}

							.w3-boxmodel .content:before {content: "Content"; font-size: 1.4em; display: block; text-align: center; line-height: 3.5;}


							@media screen and (max-width: 450px) {

							.w3-boxmodel .margin {padding: 35px;}

							.w3-boxmodel .margin:before {font-size: 1em; left: 0; top: 2.5%;}

							.w3-boxmodel .border {padding: 35px;}

							.w3-boxmodel .border:before {font-size: 1em; left: 0; top: 3.2%;}

							.w3-boxmodel .padding {padding: 35px;}

							.w3-boxmodel .padding:before {font-size: 1em; left: 0.5%; top:4.5%;}

							.w3-boxmodel .content {padding: 20px;}

							.w3-boxmodel .content:before {font-size: 1em;}

							}


							@media screen and (max-width: 360px) {

							.w3-boxmodel .margin {padding: 25px;}

							.w3-boxmodel .margin:before {font-size: 0.9em; left: 0; top: 1.5%;}

							.w3-boxmodel .border {padding: 25px;}

							.w3-boxmodel .border:before {font-size: 0.9em; left: 0; top: 2.2%;}

							.w3-boxmodel .padding {padding: 25px;}

							.w3-boxmodel .padding:before {font-size: 0.9em; left: 0.5%; top:2.5%;}

							.w3-boxmodel .content {padding: 15px;}

							.w3-boxmodel .content:before {font-size: 0.9em;}

							}

						</style>
The W3Schools box model! You can create an internal stylesheet by linking to the HTML tags for style within your document. And note that padding, border, and margin are all properties that you can make a declaration for within CSS (read more details on the box models of CSS). Also, of note, regardless of whether you're using an internal or external stylesheet, spaces don't really matter that much within CSS. That is, you'll see in a lot of premade CSS stylesheets selectors and declarations like the following: .w3-boxmodel {margin: 30px 0;} .w3-boxmodel .margin {padding: 25px;}. The fact that there's not a separate line between the two will not affect the running of the style rules involved here.
OK, so how can you tell your CSS isn't working out? The most likely scenario is that your selectors are not matching the way you think. I often forget the specific way that I have to refer to a class versus a state (versus some other selectors we will discuss) and will Google this and play around until I get a site to look the way I want. More on debugging below!
One way that you might run into an error is simply because of how CSS is organized. That is, why it's called a Cascading Style Sheet.
The cascading model means that 1) the latest rule takes precedence over the previous rule. If you declare a value for a property twice in the stylesheet, the one that will be applied is the later rule. If you're applying multiple classes to an HTML element that have conflicting property values in their declarations, what do you think will happen?
And 2) there's also specificity in the cascading model, where the most unique selectors take precedence over the less unique selectors. As you might guess, that means an ID (which should be specific/unique to each element) takes precedence over a Class which takes precedence over Elements/Tags (i.e., inline styling or applying all styling to the h1 element). Applying both #1 and #2, in the case of conflicting property values with the same specificity (i.e., both classes with conflicting 'font-family' e.g., values), then the one that came later in the CSS is the rule that applies here. In cases of higher specificity, like a selector for an ID earlier versus a selector for a class that is also on the html element with the ID, the earlier, higher specificity will apply its rule (i.e., ID styling > element/tag styling).
Finally, there's also the property of inheritance to take into account. Inheritance refers to the parent-child relationships we discussed with respect to HTML, and even above with "div" being an immediate child of the parent "section" (in the website code) - here, some CSS properties will also - by default - inherit values set on the current parent's element. If I had set a selector on section, then the div element that is a child of section would inherit the properties on section. So, if one of your elements inherits a value and you've specified its value earlier in the style sheet, then you might still have an issue with the later rule - and the inheritance of that value. Some properties are an exception to the rule of inheritance, like widths, margins, padding, and borders, since that'd make everything less flexible.
If you want to control the inheritance of a particular element, for each selected element, you can declare one of four property values: inherit (value should be the same as what the parent element has), initial (value should be the initial value of the property), unset (reset property to natural value; if property is inherited, this is akin to inherit; if not, then akin to initial), and revert (which is newer and doesn't have full browser support). So, if you style all sections to be red, and then do div p to be inherit, you're saying that you want all p elements within div elements to "inherit" the styling associated with div, not necessarily the section is red rule.
Finally, if you want to override all the other rules, you can use the !important special piece of CSS. This text makes the CSS property and value the highest/most specific thing and overrules all else. Thus, in sum, as the MDN folks suggest, you can think of this as 1) source order, then 2) specificity to qualify the source order, and 3) importance to qualify both. If you're ever uncertain about why your CSS code isn't working, one of the easiest things to do is to move the CSS line you're worried about around in the sheet or delete it and see what happens. This is what I mean by "playing around" with the code, and also one of the easiest ways to learn.
Most values for properties are keywords or numeric values. Sometimes, they are not. One example comes from the pie chart on the home page of this site.
						.design {

							background-color: rgba(1, 33, 105, 0.7);

							transform: translate(35%, 0%);

						}

						.webdev {

							background-color: rgba(0, 83, 155, 0.7);

							transform: translate(100%, -100%);

						}

						.compsci {

							background-color: rgba(153, 51, 153, 0.7);

							transform: translate(35%, -135%);

							position: absolute;

						}

						.researchmethod {

							background-color: rgba(102, 102, 102, 0.7);

							transform: translate(100%, -135%);

							position: absolute;

						}
Translate here is a function that is applying math within the CSS for the property of transform. It has its own name and parentheses with the values for the function. Within the transform property, there are multiple other functions, like rotate, that could be applied. There is also a "calc" function that could do simple subtraction.
Something of particular importance to Experiments is the background-color property. This is probably something you'll want to set to keep constant for all users. I pretty much always use a white background and test to make sure that everything else is of sufficient contrast to see properly on screen (see color contrast checker for accessibility).
Another type of CSS statement you'll get is an "@rule" indicating an instruction/rule for the CSS. Probably the most frequent one, which I used on my personal website, is the @media rule.
						@media (min-width: 768px) {

						  .dropdown-menu-arrow {

							top: -25px;

							right: auto;

							left: 50%;
							position: relative;

							-webkit-transform: translate(-50%, 0);

							-o-transform: translate(-50%, 0);

							transform: translate(-50%, 0);

						  }

						  .dropdown-menu-arrow:before,

						  .dropdown-menu-arrow:after {

							content: "";

							position: absolute;

							display: block;

							border-width: 10px 11px;

							border-style: solid;

							border-color: transparent;

							z-index: 1001;

							bottom: -18px;

							right: -8px;

							border-bottom-color: #3479B2;

						  }

						  .applied-menu{right: 50%; left: -50%;}

						  .mentoring-menu{left: -20%;}

						  .other-menu{left: -25%;}


						  .dropdown-menu{

							display: none;

							top: 3.5em;

							margin-top: 0;

						  /*  text-align: center; */
							background-color: #3479B2;

							-webkit-border-radius: 0.25rem !important;

							   -moz-border-radius: 0.25rem !important;

									border-radius: 0.25rem !important;

						  }


						  .dropdown:hover .dropdown-menu, .dropdown:focus .dropdown-menu, .dropdown:visited .dropdown-menu {display: block;}

						}
So many things to comment on here! First, the @media request: what it's doing here is essentially saying that if the width of the browser screen is more than 768px (min-width has to be 768 pixels), then you can show the drop-down-menu-arrow, etc. In short, it's applying a kind of conditional logic to classes that I have on my HTML elements.
OK, so think about the @media rule from the perspective of your experiment. If you don't want participants to do your experiment unless they have a certain screen resolution, you can use the @media rule to simply not show the buttons to move on in the study unless they're at a certain screen size. Of course, you'd want to put that explicitly in the instructions and explain what happened with respect to the rule, if you chose to do it, lest participants get confused. You can also do this with JavaScript (more on that later!). You could also increase the global font size for your experiment given a certain browser size, etc.
You can see from the rest of this example a number of other properties, including the position (absolute, relative), borders, display properties... The !important CSS value, the :before and :after pseudo-elements... There are really so many CSS properties that I can't more highly recommend checking out the CSS reference guide or googling when you need to figure out a specific property you need to change.
You might also notice I broke some of the original CSS guidelines - that is, border-width has 2 values assigned to the property. That is because some properties, like border, are shorthand properties, where you can set multiple values in a line. For border-width, two values means vertical and then horizontal. Three values changes to top, horizontal, bottom. Four values changes to top, right, bottom, left. In other words, what the value means depends on how many values you input. They're called shorthand properties because it saves you lines of code - that one line with 2 values - is equivalent to writing two lines with 1 value each.
I mentioned before that it didn't matter how much white space you had in an HTML element: the same is mostly true of CSS. You can't have white space when calling upon a specific property: border-bottom-color is not the same as border- bottom - color. But writing .applied-menu{right: 50%; left: -50%} is the same as writing it with left starting on another line. Usually people like to write with each property on a new line (because it's easier to read), BUT when people are creating CSS sheets for others to use, they will squish together the properties and selectors to save the number of lines and reduce overall processing speed. So, you'll see it written both ways, and how you do it is up to you.
Now, say you want to debug your CSS to figure out what's gone wrong. By far the easiest way to do this is to access the browser developer tools. What you can do in the DevTools will likely be different based on the browser you're using, but there are some fundamentals: namely, having a place for you to look at HTML elements, examine the source scripts of the site, and making changes within the DevTools.
There are basically two ways to look at the code of a site. You can right click on a page and click "View Source". Here, you're looking at the code as it's stored on the server that's rendering it. So, if you're looking at the code on this website, it looks pretty similar to what it'll be with the Developer Tools, since I'm not doing much server-side with Github, but if you look at a site hosted on Squarespace, "View Source" is going to a lot harder to read. Generally, though, I recommend looking at the Developer Tools, because these are just more interactive. They show you the Documnet Object Model (DOM) rendered in the browser. How do you access the Developer Tools? Here's a guide from Mozilla! Or one from Google! For me, on Windows 10, all I do is press F12 in Firefox or Chrome and the DevTools pop up.
So, what do the DevTools look like?
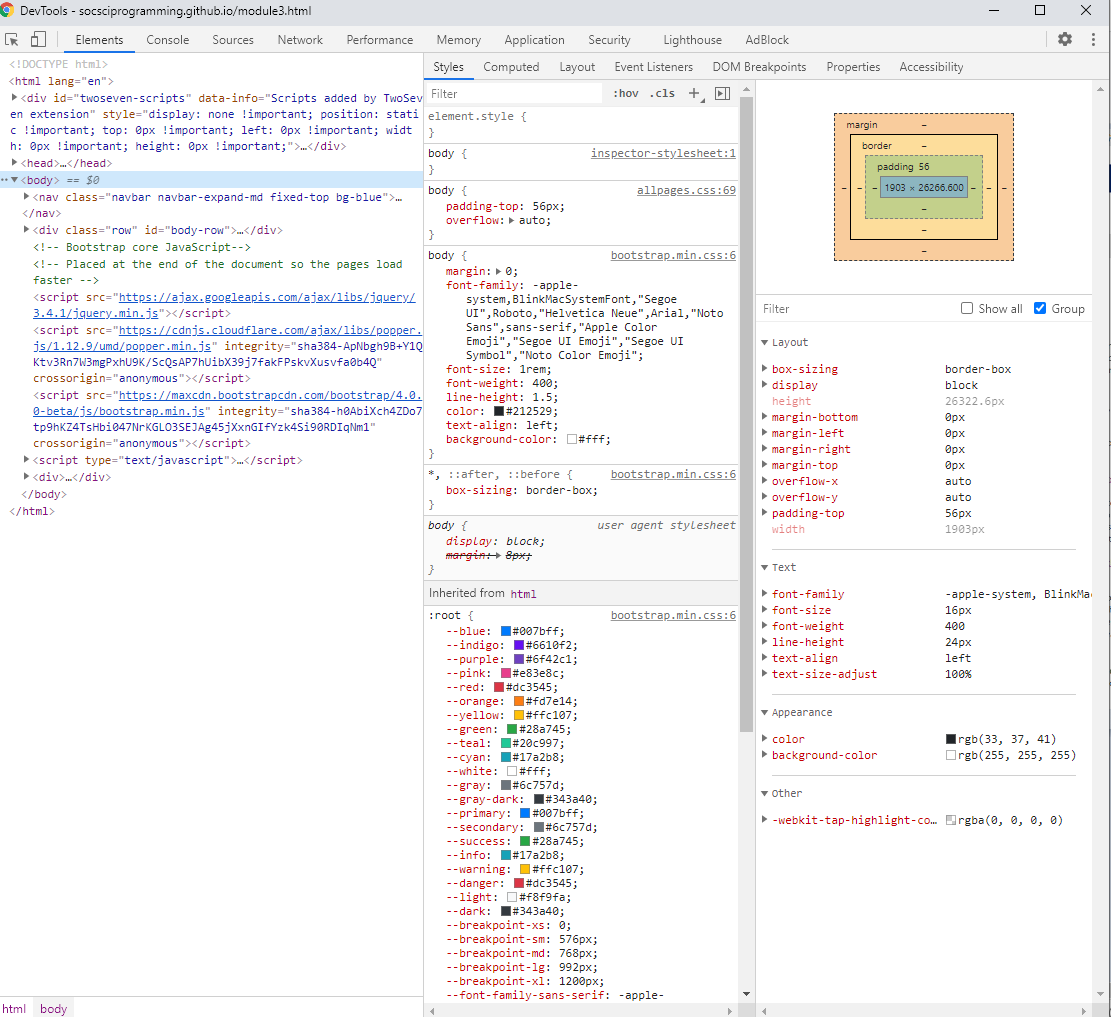
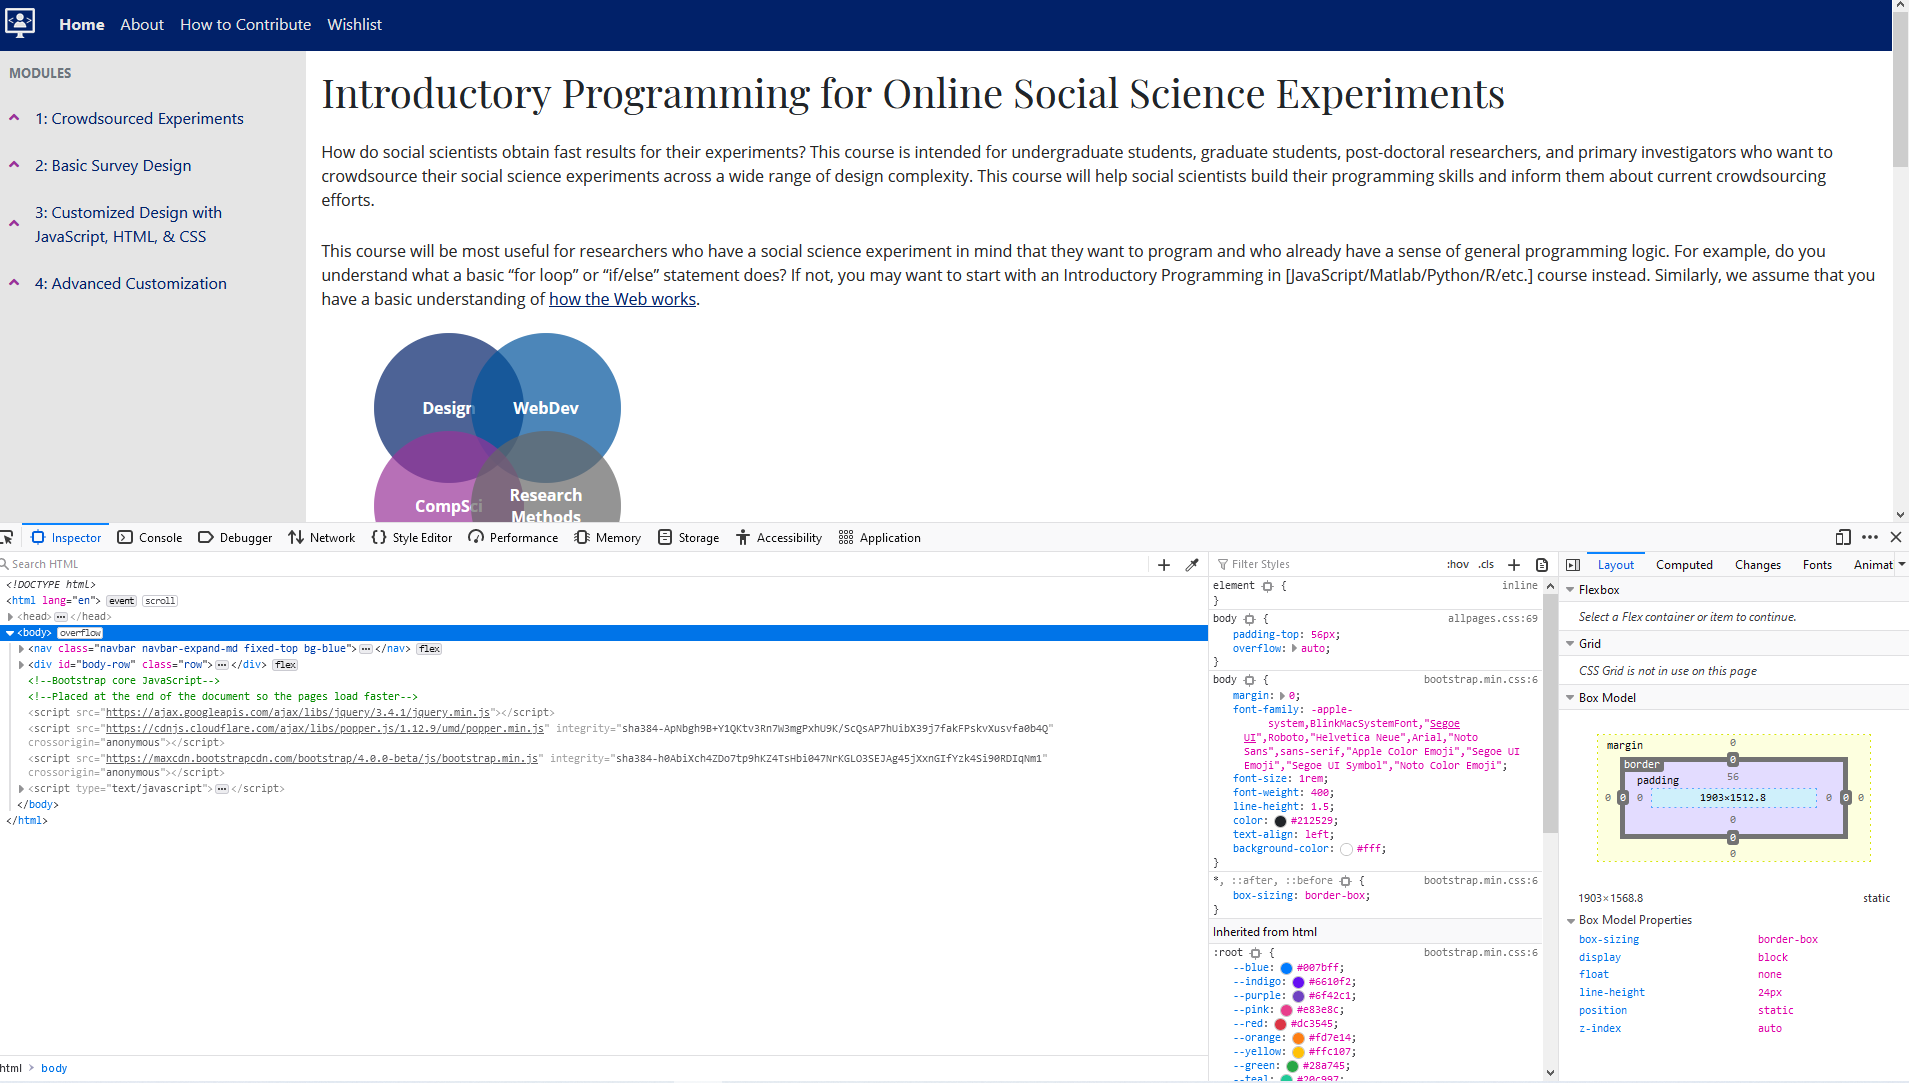
The Elements tab will show you the HTML structure of the site. When you hover over or click one of the HTML elements, it will tell you the styling rules that are applied to that element, and it'll show you what the element looks like in terms of the Box-model that we've gone over. In this particular example, it highlights that there is no margin or border applied to the body element, but there is a padding-top of 56 pixels, and the rest of the screen has a width of 1903 pixels. Why do you think this width is so large, but when you select other elements, the width changes and shrinks? With the body element clicked, you can also see the body styling - including that exact styling rule on padding-top applied. To save space, the browser has naturally compressed elements into body and head elements alone, but you can click the arrow next to each element to expand. Remember parent-child relationships? This is one easy way of viewing them and individual "nodes" within the DOM.
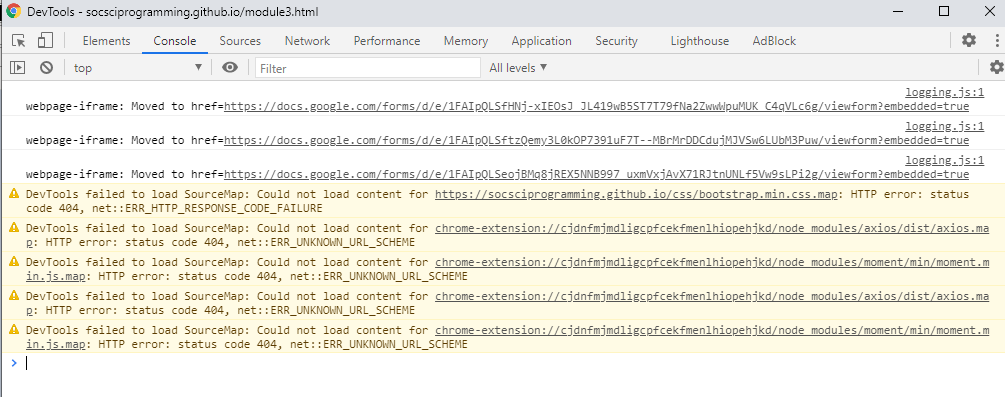
The Console tab is usually where explicit errors are listed with your code. Because CSS will just ignore an invalid rule and HTML will often just keep reading until you have the next element/tag (for example, if your error is that you haven't closed out a tag properly), the most frequent errors you'll see listed here have to do with JavaScript and any extra level of interactivity that you've added into your code. If things don't load properly, as shown in the example above, you'll see the errors here too. But, that depends on the loading error - I had posted an image tag in HTML, but had a misspelling in the filename; there was no error in the console because it read the tag code, but it showed on the page as an unloaded image (because the image didn't exist).
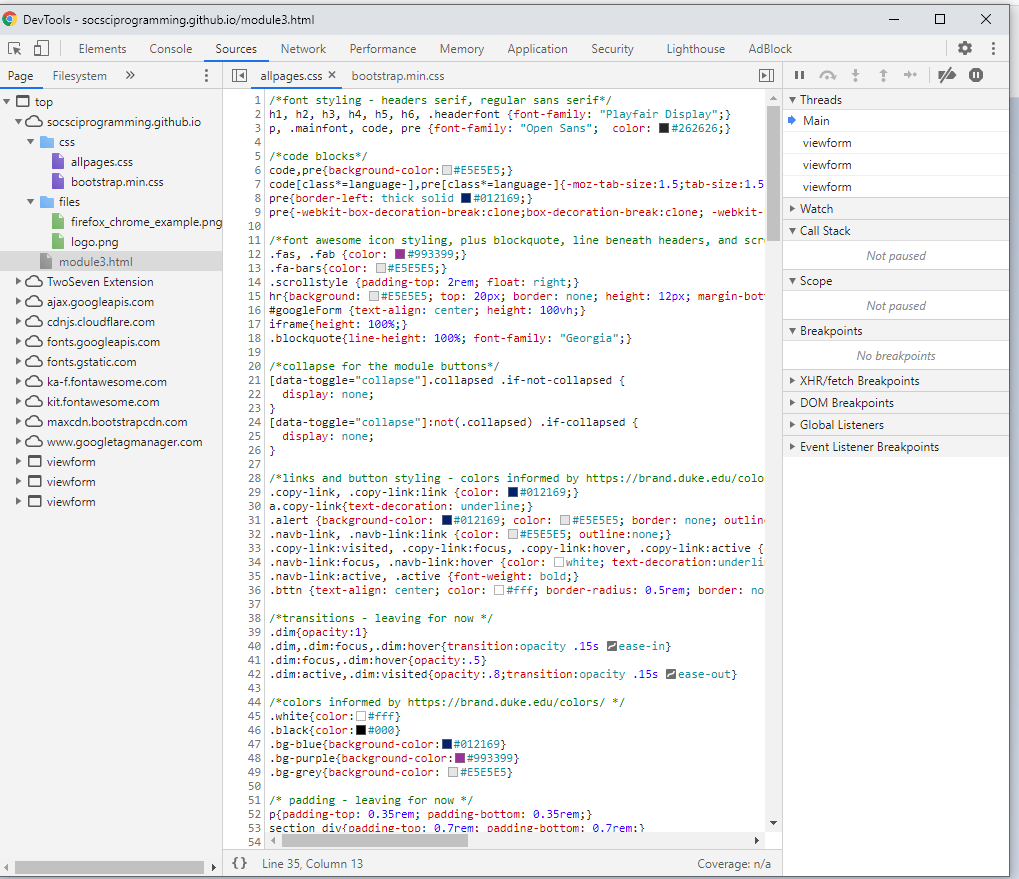
Looking at the Sources tab, you'll find the code and files you refer to. On the left hand side, you can see that on this particular site, the HTML file is accessing the files folder and the css folder. Within each are 2 files accessed directly in the HTML. For me, this section is best to look at your CSS code. You can modify any bit of the CSS in this section and literally watch on screen for the HTML document to change. If you open this site up right now, delete the p, .mainfont line and see what happens.
So, if I want to edit HTML elements, I'll do it in the "Inspect/Elements" tab, where I can right click the HTML element and select "edit as HTML" and see what happens - live - to the site. And if I want to edit CSS, I'll edit directly in the Sources tab and see what happens to the site design. For each particular element, you can also edit CSS on the Inspect/Elements page where there's the plus sign under styles, but I personally find easier to do in the sources section. On the other hand, in the Inspect/Elements page, you can directly see when you might have conflicting or invalid rules - here, you will see which have been crossed out, which rules are applied to each element, etc. You'll also be able to see in the Inspect/Elements tab whether the property in question is supported by the browser you're in.
What to do if your rules are crossed out? Well, check to make sure this is a valid CSS property/value and valid HTML. On occasion, I have spent a long time trying to figure out the error, only to realize something was misspelled or there was a typo present. You can run CSS through the CSS validator and HTML through the HTML validator. You'll want to check if you experience the same issue on other browsers - is it specific to the browser you're using? Is your code supported in your browser? You'll want to think through what we discussed about the cascading model, specificity, and inheritance - is that why your rule is being ignored or overriden? You might also just want to move things around and see what happens. When I was trying to debug why the responsive design for this site failed on this module, I commented out the code blocks (unique to this module) until I saw which ones were causing the largest issues by slowly uncommenting out the issue. I also had tested out removing nonessential CSS.
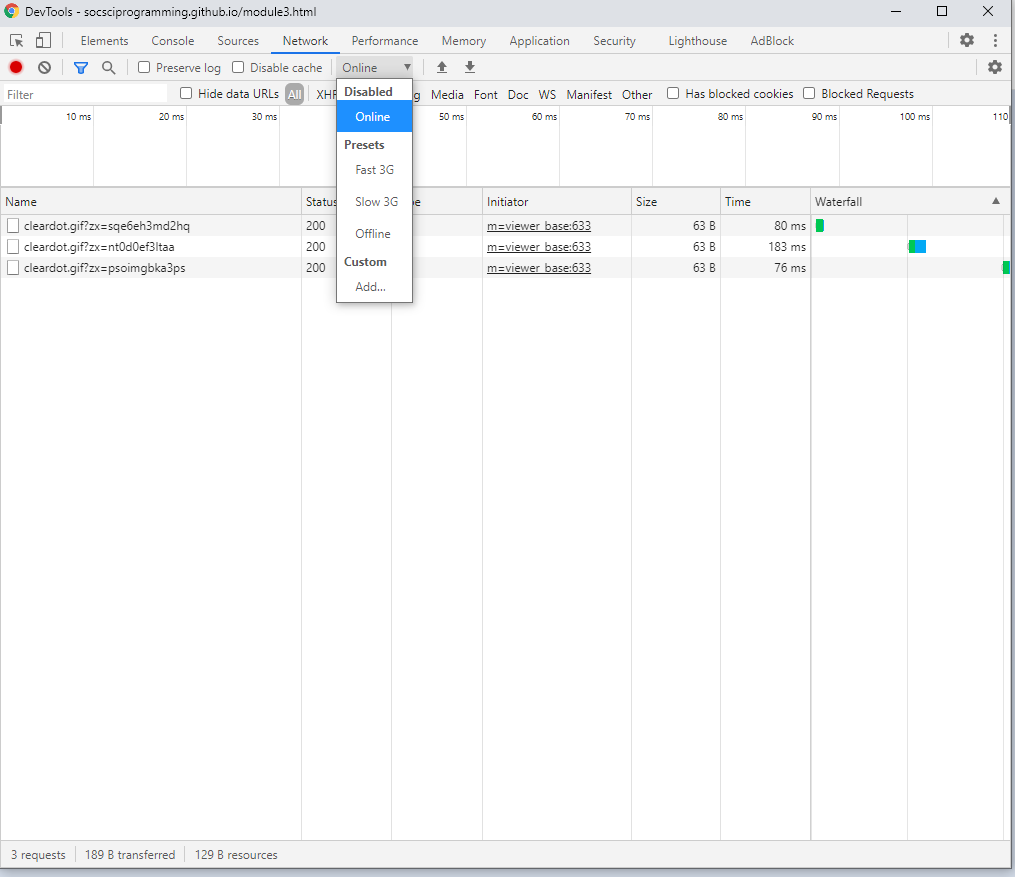
Looking at the Network tab, you can see how the site performs on different preset speeds. For example, if you've coded an experiment and you want to see if your code goes well with both fast and slower internet, you can test the code with both the Fast and Slow 3G presets (or set your own Custom preset). I did this once for a study where I was going to run a lot of people, and I thought that it'd be best to make sure internet speed wasn't going to be an issue for my results or my ability to collect data.
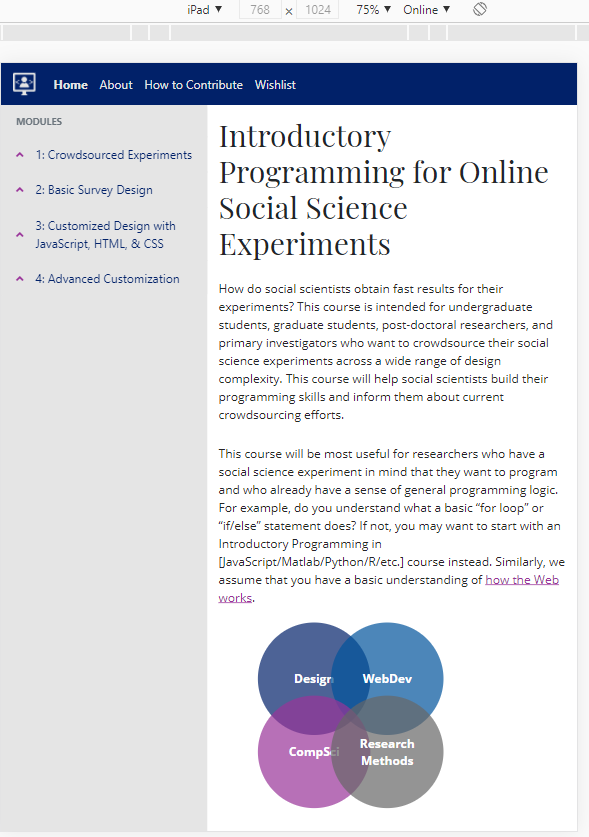
Finally, what happens if you click the icons that look like a phone and an iPad, i.e., the "Toggle Device Toolbar"? Well, the page where you're looking at the developer tools from will then turn to this preview, which lets you toggle between different devices and shows you what the site looks like on those devices. In this preview, I've chosen "iPad" so we can see what the site looks like on a standard iPad size, but you can also click for iPhones and Galaxy S5s and Responsive, which means that you can adjust the height and width as you like. You can see that next to the dropdown of these presets, you can also change the "network" preset to something like "Mid-tier mobile" and "Low-tier mobile" or "Offline." When you hover over the little boxes below the toolbar allowing you to select devices, you can also see the width of typical devices, like "Laptop - 1024 px" and choose those too. All of this is meant to show you what your code dynamically looks like on screens beyond your own, which is really important if you are testing participants who are all accessing the internet on different devices.
I can say that for this site specifically, I chose a design that is not super mobile friendly, but that's mostly because coding is just a lot harder to do on your phone than on a computer. So, it seemed to me that the site design should be more oriented to computers than mobile devices. You'll need to have specific reasoning why you target the design of your study one way or the other.
Finally, how do the Developer Tools look in other browsers, like Firefox? Well, you can see that there's not really much of a difference. A lot of the same Tabs exist, and might be named slightly differently (Inspect vs. Elements). They both show you the styling applied to elements, plus the box model that we've gone over, and the network and performance/memory tabs. They both let you look more closely at a script, and they both, when you right click on the code in Inspect/Elements, let you click "Edit as HTML" and make whatever edits you want to the structure of the site.
OK, so how does this all actually apply to when you're coding a study? In most experiments, I don't use as much CSS as I do with styling webpages like this or my own personal website. I try to use CSS as a framework that guides User Experience, like making buttons a certain color and shape to be consistent across the entire experiment. I specify Arial as the font for basically everything, since it's a pretty standard (i.e., on most computers) and easy to read font. Even using a small amount of CSS, though, can help you abide by our guiding online programming and design principles, as discussed in Module 2. But of course this all depends on your particular goals: in my webpage studies, I don't want people to take the study on a mobile device, so I specifically ensure they can't (window must be greater than 800 x 600, plus the experiment asks for keypresses). This of course limits the generalizability of my study and desire to participate, I'm sure, but also means I don't need to make as many styling changes. All that being said, let's look at my colleague, Nick's, demostration experiments that are coded in HTML, CSS, and JavaScript:
Task-switching demo, Face inversion demo, Levels of processing demo, Survival Processing demo. These are all coded as demos for an Introductory Cognitive Psychology class, but one thing you might notice is that they're all formatted pretty nicely. The demo is centered, the buttons are blue and easy to find and select, the headers are clearly marked, the text itself is easy to read in a kind of magazine structure, the instructions are immediately presented on screen, and the flow of information appears clear from the front page on. You're going to have a lot of variability in how people code, but you can't forget some of our fundamental principles of online programming -- and the need to prioritize user experience!
Have I gone over everything that is to be known about CSS? Not at all! I hope to have given you a brief intro to the basics, but there is still so much more out there. From display, to different text directions, to backgrounds and borders, to overflow, to tables, to values and units (like why some of the values say rem and em instead of pixels and there's % etc.), to sizing, to images... An entire set of tutorials related to CSS layout (and making responsive design). In short, now that you've gotten an overview of CSS, my hope is that if you need something more specific than is covered here, you'll Google it or click one of these links! Or, you'll find a package like Bootstrap (see Module 4!) that helps accommodate all of these concerns so you don't have to think about them as much.
Additional reading: The Mozilla Developer site has multiple tutorials on CSS. This may be more detail than you want, but if you really want to delve into CSS and web development, it's a great resource.
JavaScript basics
Know how we were just talking about the DevTools for CSS? Well, the "Console" tab is where you can type in JavaScript as though it's a terminal. You can run an entire script there if you wanted. In fact, one big distinction to make here is that we're pretty much always going to be talking about client-side JavaScript: that is, code that's downloaded, run, and displayed by a browser on a user's computer. The opposite is server-side code, where the code is run on the server and then the results are downloaded and displayed in the browser.
JavaScript deals in variables, which are containers for values (e.g., characters, numbers, etc.) that can change, and you have to define/declare variables before you can refer to them. You can have local variables that are assigned a value and global variables that you assign by including "var" or "let" before the name of the variable (more on let vs. var later!).
						var coolVarName = 2; <!--global variable -->
						let coolVarName = 2; <!--use var or let to create a global variable; let is more modern, var is more historical -->
						coolVarName = 2; <!--local variable -->
Variables are useful because they can help make code more efficient, allowing you to refer to something without having to repeat blocks of code over and over. Notably, you don't have to declare a value for a variable in order to declare the variable; you can write let coolVarName; or var coolVarName; and the variables should "exist" in memory then as empty containers. This "declares" the variable, at which point you can initialize it by assigning it a value. After initializing a variable, you can update its value at any time... which gets to one of the big benefits of JavaScript.
With JavaScript, you can dynamically update content (e.g., running code in response to , animate images, and more--through its interaction with HTML and CSS. To give another example, you can create a button to "move on" in a survey, then style it in CSS (according to design principles!), and then add JavaScript to make it interactive: when you click the button, let's have a prompt appear, let's show you new (previously hidden) information, let's load new images, etc. To understand what exactly JavaScript is doing, you also have to think about *what* it might be interacting with.
APIs - or Application Programming Interfaces - are sets of code blocks that allow you/developers to implement programs relatively easily (because they're ready-made). You can have 3rd-party APIs, like "Netflix Party" (Teleparty now?) or social media APIs (Twitter, Instagram, etc. that show the latest tweets/photos from your feed), or Browser APIs, which are what you're more likely to use when coding up your experiments. Browser APIs - as perhaps implied by the name - are built into the web browser and help do complex things. Some examples include: the Document Object Model (DOM) API, Geolocation API, Canvas API, WebGL API, and Audio and Video APIs. The DOM API will be extremely important for coding your experiment: it allows you to manipulate HTML and CSS, create, change, or remove HTML, and more. We previously talked about the DOM in the context of what's loaded when and with regard to inspecting the Developer console - and that's only a fraction. When we code, we will typically wait until the "DOM" is ready and loaded before rendering our specific code. (That is, we'll typically modify HTML and CSS via JavaScript, via the DOM, executing the code for a web page, and if JavaScript tries to run before the HTML and CSS it dynamically interacts with are loaded, voila, usually an error!). If you have any images that you want to "draw" on-screen, you'll be using the Canvas API; 3D content, the WebGL API. If you want to grab longitude and latitude coordinates from folks (e.g., make sure they're in the U.S. or other countries), you might be using the Geolocation API, which is what Google Maps uses. And so on.
How is JavaScript read? Typically from top to bottom. Unlike CSS, there's no "priority" or "specificity" style rules except that what came first gets loaded first. So, if you were to add a button that then shows new information when you click it, you'd need to define the button (e.g., let coolVarName = ...) BEFORE adding the event listener (i.e., code that looks for when you perform X event - here, clicking the button), then what you want to happen upon that event (i.e., usually a function - here, showing information). You can't define what you want to happen upon clicking *before* you tell the browser to watch out for clicking and what's even being clicked. That's where you'd - again - run into an error.
OK, so I briefly mentioned variables. Where do you even START putting JavaScript? Where do you define those variables? I mentioned that you can dynamically run JavaScript in the Developer's console, but obviously if you're running an experiment, you're going to code up your experiment and run that without accessing everyone's individual Console screen.
Where exactly the JavaScript code is in your HTML document can also depend on your preferences (i.e., in the head HTML tag or in the body tag) and what type of scripting you'll call on. Basically, you're going to use the HTML element <script> to indicate JavaScript (just like how you indicated CSS with <link> and <style> HTML elements). And within this module, when we use external sources of JavaScript, we place the following code *before* the end of the head HTML tag:
						<script src="https://kit.fontawesome.com/25e7f7a6fa.js" crossorigin="anonymous"></script>

						<script async src="https://www.googletagmanager.com/gtag/js?id=G-5K6E5T95PP"></script>
That is, here I'm calling upon external JavaScript from Font Awesome and external JavaScript from Google Analytics for the website (akin to the link tag for CSS). We also have some JavaScript code that comes before the end of the body HTML tag:
						<script src="https://ajax.googleapis.com/ajax/libs/jquery/3.4.1/jquery.min.js"></script>

						<script src="https://cdnjs.cloudflare.com/ajax/libs/popper.js/1.12.9/umd/popper.min.js" integrity="sha384-ApNbgh9B+Y1QKtv3Rn7W3mgPxhU9K/ScQsAP7hUibX39j7fakFPskvXusvfa0b4Q" crossorigin="anonymous"></script>

						<script src="https://maxcdn.bootstrapcdn.com/bootstrap/4.0.0-beta/js/bootstrap.min.js" integrity="sha384-h0AbiXch4ZDo7tp9hKZ4TsHbi047NrKGLO3SEJAg45jXxnGIfYzk4Si90RDIqNm1" crossorigin="anonymous"></script>


						<script type="text/javascript">

						$(document).ready(function(){


							//this is the scroll to the top arrow; it selects any select that says href=#top and when you click that link, it animates the html body to slowly scroll to the top
							$("a[href='#top']").click(function() {

								$('html,body').animate({scrollTop: 0}, "slow");

								return false;

							});

							//this is the tooltip hover that explains what the scroll to the top arrow is in case someone is not familiar with that
							$('[rel=tooltip]').tooltip({ trigger: "hover" });


						});

						</script>
This (i.e., script type="text/javascript") is "internal" JavaScript, code within the same file as the HTML code (akin to the style tag for CSS). You may also note this is how you make one-line comments in Javascript: with two backslashes (//). If my comment is more than one line, I sometimes just separate it into multiple lines and continue with the //, but you can also create a multiline comment in JavaScript just as you would in CSS (i.e., with /* */). Here, we've placed the JavaScript in the body, after all the HTML is loaded, so that the page is loaded faster, because the jQuery and Bootstrap JavaScript (external) libraries have a lot to load in. Some experimental files I've seen put their JavaScript in the body HTML, some in an external file loaded in the head HTML, etc. At the end of the day, choose whatever works best for you: you may want separate files or you may want everything in a single file, but that's up to you. Finally, just as you can do styling in line with HTML elements, you can do this with JavaScript, too. Here's an example from MDN:
						function createParagraph() {

						  let para = document.createElement('p');

						  para.textContent = 'You clicked the button!';

						  document.body.appendChild(para);

						}


						<button onclick="createParagraph()">Click me!</button>
"Onclick" here is defining an event at which you'd run the JavaScript function "createParagraph." That is, when you clicked the button, it would create a p html element named para, and the text content for that element would tell you that you clicked the button, and it would keep appending a new element with this text each time you clicked the button.
Just as styling HTML elements in line with CSS rules is not recommended, it's not recommended to add JavaScript in line to HTML elements either--and for similar reasons. It's bad practice and again inefficient, as you'd have to repeat and/or include that on multiple elements. Instead, you could literally write JavaScript that says when you click all buttons, run this createParagraph() function (rather than applying this event handler on each HTML element).
One thing you might have noted from the internal JavaScript example was the $(document).ready(function(){}); code. As I said earlier, one of the APIs we'll be relying on is the DOM API within the browser. We'll ensure that because HTML is also loaded from top to bottom (in the order in which it appears), we only run the JavaScript until *after* the DOM has been loaded. That will help make sure we have no immediate JavaScript errors from loading order. In internal code, you can do that in various ways...
						document.addEventListener("DOMContentLoaded", function() {

						  ...

						});

						$(document).ready(function(){

						...

						});
The first line looks for the DOMContentLoaded event, i.e., when the HTML body has been loaded and parsed, while the document.ready code is from the JavaScript jQuery library and also looks to make sure whatever is inside that function only runs after the HTML has been loaded and parsed. To do this on an external script, you'd add the "defer" attribute:
						<script src="https://kit.fontawesome.com/25e7f7a6fa.js" crossorigin="anonymous" defer></script>

						<script async src="https://www.googletagmanager.com/gtag/js?id=G-5K6E5T95PP"></script>
What's async doing here? With that attribute, the script will be executed once the script finishes downloading - you don't know when the script will run (i.e., what order), but it won't stop the rest of the page from displaying. If you need your first script to download before the second script, don't use async. But if you need a bunch of stuff to load in the background - i.e., if the script should run immediately and doesn't have dependencies - you can use async. Scripts with the defer attribute will run in the order they appear and be executed once the script and page content are downloaded. You might use this if you have dependncies with respect to other scripts or the DOM.
One of the things that's probably hardest to learn from these tutorials, but is the most fundamental part of you translating this knowledge of HTML, CSS, and JavaScript into functional code is thinking like a programmer. Part of this is working from a big picture perspective to more detailed - thinking about what you need your code to do, then working out what code would function for your purpose, and putting the two together. We'll go over this in more detail in tutorials below where we'll walk step by step with respect to particular code. Generally, you'll start out defining your global variables (e.g., trial matrix - how many of a particular trial type, how many trials, how many blocks), define your experimental trial types (what screens will you want? a visual search screen? a stroop stimulus screen?), define variable values for that trial (what colors are the stimulus on screen? where will they be presented?), and then define your run trial -> block kind of sequence (i.e., call your previous functions - defined trial variables, the trial specific screens, advancing trials, but repeated in a cycle).
OK, so how might you actually start? Well, we talked a little bit about defining variables with var and let. Typically, people now use let for global variables, because it's more modern in JavaScript. With var, you could technically declare a variable after you initialize it, and you can declare a variable with the same name multiple times with var, but you can't do either with let. That is, you could write var coolVarName = 5; var coolVarName = 8; and on and on, and that would work, but with let, you'd need to do let coolVarName = 5; coolVarName = 8. In essence, these two function similarly, but let, because it is more modern and sensible in terms of making code more readable, is probably what you should use. You can also declare a variable with the keyword const: this means that values cannot be changed for this variable. Often, people will use const to refer to HTML elements that involve some level of user input (e.g., your results), and the HTML element itself won't change (but the text that is assigned as the value for this HTML element will be updated, which is why const works for that purpose).
The majority of an Experimental task/study will be one of three types of JavaScript features: functions, if/else (and if...else if or if...else if...else) statements, and for loops. A function is a reusable block of code that once it's written, you can run it again and again. Perhaps you can see how that's helpful already - if you've defined trial sequences, you'll probably have functions for individual trial types that you can then call again and again. An if statement is a conditional - you've probably experienced this logic in another programming language before. Conditionals mean that you'll run code only when that condition is "true" or not. Here is an example of using a function + if statement in tandem:
						function loadImage(){

							//let participants know that the task is loading based on the # of images to get through for the file index
							ctx.clearRect(0, 0, canvas.width, canvas.height);

							ctx.fillStyle="black";

							ctx.textBaseline="middle";

							ctx.textAlign="center";

							ctx.font="75px Arial";

							$("#indicator").text("The task is loading. Please wait.");

							$("#indicator").show();

							ctx.fillText(Math.round((fullCount/fbimages.length)*100)+"%", (canvas.width/2), (canvas.height/2));


							if (fullCount < fbimages.length){

								fbarray[fullCount] = new Image();

								fbarray[fullCount].onload = loadImage;

								fbarray[fullCount].src = fbimages[fullCount];

								fbarray[fullCount].alt = fbimages[fullCount];


								fullCount++

							}

							else{

								Prep(); //this is a function that will show the Instructions html after the images are fully loaded
							}

						}
You can see that you define a function with the keyword function, the name of the function (loadImage), whether the function will take an input (here, no input, nothing is within the parenthesis), and then indicate the content of the function with the {} curly brackets. To run this function, I would type loadImage();. This is a pretty simple load image function - we'll get to more of what this means, but ctx stands for context, context interacts with the canvas API (clearRect, fillStyle, textBaseline, textAlign, font, fillText), and the canvas API allows us to 'draw' on the screen. What we're basically doing is defining properties of the text that will be drawn below the "indicator" HTML element indicating that the task is loading and then saying how many images have been loaded out of how many remain (using a built-in browser function with Math.round()). Then, we have an if/else statement (whereby the conditional is defined within the parenthesis, and the conditional statement is followed by {} curly brackets for both if and else) saying that so long as our counter is less than the length of the "fbimages" array, we're going to keep creating new images in "fbarray", source the images for fbarray from the fbimages array, and keep going until the conditional is no longer true. fullCount++ is equivalent to saying fullCount = fullCount + 1 (i.e., adding 1 to its current value so that it's essentially growing by 1 each time you iterate through the function). Once the images are all loaded (i.e., the conditional is no longer true, our counter is now larger than the length of the fbimages array), we hit the 'else' logic and immediately run the Prep() function. If you don't understand all this yet (e.g., what is an array?!), don't worry - here, I mostly wanted to show you how a function might work and how you could combine a function with other programming logic to keep your task going.
OK, so now you have an idea about the basic structure of an experiment coded in JavaScript as well as how to call on functions and define variables. You also know how to call upon JavaScript in an HTML document as well as basics for how JavaScript interacts with your code in the browser. Let's get into more of the basics of JavaScript.
In the above function, you might have noticed I write (fullCount/fbimages.length)*100)+"%". The backslash (/) indicates division, the asterisk (*) indicates multiplication, the plus (+) indicates addition, and although it wasn't used in the above example, the minus (-) indicates subtraction. These basic operators within JavaScript, which allows us to do math and join together strings. If you have previous programming experience, you might be confused as to how I could do math on a clear number-based format (fullCount/fbimages.length)*100) and then add "%", which is a string format. In JavaScript, using the addition operator, you can concatenate (or join together) strings! I frequently put numbers together with strings in my instructions, especially if I want to fill in a value, like the key that's been assigned to a particular condition, and this isn't automatically set the same for each participant.
						if (Memory == 0)

						{$("#Instructions2").html('Press z/Z if the color-word is printed in <text style="color:' + picword[0][0] + '">' + picword[0][1] + '<text style="color:black">, x/X if the color-word is printed in <text style="color:' + picword[2][0] + '">' + picword[2][1] + '<text style="color:black">, c/C if the color-word is printed in <text style="color:' + picword[4][0] + '">' + picword[4][1] + '<text style="color:black">, b/B if the color-word is printed in <text style="color:' + picword[1][0] + '">' + picword[1][1] + '<text style="color:black">, n/N if the color-word is printed in <text style="color:' + picword[3][0] + '">' + picword[3][1] + '<text style="color:black">, and m/M if the color-word is printed in <text style="color:' + picword[5][0] + '">' + picword[5][1] +'<text style="color:black">.');}

						else

						{$("#Instructions2").html('You will use the a/A and l/L keys to indicate Old and New, respectively. The response mappings will stay on screen for these ratings.');}

						$("#Instructions2").show();
In the above code, I wanted to emphasize that z/Z was the key for the color-word that was in the first slot of the "picword" array and that it was the key used for the color in the first slot of the second dimension of the "picword" array. In short, I simply wanted to color the words that I was inputting - and that were randomized for each participant - and to include these in the instructions in a dynamic way. This meant that the instructions would be specific to each participant and color was used intentionally to emphasize what the participants needed to be doing. In the second part of the conditional, I didn't change the keys the participants were using based on the Old/New condition, because it didn't matter to me. The two examples here hopefully show the difference between dynamic instructions enabled by JavaScript string concatenation and static instructions defined in an HTML element.
One last note on this front: there are also shortcut operators called assignment operators, which assign a value to whatever variable in on the left based on the value of what's on the right of the operator. Multiple times, you'll have seen me use the assignment operator (=). There are logical assignment operators and more basic addition ones and more. Putting BISBAS = BISBAS - 5 is the same as doing BISBAS -= 5 with these operators.
Finally, in the above example on the loadImage function, you might have also noticed how I used comparison operators to help evaluate the true/false / conditional if statement. < indicates less than, > indicates greater than, !== indicates not equal to (strict), != indicates loose not equal to, === indicates a strict equality, and == indicates a loose equality. For example, 2 === '2' will return false, but 2 == '2' will return true - strict equality or strict not equal to means that the cases have to match exactly. That 2 the number has a different format than 2 the string is why it will return false with === but they are the same value, so (the browser does A === ToNumber(B) when comparing the two and) it returns true with ==.
Something that I have referred to, numerous times, is an "event". Some of the examples I gave previously were about clicking a button or pressing a keyboard button. Generally, an event is just something that happens in the browser and that can trigger the execution of other blocks of code. Triggering other blocks of code requires your program/code to recognize that event has actually happened. For that to happen, you have to have an "event listener", which will be on the lookout for the event happening, and the blocks of code that are triggered by the event firing are the "event handlers." In my experiments, I typically record record data differently if someone presses a key vs. if they don't press a key during the specified interval. Here's part of what that looks like:
						$("body").keypress(function(event){

							keyPressed = String.fromCharCode(event.which);

							if (window.hasResponse == 0){

								if (keyPressed == "z" || keyPressed == "x" || keyPressed == "n" || keyPressed == "m" || keyPressed == "c" || keyPressed == "b" || keyPressed == "Z" || keyPressed == "X" || keyPressed == "N" || keyPressed == "M" || keyPressed == "C" || keyPressed == "B" ){

									window.hasResponse = -1;

									Responset = new Date().getTime() - runStart;

									respTime = Responset - StimTime;

									....

								}

								....

							}

						});
This is using jQuery, a JavaScript library, and not pure JavaScript. We will go over some of the differences below; in pure JavaScript, instead of .keypress or .whatevereventlistener, you'd do body.addEventListener('keypress',whatever-is-implementing-the-event-or-a-new-function) or something to that extent. Some other people use the event listener with respect to keypresses to merely mark accuracy and record data elsewhere, which seems more sensible. There's also a lot of detail with respect to individual event listeners that you could look up (e.g., keydown versus keypress versus keyup).
OK, so I said that a lot of your experiment was going to be functions, if statements, and for loops, and we've gone over the former two. Now let's discuss for loops here. Here's a simple example that you can paste in the JavaScript console (of any browser, including this webpage) and see what happens.
						let Stimuli1 = [];

						for (let i=1; i < 31; i++){

							Stimuli1=Stimuli1.concat(1);

							console.log(i);

						}
If you pasted this in the console, you would see that the counter i was logged 30 times, incrementing by 1 each time the for loop was run, and the variable Stimuli1 is an array of 30 1s, since we concatenated 1 each time the loop was run to a blank variable. You can see that when you're running a for loop, there are three primary arguments: a starting value (let i = 1), a condition (i < 31) indicating when to stop, and an incrementor (i++, i increasing by 1 each time the loop runs). Inside the {} is the code we expect to be run according to those conditions. You can probably see how for loops would help you define your experimental conditions, allowing you to iterate over the number of trials that you have.
In JavaScript, most of what you're manipulating are "objects" or items with similar functionality stored as a group. When we use the DOM as an initiator for our JavaScript code - e.g., document.addEventListener("DOMContentLoaded", function() {} - we are running the addEventListener "method" on the document "object". You'll note the use of objects whose values and properties we'll change in various code... for example:
document.querySelector("#main-display").style.display = "flex";
We're also running the method querySelector on the document object, and then grabbing the main-display HTML id element, setting its style=display:flex property here via JavaScript. This is a very brief introduction to what someone might mean when they tell you that JavaScript is an object-oriented coding language (see this guide for more detail -- we will not really get into OOP in this module!).
OK, so now you've got the basics of for loops, functions, if statements, where to call JavaScript, different operators in JavaScript, events, and more, let's get a little more into the types of variables and other little details. First, you might have noticed some naming conventions, like the "lower camel case" convention where you keep the first word lower case and capitalize the first letter of the second/other words in your variable name (e.g., coolVarName). You can't name variables after special keywords (i.e., for/function), you shouldn't use underscores or numbers at the beginning of variables, and you should watch out for special characters. You should also name variables *intuitively* so they're describing the data they contain, and you should watch out for case sensitivity (coolVarName is not the same as coolvarname, so be careful what you write out).
What can variables contain? What types exist? You might have seen me refer to basic terms like "strings" and "arrays". Variables that contain strings ("2", "hello world!", 'this works too', 'as long as you\'re consistent', "it's like HTML, you cannot mix double and single quotes", 'if you want to include something like can\'t, you have to put a blackslash before the single quote to escape it & ensure that the quote is recognized as text') are treated as characters, not numbers. If you wanted to treat your string variable as a number, you'd have to use a function to run the conversion. You can also "split" strings based on a character, like the backslash above (e.g., stringVar.split('\');. A variable can also be a boolean (true/false value) like let checkResponse = true;, which I've typically done for local conditionals. Remember what I said about JavaScript as an object-oriented language? Well, you can also make a variable be an object, like let picword = {color: 'yellow', word: 'YELLOW'};, and to call the color or word, you'd do picword.color. An array is a variable that contains other variables withim them. You've seen in an example the 'picword' array. That array looks something like:
var picword = [["YELLOW", "yellow"], ["RED", "red"], ["GREEN", "green"]];
Indices within JavaScript start at 0, so the first element is called with 0. Thus, picword[0][0] returns "YELLOW", picword[0][1] returns "yellow", picword[1][0] returns "RED", picword[1][1] returns "red", and so on. This multidimensional array has arrays within the larger variable so that each element is its own array. You can also have (single dimension) arrays that mix words and numbers, like var picword = [1,2,"hello world!"];. To create a new array, you can initialize the variable as var array = ['']; or write var array = new Array('');. Of note, if you wanted to add onto the picword array, but in a different variable, you would want to use the concatenation method from above, like var newVar = picword.concat('coolarray!');. This is because if you just assigned the new variable to be equal to the picword array and then made your changes, the changes would happen to both your new array and the picword array. This has to do with how JavaScript refers to arrays.
If you want to figure out the length of an array... well, you've actually already seen this happen within the code - do you remember? "fbimages.length". This will tell you the length of the fbimages array. You can also get the length of a string with this property. If you're appending to an array (adding information to a variable), you can use the + operator as we previously discussed, concatenation, and more... If you do picword[0] = 'PINK', this will replace the first element in your current array, so that's why you'd have to concatenate or use methods like push() or pop(). For example, if I did picword.push(['PINK', 'pink']);, this would add the pair to the end of the array. picword.pop(); would remove that pink element I just added to the end of the array. You could do the same for the beginning of an array with unshift() and shift(). Another useful string + array method is 'join()'. I frequently use this method to bring together my data after the experiment is done, joining the array rows together and then assigning it to an HTML element that is delivered in our lab's PHP script (more on data storage in Module 4).
One last note on variables generally - Remember when I said that 2 == '2' would return true but 2 === '2' would return false? This is one facet of how dynamic JavaScript is, but also means you should be on the lookout for something like this, because it can cause an error. '2' is still coded as a string, not number, even if the logic recognizes that the value is the same; that means that you won't be able to treat the variable the same as you would with 2.
Finally, in the example above with the keypress, one useful change would be to use some string methods - e.g., toLowerCase() or toUpperCase(). For example, after retrieving "keyPressed", one could do keyPressed.toLowerCase(), which would convert the keypress to lower case, and then you wouldn't have to type out all the "if keypressed = B" and iterations of the upper case possibilities. The same could be done with however you define the correct button press (i.e., whether in the stimulus matrix, when drawing the stimulus, in the keypress function, etc.). This should be useful for you to keep in mind if you're coding a keypress experiment.
Previously we also said that functions were going to be a big part of your experimental code, but that we'd return to them. Let's look at that now:
						function gup( name, tmpURL )

						{

							var regexS = "[\\?&]"+name+"=([^&#]*)";

							var regex = new RegExp( regexS );

							var results = regex.exec( tmpURL );

							if( results == null )

								return "";

							else

								return results[1];

						}
This was a commonly used function to retrieve the worker ID, assignment ID, and HIT ID from MTurk (document.getElementById('workerId').value = gup('workerId', document.referrer);). In short, it looked at whatever URL you fed as an input into the function and looked for whatever you put as the name input within the URL. Specifically, it looked for the "cookie" attached to the URL that said name= ... and then split the URL string so that that was the value of the 'name' variable. We used to put in 'document.referrer' because Mturk linked to the JavaScript experiment (and therefore was the referrer), BUT recently, MTurk has changed up their browser security settings, I think, perhaps restraining our ability to use this to get workerID.
But, this function is useful to think about the basics of creating a function. You start JavaScript functions with the keyword function, the name of the function (gup), and the function input (name, tmpURL - can also be a blank parenthesis), followed by the code to be executed in {}. The exact function or input name don't matter so long as they're not a reserved keyword and you don't have a typo when you call either. Functions can also have a 'return' value at the end if you want to refer to something you'd get out of code that you've run. Notably, I did not have a return value in the loadImage function because the values go direclty into the feedback array, which I'll call later.
OK, I previously also mentioned "ctx" and context and the canvas API. Because you're coding experiments, this is going to be extremely helpful to understand. We will go over that in "Presenting Stimuli" and we will go over how to tell you've got an error with "Debugging" below. That being said, you will definitely need - just as you did with Qualtrics - some way of getting an MTurk Worker's workerID. You will also need code to end a block, code to end a run, and code to submit to an external server so your data is recorded. In short, data collection, keeping track of time, and marking who did your task. Because the above function no longer seems to work with respect to MTurk, I now ask participants to enter their worker ID. This is the relevant HTML:
						<p id="info" class="usual" style="font-size: 24px">Please input your worker ID (with no extra spaces, please) into the blank below.</p>

						<p><input id="personname" name="personname" value="" class="usual"></p>

						<p><button id="submitname" class="usual b-right f6 link dim ph3 pv2 mb2 dib white bg-green" style="font-size:14px">Submit your worker ID.</button></p>
With respect to the JavaScript, I actually have an array that lists out the workerIDs of participants who have already done the task before. But, because I'm now having participants 'input' their workerID, some participants may type this out with all lowercase. (It's either all lowercase or all uppercase - no one does a weird mix of the two, and Amazon doesn't show their workerID in that way).
						function workerarrayLC() {

							for (i=0; i < worker_array.length; i++){

								var newID = worker_array[i].toLowerCase();

								LCworkerarray = LCworkerarray.concat(newID);

							}

							return LCworkerarray;

						}
So, worker_array is the all upper-case version of the workerIDs that I wanted to convert to lowercase and refer to when determining whether this person had already done the task and I'd somehow missed them in the Qualifications exclusion. Below is the code for submitting their workerID:
						$("#submitname").click(function(){

							var person = document.getElementById('personname').value;

							if (person == null || person == "") {

								alert("Please enter your worker ID - this is how we will know if you've done the study!");

							}

							else{

								document.getElementById('workerId').value = person;

								document.getElementById('assignmentId').value = person + "_assID";

								document.getElementById('hitId').value = person + "_hitID";

								$("#info").hide();

								$("#personname").hide();

								$("#submitname").hide();

								var duplicateWorker = checkWorkerId(workerId);

								if (duplicateWorker==1){

									hideHTML();

									$("#NoGo").html('You have performed our task before, <br/>\

									we cannot take duplicate responses. Please return this HIT. Thanks!')

									$("#NoGo").show();

									$("#ClosePage").show();

								}

								else{

									updateMainMenu(0);

								}

							}

						});


						function checkWorkerId(workerId){

							workerId = document.getElementById('workerId').value;

							var wID2 = workerId.toLowerCase();

							if (jQuery.inArray(workerId,worker_array)!=-1 || jQuery.inArray(wID2,LCworkerarray)!=-1)

							{duplicateWorker=1;}

							else

							{duplicateWorker=0;}


							if (workerId == "")

							{duplicateWorker=0;}


							return duplicateWorker;

						}
The first block of code is an event listener, looking for when participants click the button to submit their worker ID. When they do this, it will assign whatever they put in the "person" input element; if it's blank, then participants will receive a pop-up telling them to enter their workerID. If it's not blank, we'll assign the value of what they entered to the workerID HTML element and variations on that for assignment & HIT id. We'll then hide the input forms, since they're no longer relevant, and we'll check to make sure that this person hasn't already completed the study. We assign duplicateWorker to the value retrieved from the checkWorkerID function. In that function, we grab the value we just assigned to the workerID HTML element, and we compare to see whether this value - whether upper or lower case - is in either the uppercase or lowercase workerID arrays. If it is, duplicateWorker is assigned a value of 1; else, it's 0. If it's 1, participants won't be able to see anything else in the task beyond an HTML element telling them to return the HIT. If they aren't ad duplicate worker, they're shown the next page in the task... Hopefully this has illustrated just the level of variability that you can get in coding here - and I'm sure those examples could be improved too!
There is SO much more that can be said of JavaScript, but for the purpose of you coding up your own Experiment, sometimes the easiest way to code is to look at other examples and then adjust for your specific task--and to just try as you go along. When I was still trying to figure out whether my code was doing what I expected, I used a lot of the basic debugging methods.
Some practical tips, as they relate to coding an experiment:
- If you're displaying images, you should always call your image loader function in the background once the page loads. You can show participants the instructions for the task in the meantime so as to give everyone - even folks with slow internet speeds - the chance to load in all the images before starting the task and causing an error. (Alternately, you can of course program your task so that participants cannot advance until the images are all loaded, like how the loadImage() function above explicitly tells participants how many more images need to be loaded before they can continue).
- If you're wondering how you're going to combine all your task elements, setTimeout() is going to be key. This method calls the next function after the amount of time you specify, like setTimeout(drawStimulus, 500), indicating you'd run the drawStimulus function after 500 ms. If you really want to get into the weeds here, Dr. Nick Brosowsky also created a better version of setTimeout called eventTimer.
- This is a really specific detail, but if you're going to have fixed length trials, you cannot clear the timeout within your event listener. Put more simply: fixed length trials require you to keep track of the amount of time before moving onto the next function. If you were going to do response-sensitive trials - i.e., advancing to the next trial screen as soon as someone presses a key, instead of waiting a specified time - then you would clearTimeout().
- When you run an experiment and have participants start after the instructions, make sure you have a "countdown" function so that participants don't truly immediately start after clicking the button - not unless you want them to miss that first trial. This is a part of prioritizing user experience in online programming; no one will expect the first trial to come so immediately, and here you'd be giving them a warning.
- Similarly, if you're concerned about the user experience and you don't want participants to try to do your experiment on e.g., mobile devices, you can check the size of their current window. Mobile devices are restricted to specific dimensions - if you make sure participants cannot advance unless they have a certain browser width or height, you'd pretty much eliminate their ability to load your task on their phone. That of course doesn't mean they can't make your screen small on their computer once they get started--you'll have to think of your specific Experiment and how you can incentivize actually doing your task and assessing whether participants are doing what you expect.
- If you're excluding participants, you now see that you can do this via Qualifications on MTurk as well as look for duplicate workers in your own JavaScript code. See above for sample code!
Here are some more useful functions based on those practical tips:
						// adapted from: http://stackoverflow.com/questions/3437786/get-the-size-of-the-screen-current-web-page-and-browser-window
						function checkSize(){

							var w = window.innerWidth;

							var h = window.innerHeight;

							if (w < canvas.width || h < canvas.height){

								$("#indicator").text('Your browser window is too small to display the images properly. Please increase the window size or your screen resolution.');

								$("#indicator").show();

								$("#resize").show();

							}

							else{

								countDown(3);

							}

						}


						function countDown(time){

							if (time > 0){

								ctx.fillStyle="black";

								ctx.font="100px Arial";

								ctx.clearRect(0,0, canvas.width, canvas.height);

								ctx.fillText("" + time, canvas.width / 2, canvas.height / 2);

								eventTimer.setTimeout(function(){countDown(time - 1)},1000);

							}

							else{

								runStart = new Date().getTime() - ScreenPulled;

								showITI();

							}

						}
Can you tell what these functions are doing? Ctx is the same as it was above--and we'll get to the details again below!
Additional reading: The Mozilla Developer site has multiple tutorials on JavaScript. This may be more detail than you want, but if you really want to delve into JavaScript and web development, it's a great resource.
Please remember to evaluate the subsection with the Google Form below so this can be improved in the future (you can find the results from the Google Form here).
Experimental Tutorials
Now that you've gotten a basic understanding of HTML, CSS, and JavaScript, we'll go over some of the basics that go into creating Experiments, little by little.
Presenting Stimuli
OK, so now let's get into some of the basics of building an Experiment. First, how might you present stimuli on screen? Let's go over a cognitive psychology task called the "Stroop Task" where people are supposed to name the color a color-word is printed in, while ignoring the semantic meaning of the word.
In this case, let's start off with four simple trials, with two color words - each presented in their own color and the color of the other word. Let's also make the background grey and make sure we're using the full space of the page loaded. Let's do this with a mix of CSS and JavaScript.
						<!DOCTYPE html>

						<html>

						<head>

						<link rel="stylesheet" href="WordStroop.css" type="text/css" charset="utf-8">
What does this .css file look like? It's pretty simple.
						html {

							height: 100%;

							width: 100%;

							margin: 0;

							padding: 0;

							border: 0;

						}


						body {

							height: 100%;

							width: 100%;

							margin: 0;

							padding: 0;

							border: 0;

							background-color: grey;

						}


						table {

							height: 100%;

							width: 100%;

							margin:0;

							padding:0;

							border:0;

							text-align:center;

							vertical-align:middle;

						}
For the purpose of these next few demos, there's very little styling: grey background, full height and width with no padding, margin, or borders. Also, center-aligned text for items that are in the table portion of the HTML document (which is where the instructions during breakpoints or right before starting the task will be).
OK, so what's next in the code?
						<!DOCTYPE html>

						<html>

						<head>

						<link rel="stylesheet" href="WordStroop.css" type="text/css" charset="utf-8">

						<script type="text/javascript" src="jquery-1.7.1.js"></script>

						<script type="text/javascript">

						$(document).ready(function(){

							var trialNum = 4;

							var i = 0;

							var color = ["red", "green", "red", "green"];

							var word = ["RED", "RED", "GREEN", "GREEN"];


							var canvas = document.getElementById("myCanvas");

							var ctx = canvas.getContext("2d");


							//removed the other code here
						});

						</script>

						</head>

						<body>

							<table>

								<tr>

									<td>

										<canvas id="myCanvas" width="500" height="500"></canvas>

									</td>

								</tr>

							</table>

						</body>

						</html>
Here, you can see that we put our code in with the document.ready function - that is, it will load once the DOM is ready so we don't run the risk of running the JavaScript where we might come across variables that hadn't been defined, causing a serious error. OK, so all parts of the javascript are wrapped in the document.ready loader - this is using the jQuery library. If you remember from our example above, document.addEventListener("DOMContentLoaded", function() {}) was our vanilla JavaScript way of doing this as well.
We then define the variables we're interested in. In particular, we've defined the canvas HTML in the HTML section and defined it as a variable & followed the guidelines to ensure we can 'draw' on the canvas by getting the canvas context. What's in the part of the code that I commented out?
							function runTrial(){

								if (i < trialNum){

									ctx.clearRect(0, 0, canvas.width, canvas.height);

									ctx.font="60px Arial";

									ctx.fillStyle=color[i];

									ctx.textBaseline="middle";

									ctx.textAlign="center";

									ctx.fillText(word[i], canvas.width / 2, canvas.height / 2);

									i++;

									setTimeout(runTrial, 1500);

								}

							}


							runTrial();
Here, you can see your first function in the guise of an Experimental manipulation. Each iteration of this function is designed to accomodate 1 trial of the Experiment, where the trial counter here is i and i is incrementally increased after running the function (1 on first iteration, 2 on second, etc.). When i is no longer less than the number of trials to run, there is no other 'else' statement within the function, so the screen would likely just have the last word that was drawn (which wasn't cleared from the screen). There are a lot of small components in this function, too, that are important to understand. Many come from directly interacting with the canvas method. The clearRect line is akin to clearing the screen where you've drawn anything - it starts from the top left (0 in x coordinates, 0 in y coordinates) and goes through the width and height of the canvas where you are drawing words. The function then specifies the font, font size, and color of the word to be drawn - with the color being incremented through the array via the trial counter - and the text is also specified to be in the middle & center of the screen. The text is drawn to the screen in the middle (the width of the canvas divded by 2, height divided by 2). The word itself is also incremented through the word array via the trial counter. Then, at the end, the setTimeout method ensures that the runTrial function here will run after a 1500 millisecond delay (1.5 sec). Finally, at the end, you see that outside of the function, we call it in the screen via its name: runTrial(). Without that line, nothing would happen in this code.
So, finally, you can see this code put all together. The following code draws 1 color-word four times, with the color of the word matching its meaning on trials 1 and 4, and being incongruent with its meaning on trials 2 and 3.
						<!DOCTYPE html>

						<html>

						<head>

						<link rel="stylesheet" href="WordStroop.css" type="text/css" charset="utf-8">

						<script type="text/javascript" src="jquery-1.7.1.js"></script>

						<script type="text/javascript">

						$(document).ready(function(){

							var trialNum = 4;

							var i = 0;

							var color = ["red", "green", "red", "green"];

							var word = ["RED", "RED", "GREEN", "GREEN"];


							var canvas = document.getElementById("myCanvas");

							var ctx = canvas.getContext("2d");


							function runTrial(){

								if (i < trialNum){

									ctx.clearRect(0, 0, canvas.width, canvas.height);

									ctx.font="60px Arial";

									ctx.fillStyle=color[i];

									ctx.textBaseline="middle";

									ctx.textAlign="center";

									ctx.fillText(word[i], canvas.width / 2, canvas.height / 2);

									i++;

									setTimeout(runTrial, 1500);

								}

							}


							runTrial();

						});

						</script>

						</head>

						<body>

							<table>

								<tr>

									<td>

										<canvas id="myCanvas" width="500" height="500"></canvas>

									</td>

								</tr>

							</table>

						</body>

						</html>
OK, so that gave you an idea of how to present word stimuli. You've also seen through the clearRect function how you might draw rectangles on the screen - defining the top left coordinates down to the bottom right and filling in the rectangle. You can actually view the code above live at this link. Let's take a look at some other ways to present stimuli on screen, using the same basic format, with respect to including our JavaScript after the DOM has loaded, defining and drawing on the canvas, etc.
How would we draw something to the screen whenever the mouse was clicked? How would we draw a circle?
First below, here, we define the radius of the circle and the position of the mouse in X and Y coordinates. This mousemove event "is fired at an element when a pointing device (usually a mouse) is moved while the cursor's hotspot is inside it." This is an event that works especially well if you need participants to *draw* something, like their signature or if you are having them draw things as part of a creativity task etc. You can see another example at the link for the mousemove event. For our purposes here, we've added the event listener to the canvas - so whenever you're moving the mouse within the canvas, we'll listen for the event. Then we'll run the getBoundingClientRect method to get the positional coordinates for the canvas relative to the viewport (visible area of the web page), and then define the (rounded) X and Y coordinates for where the mousemose event happened relative to information we gleaned from the getBoundingClientRect method. Those coordinates we will use again below to actually draw a circle.
						<!DOCTYPE html>

						<html>

						<head>

						<link rel="stylesheet" href="WordStroop.css" type="text/css" charset="utf-8">

						<script type="text/javascript" src="jquery-1.7.1.js"></script>

						<script type="text/javascript">

						$(document).ready(function(){

							var canvas = document.getElementById("myCanvas");

							var ctx = canvas.getContext("2d");

							var mouseX;

							var mouseY;

							var r = 30;


							canvas.addEventListener("mousemove", function(evt){

								var rect = canvas.getBoundingClientRect();

								mouseX = Math.round((evt.clientX - rect.left) / (rect.right - rect.left) * canvas.width);

								mouseY = Math.round((evt.clientY - rect.top) / (rect.bottom - rect.top) * canvas.height);

							});

						//removed the other code here
						});

						</script>

						</head>

						<body>

							<table>

								<tr>

									<td>

										<canvas id="myCanvas" width="500" height="500"></canvas>

									</td>

								</tr>

							</table>

						</body>

						</html>
OK, so now we've got the coorindates to draw on the canvas & have it mouse-specific. What next?
Below is the code that we removed from the demo above. We've created a function to draw the circle, first clearing the screen, then beginning the path (which is necessary when drawing lines on the screen). We then specify the "arc" drawing for the circle, the color of the path and its fill (a green circle), actually fill the circle/current drawing, draw the path specified (stroke), and then close the path, which will then create the path back to the starting point.
In the next part of the code, we create a small square that's like a bounding box for the circle in its smallest iteration and tells us where exactly the mouse click is. Now we're explicitly creating lines. moveTo will move to a position without creating the line, and then you have the four line paths specified before you again actually create them on the canvas with stroke() and fill them and close the path. So ends the drawCircle function.
After that, we define an interval variable, initially set to null. It's then set to equal the value of the setInterval Method, which will run the draw Circle method every 1000/60 milliseconds. Then we have an event listener for contextmenu: the contextmenu is when you right click and get a bunch of options, like Back, etc. This is essentially disabled here: we return *false* for the event when people right click within the canvas. Next, we have an event listener on the body HTML for keypresses (which, of note, is now deprecated, and it is recommended you use keydown). We then decode which key was presssed with the fromCharCode method, since the output would also be "numbers" to represent keys. Then if the interval is not null and if someone presses p, this will clear the interval and set it back to null. After this, we have another 2 event listeners: a left click and a right class (contextmenu). When people do either, it changes the radius of the circle that is being drawn on screen.
							function drawCircle(){

								ctx.clearRect(0, 0, canvas.width, canvas.height);

								ctx.beginPath();

								ctx.arc(mouseX, mouseY, r, 0, 2 * Math.PI);

								ctx.strokeStyle="green";

								ctx.fillStyle="green";

								ctx.fill();

								ctx.stroke();

								ctx.closePath();


								ctx.beginPath();

								ctx.fillStyle="rgba(255, 0, 0, 0.5)";

								ctx.moveTo(mouseX - 10, mouseY - 10);

								ctx.lineTo(mouseX + 10, mouseY - 10);

								ctx.lineTo(mouseX + 10, mouseY + 10);

								ctx.lineTo(mouseX - 10, mouseY + 10);

								ctx.lineTo(mouseX - 10, mouseY - 10);

								ctx.stroke();

								ctx.fill();

								ctx.closePath();

							}

							var intervalHandle = null;


							intervalHandle = setInterval(drawCircle, 1000 / 60);

							$("body").on("contextmenu", "canvas", function(e){return false;});

							$("body").keypress(function(event){

								var key = String.fromCharCode(event.which);

								if (key == 'p' && intervalHandle != null){

									clearInterval(intervalHandle);

									intervalHandle = null;

								}

							});


							canvas.addEventListener("click", function(evt) {

								r = r + 5;

								if (r > 50){

									r = 50;

								}

							});


							canvas.oncontextmenu = function() {

								r = r - 5;

								if (r < 10){

									r = 10;

								}

							}
Voila! And you can see the code in its entirety below.
						<!DOCTYPE html>

						<html>

						<head>

						<link rel="stylesheet" href="WordStroop.css" type="text/css" charset="utf-8">

						<script type="text/javascript" src="jquery-1.7.1.js"></script>

						<script type="text/javascript">

						$(document).ready(function(){

							var canvas = document.getElementById("myCanvas");

							var ctx = canvas.getContext("2d");

							var mouseX;

							var mouseY;

							var r = 30;


							canvas.addEventListener("mousemove", function(evt){

								var rect = canvas.getBoundingClientRect();

								mouseX = Math.round((evt.clientX - rect.left) / (rect.right - rect.left) * canvas.width);

								mouseY = Math.round((evt.clientY - rect.top) / (rect.bottom - rect.top) * canvas.height);

							});


							function drawCircle(){

								ctx.clearRect(0, 0, canvas.width, canvas.height);

								ctx.beginPath();

								ctx.arc(mouseX, mouseY, r, 0, 2 * Math.PI);

								ctx.strokeStyle="green";

								ctx.fillStyle="green";

								ctx.fill();

								ctx.stroke();

								ctx.closePath();


								ctx.beginPath();

								ctx.fillStyle="rgba(255, 0, 0, 0.5)";

								ctx.moveTo(mouseX - 10, mouseY - 10);

								ctx.lineTo(mouseX + 10, mouseY - 10);

								ctx.lineTo(mouseX + 10, mouseY + 10);

								ctx.lineTo(mouseX - 10, mouseY + 10);

								ctx.lineTo(mouseX - 10, mouseY - 10);

								ctx.stroke();

								ctx.fill();

								ctx.closePath();

							}

							var intervalHandle = null;


							intervalHandle = setInterval(drawCircle, 1000 / 60);

							$("body").on("contextmenu", "canvas", function(e){return false;});

							$("body").keypress(function(event){

								var key = String.fromCharCode(event.which);

								if (key == 'p' && intervalHandle != null){

									clearInterval(intervalHandle);

									intervalHandle = null;

								}

							});


							canvas.addEventListener("click", function(evt) {

								r = r + 5;

								if (r > 50){

									r = 50;

								}

							});


							canvas.oncontextmenu = function() {

								r = r - 5;

								if (r < 10){

									r = 10;

								}

							}

						});

						</script>

						</head>

						<body>

							<table>

								<tr>

									<td>

										<canvas id="myCanvas" width="500" height="500"></canvas>

									</td>

								</tr>

							</table>

						</body>

						</html>
So you now have the code for this circle drawing that depends on clicking + where you're moving your mouse (like creating the active cursor you can see if you're giving a Zoom .pptx presentation & select this on - maybe just a Mac?). You can see the code live here. That should also give you an example of how you can use Github Pages to host your tasks online as well (re: Module 1!).
How would we play a sound? So, images and sounds first have to be *loaded* for us to actually play them or draw them on the canvas. In the code below, thus first the variables that have the filenames for the sound files plus a new array for the sounds is created. Then we have a loadSound function that iterates through the new sound array by loading a new Audio element with the files we specified in the fileName array. Then, we use the oncanplaythrough event, enabling the audio to be played through all the way once it's been loaded via this function. We do this until there are no more audio files to be loaded and then go to the else statement, where the playSound function is then run. The playsound function will play the sounds after 3000 milliseconds, iterating through the array we've created. We also listen for a keypress, and if someone presses 'p', the audio will pause from playing. Of note, at the end here, we explicitly run the loadSound function, because you need to load the sounds before you can play them, and you need to initiate the "loop" for your experiment - here, the loop starts with loading the images, then goes to play them.
						<!DOCTYPE html>

						<html>

						<head>

						<link rel="stylesheet" href="WordStroop.css" type="text/css" charset="utf-8">

						<script type="text/javascript" src="jquery-1.7.1.js"></script>

						<script type="text/javascript">

						$(document).ready(function(){

							var fileName = ["s1.wav", "s2.wav", "s3.wav", "s4.wav"];

							var s = new Array(4);

							var sCount = 0;

							var i = 0;


							function loadSound(){

								if (sCount < 4){

									s[sCount] = new Audio(fileName[sCount]);

									s[sCount].oncanplaythrough = loadSound;

									sCount++;

								}

								else{

									playSound();

								}

							}


							function playSound(){

								if (i < 4){

									s[i].play();

									setTimeout(playSound, 3000);

									i++;

								}

							}


							$("body").keypress(function(event) {

								var key = String.fromCharCode(event.which);

								if (key == 'p'){

									s[i - 1].pause();

								}

							});


							loadSound();

						});

						</script>

						</head>

						<body>

						</body>

						</html>
You can explicitly see this code in action here on the site.
How would we present an image? So you'll see below a lot of the same elements as they were presented previously - defining variables, the canvas... Here, like loading in audio, we have a loadImage function, specifying that each item in the new imgs array we've created in an Image, and that the image source is the filename we specified, which helps to basically note what each image will be. They're then loaded with the onload event, as above with the sounds. Of note, for all of these little demos, you may want to make your own *edits*. To give a small example, when I load images, I also add in an "alt" name so that I can record exactly which images were presented in a relatively simple filename. Also, all of these demos have the JavaScript in the same file as the HTML, when you may want to code these separately so they'd be more re-usable, etc.
After loading in the images, we've again progressed here to a runTrial function, where we will iteratively run this function every 2000 milliseconds, thus drawing all four images (with the drawImage method on the canvas). We also draw a red male/female label on top of the image. Notably, this should highlight for you that again JavaScript runs from top to bottom, so the image will be drawn first, then the red text label. They're both drawn before the screen is cleared again - you are able to "layer" things like that with JavaScript easily.
						<!DOCTYPE html>

						<html>

						<head>

						<link rel="stylesheet" href="WordStroop.css" type="text/css" charset="utf-8">

						<script type="text/javascript" src="jquery-1.7.1.js"></script>

						<script type="text/javascript">

						$(document).ready(function(){

							var trialNum = 4;

							var i = 0;

							var word = ["male", "female", "male", "female"];

							var fileName = ["F01.jpg", "F02.jpg", "M01.jpg", "M02.jpg"];

							var imgs = new Array(trialNum);

							var imgCount = 0;


							var canvas = document.getElementById("myCanvas");

							var ctx = canvas.getContext("2d");


							function loadImage(){

								if (imgCount < trialNum){

									imgs[imgCount] = new Image();

									imgs[imgCount].src=fileName[imgCount];

									imgs[imgCount].onload=loadImage;

									imgCount++;

								}

								else{

									runTrial();

								}

							}


							function runTrial(){

								if (i < trialNum){

									ctx.clearRect(0, 0, canvas.width, canvas.height);

									ctx.drawImage(imgs[i], 142, 115);

									ctx.font="60px Arial";

									ctx.fillStyle="red";

									ctx.textBaseline="middle";

									ctx.textAlign="center";

									ctx.fillText(word[i], canvas.width / 2, canvas.height / 2);

									i++;

									setTimeout(runTrial, 2000);

								}

							}


							loadImage();

						});

						</script>

						</head>

						<body>

							<table>

								<tr>

									<td>

										<canvas id="myCanvas" width="500" height="500"></canvas>

									</td>

								</tr>

							</table>

						</body>

						</html>
You can see this code live as a demo here on the site.
OK, hopefully that has given you a variety of ways of presenting stimuli. We'll move on to actually recording responses next.
Recording Responses
There are a number of events that can be detected with JavaScript. We've already talked about detecting key presses, mouse clicks, etc., and that link is a good reference for the kinds of events found in JavaScript. There are three really important parts to recording responses: 1) event listeners; 2) conditions for the event listeners; 3) having a way of keeping your data stored or actually recorded.
Since you've seen examples of the event listeners in the demos above, I won't mention them again here. But what those demos don't have is condition-specific assignment: only marking specific times when you're accepting keypresses or mouse clicks or going to record those responses.
In the example below, I draw what I want participants to respond to within the "drawStroop" function and then I specify that window.hasResponse is equal to 0. The setTimeout method here will move onto the showFeedback function after the number of milliseconds specified by the respDeadline. Then within the showFeedback function, I specify that window.hasResponse is equal to -1. You don't need that particular name for the variable, but it is useful to have some validator to make sure you're only looking at the times when someone is performing the event *when you care*. Sometimes people might press a key or click when it's not time for them to do so and if you recorded responses during those times, you'd be loaded with so much meaningless data.
						function drawStroop(){
							ctx.font="100px Arial";
							StimTime = new Date().getTime() - runStart;
							//removed the other code here
							window.hasResponse = 0;
							eventTimer.setTimeout(showFeedback, respDeadline);
You can see that we continue with the condition-specific assignments by adding in an if statement that looks at only when participants are allowed to respond. It'll still listen for events that are occurring outside of when we've specified, but then with the if statement looking at window.hasResponse == 0, we know we'd only be recording keypresses during the key point in time. We also add more conditions, checking specifically for the *right* keypresses. This then goes on to specify whether participants are correct or incorrect in their responses and/or other specific data that we'd be interested in analyzing here, and with that point, there's no reason to record this as an actual keypress (versus a lack of one) if people are pressing the wrong buttons.
						$("body").keypress(function(event){

							keyPressed = String.fromCharCode(event.which);

							if (window.hasResponse == 0){

								if (keyPressed == "z"){

							}}});

						//removed the other code here
OK, but how do we actually record the data itself? Well, in module 4, we go over storing data via PHP scripts. In the meantime, we here will go over ways you can do this on MTurk (or other sites) without involving a PHP script. First, we have an HTML form element. If you've ever visited a website and had to submit a contact form or information, this is what they're using. In this, we have hidden inputs assignmentId, hitId, workerId that we will get from MTurk and then assign the value to these HTML elements. For demos, this would be demographics, a few questions we'd ask of participants and then assign their value to demos, and logs would be what we'd assign the value of actual data in the task to. The fact that it's a form means that when someone clicks the "submit button" (where presumably the code to submit the form would be - e.g., document.getElementById("mturk_form").submit();), it would trigger the "POST" method and the action listed, which here is the developer sandbox for workers. This would produce columns of data in the batch .csv file you could download from the MTurk site (i.e., something you can do/use in the absence of having a more complicated script - if you needed to do this on the real MTurk site, the link is https://www.mturk.com/mturk/externalSubmit).
						<!DOCTYPE html>

						<html>

						<head>

						<link rel="stylesheet" href="WordStroop.css" type="text/css" charset="utf-8">

						<script type="text/javascript" src="jquery-1.7.1.js"></script>

						<script type="text/javascript">

						//removed the other code here
						});

						</script>

						</head>

						<body>

							<table>

								<tr>

									<td>

										<form id="mturk_form" method="POST" action="https://workersandbox.mturk.com/mturk/externalSubmit">

											<input type="hidden" id="assignmentId" name="assignmentId" value="">

											<input type="hidden" id="hitId" name="hitId" value="">

											<input type="hidden" id="workerId" name="workerId" value="">

											<input type="hidden" id="logs" name="logs" value="">

											<input type="hidden" id="demos" name="demos" value="">

											<p style="font-size: 30px">Click to submit data to MTurk</p>

											<input id="submitButton" style="font-size: 30px" type="submit" name="Finish" value="Submit">

										</form>

									</td>

								</tr>

							</table>

						</body>

						</html>
How do you actually assign the values of the data to these HTML elements?
OK, so let's say the data look like this: data[logCounter++] = ["SCRespITI:", versionNumber, logCounter, trialCounter, MatrixCounter, ImageCounter, runCounter, Congruent, MIC, ItemType, colorpresent, wordpresented, StroopNum[MatrixCounter], fbarray[ImageCounter].alt, PressCorrect, keyPressed, accuracy, respTime, feedbackType, runStart, FBonset, StimTime, Responset, ACCCount]. Logcounter++ means each time the line is run, it is increased by one. It would add a new row of data in this array, with the constant "SCRespITI" at the front, and the values for all these other variables. On each trial, the timing would be updated, as would the individual conditions and stimuli being presented according to the matrices we would have specified earlier (like how in the demos above, word and color had separate arrays and then on trial 1, the color of the color-word was congruent with its meaning, but not on the next trial, etc.). If this is what the data look like, then all we'd have to do is something akin to... $("#logs").val(data.join(";")). This joins the value of the 'data' array to the logs HTML element. Then that means when you submit the mturk_form, you'll have all the recorded responses you've been including in arrays or JavaScript objects in the HTML elements.
Are there other ways of recording the data? Absolutely. You'll see some code for recording data down below in the Demo expansions (specifically instances of object-oriented programming), and you can see another example in the coding example repository (see live version here).
Randomization
So you've generated the matrices of stimuli that you want to present on screen, like word = ["RED", "GREEN", "BLUE", "YELLOW"]. How do you ensure that this occurs in a random order for each person, assuming that somehow seeing red before green might bias how your participants respond?
I've personally always used this function that I found on StackOverflow (see explanation of how this works):
						function shuffle(array)

						{

							var currentIndex = array.length, temporaryValue, randomIndex;


							// While there remain elements to shuffle...

							while (0 !== currentIndex) {


								// Pick a remaining element...

								randomIndex = Math.floor(Math.random() * currentIndex);

								currentIndex -= 1;


								// And swap it with the current element.

								temporaryValue = array[currentIndex];

								array[currentIndex] = array[randomIndex];

								array[randomIndex] = temporaryValue;

							}


							return array;

						}
Math.random * currentIndex will generate a random number between 0 and n and then math.floor will make it into an integer. This is randomIndex, where we then swap out the current element by using this as an index in the array we're shuffling. Notably, there are limitations to this mechanism for shuffling an array. As with all the code on this site, there is ALWAYS another way to do this.
In terms of calling this function, it's pretty easy. You just write shuffle(array) or shuffle([1,1,2,2]) etc.
Debugging
There are a lot of good tools for Debugging in JavaScript, depending on how in depth you want to be. You can use a lot of the tools we've already discussed, with respect to the Developer console, opening the console there to see whether there are any explicit errors noted for you. Within the Developer's Console/Debugger Window, you can also go to the Sources tab and click on specific "lines" of code. This will create a "breakpoint" that looks like a line a grey. That means when you actually run the site or reload/refresh the page, the code will stop running right at the spot where you have the breakpoint. I've done this to isolate where exactly the error is in the code - or what's going wrong, specifically, so I know what I need to actually address moving forward (since not every error will be obvious to you). I once had to learn why running simultaneous executions of a loadImage function wasn't working, and in that case, the breakpoints in combination with other debugging (the next point) helped. You can also run the code console.log(varName) so that you can ensure that what you think is happening to a variable actually is. I did this a lot whenever I needed to figure out whether I was generating arrays that actually had the elements I wanted or thought they did. Similar to console.log, you can write in pop up messages with alert() so that you know if your code met a particular condition. Alerts are more unwieldly than the other methods, but again, using them all together might help the most. You can also write debugger into your code to create a sort of breakpoint. Finally, Brackets is a good text editor program - it explicitly will tell you when it thinks it's found an error.
How does a text editor know when you might have created an error? If I'm not mistaken, it uses a combination of programs, like ESLint, which analyzes code quickly and automatically to find any errors. There is also HTML Tidy, which will help clean up and correct HTML context, like opening tags that are missing a closing tag. Firefox has also developed a tool called Debugger to help people figure out issues with their code. There are *so many* different tools like this that can help you think about debugging your experiment. Some of these I've also mentioned earlier, with respect to checking your specific HTML code.
Here is an entire list of debugging tools, some of which I've mentioned and some which I've left out. Honestly, though, I've primarily used the basic tools: Developer Tools errors, console.log, breakpoints, and alerts. Unless you're writing something really, really complex, these should be sufficient to help you figure out what errors you've made.
Of course, you'll have to work out what errors you did make. Was it a syntax error, something that caused your code not to run at all or stop working part way through? Was it a logic error, something where the syntax is correct but the code isn't running the way you want it to? A logic error probably won't produce an error in the console itself, which may mean that you have to employ the principles of online programming we talked about previously -- always testing your own code.
Differences between JavaScript libraries
I've skated around the idea of JavaScript libraries throughout this Module. JavaScript is a language, but there are many people who have tried to streamline the process of creating a new experiment, or streamline the way others write code. There are a number of specific libraries, even for psychology.
Probably the most popular library is jQuery. It's popular not just for experiments like these, but web development. Various JavaScript, HTML, and CSS bundles or frameworks for web design incorporate links to jQuery as part of the design. One question you might immediately have is: what's the difference?
The easiest way to tell the difference - in the sample code above - is to comment out that jQuery line in the HTML document and see where the errors arise. Which lines of code depend on having a jQuery library loaded into the homepage? But many folks have written articles on how to choose between jQuery and JavaScript: e.g., 1, 2, 3. Some folks say that jQuery speeds up development time because it has a bunch of pre-written functions for your use; some folks say that you should use JavaScript so that you have a better handle on the way the code works before using particular libraries. You might want to play around with both, read a few of those articles, and then decide. The demos above used a mixture of plain JavaScript methods and loaded in the jQuery library.
But maybe you're looking for something else. There is another library called jsPsych meant for running behavioral experiments in a web browser. It has a bunch of tutorials, especially since its format is a little different. It designs experiments in the form of a timeline, with plugins (templates) that can be added and refined for the task in question. I have seen this library used for psych experiments, but I personally would choose between jQuery or vanilla JavaScript. Outside of coding behavioral experiments, you're much more likely to use vanilla JS or jQuery again, whereas getting too used to a library like jsPsych might not generalize your skills as much. That's why you won't see me posting examples with this library, but you can definitely still check out their work.
Similarly, there are a number of other libraries and tools, like lab.js, PsychoJS (the PsychoPy JavaScript extension), and PsyToolkit, which are free. PsychoJS and lab.js provide Graphical User Interfaces where the others do not. There's also Gorilla and LabVanced, but neither of these is free despite the GUI interface.
There are of course a number of other libraries not mentioned here, like React.js (frequently used in web applications). But these will be less relevant to your coding a behavioral experiment. That may be yet another reason to use jQuery or vanilla JS - so that you can understand what other libraries you run into are doing code-wise.
Please remember to evaluate the subsection with the Google Form below so this can be improved in the future (you can find the results from the Google Form here).
Demos and Scripts
This section will go over three different scripts that show how to code a basic Stroop task. In cognitive psychology, the traditional Stroop task has participants categorize the color in which color-words are printed. Typically, participants are slower and more error prone when a color-word is printed in a color that is incongruent with its semantic meaning (i.e., "RED" printed in blue) compared to when the color-word is printed in a color that is congruent with its semantic meaning (i.e., "RED" printed in red). Odes have been written to this task, one among many used to understand what exactly people pay attention to. By seeing how the same task can be coded in multiple ways, I hope to demonstrate for you the breath of JavaScript, HTML, and CSS combinations and the power of what they can do together for your Experiments. After that, we'll go over how these coding languages are used in Qualtrics and MTurk, so you can see the coding languages in other applied contexts as well.
Basic Stroop task demo, I
The following code comes from Dr. Jiefeng Jiang when he first taught me how to code in JavaScript.
First up, we have the "Menu" file that essentially will help participants navigate from each task. The purpose of this file is to link to other HTML documents in the way that an "index" page on a website links to the Research, Diversity, Mentoring tabs. It has the same start as the demos above, with the CSS file and loading in JQuery.
Let's take a look at the code slowly.
So, the first function is the 'basicPopup' function, which is the main purpose of this menu file. When participants click the button to go onto the next task, this function will be run, opening the new html window that is specified. This page essentially just helps people navigate. Next, we have the 'gup' function, which is meant to split the referral HTML link string (i.e., the website/MTurk HIT that links to the menu file - you'll see the code below). As I stated earlier, however, this code is probably an outdated function now that MTurk changed the way it passes on its variables. I talked about including an 'input' HTML element, and in module 4, I go over yet another way to get the MTurk information. But, probably the most important section is the updateMainMenu function. Here, if you write updatedMainMenu(0), it will show the instruction and myButton HTML elements; if you write updateMainMenu(1), it will show the HTML instruction element saying there's a demographic survey to fill out... In essence, this is the function that makes the menu file a "navigation" based file. In the other HTML files, anytime you want to advance in the menu file, you'd just call this function: updateMainMenu(1 or 2). Then, if you close out that HTML file, the participants will see, "Ah, I'm on the next section!"
						<!DOCTYPE html>

						<html>

						<head>

						<link rel="stylesheet" href="WordStroop.css" type="text/css" charset="utf-8">

						<script type="text/javascript" src="jquery-1.7.1.js"></script>

						<script type="text/javascript">

						var curStage = 0;


						function basicPopup(url){

							popupWindow = window.open(url, "popupWindow");

						}


						function gup(name, tmpURL){

							var regexS = "[\\?&]"+name+"=([^&#]*)";

							var regex = new RegExp(regexS);

							var results = regex.exec(tmpURL);

							if (results == null){

								return "";

							}

							else{

								return results[1];

							}

						}


						function updateMainMenu(expStage){

							switch(expStage){

								case 0:

									$("#instruction").show();

									$("#myButton").show();

									break;

								case 1:

									curStage = expStage;

									$("#instruction").text("Click button to fill out a demographic survey");

									break;

								case 2:

									curStage = expStage;

									$("#instruction").text("Click button to start main task");

									break;

								case 3:

									curStage = expStage;

									$("#instruction").hide();

									$("#myButton").hide();

									$("#mturk_form").show();

									break;

							}

						}
Now, here's the rest of the code we didn't look at yet. Below, you can see the code meant to use the gup function to split the MTurk HIT string into the information we need for assignment ID, HIT ID, and worker ID - this is what I meant about calling the "document.referrer" or the referrer (website that linked to) for the document (current webpage). We essentially have HTML elements at the bottom for assignment ID, etc. that we assign the values to, via this function. That's why you can also use the code I mentioned aerlier with the input HTML element.
Here, you also see the exact way that this menu page navigates through the task. When you click the button, if you're on the 0 stage for the updateMainMenu function, it will pop up with the practice HTML (below), until it's told to move forward onto the next step. And we explicitly write to updateMainMenu(0) so that the screen is not 0 - we need to pull up that first page. And below all this, you see that we format information that we'd need in order to get appropriate data out of MTurk. The "form" element is typically how we send data on the interweb - anytime you fill out a contact form, you're using this element. Here, we indicate that we want to keep track of assignment ID, hit ID, etc. in addition to logs and demos. We also have the workersandbox link as the place to submit the form - that's already set up for you so that if you submit the form, it will look for the worker in the batch (identified through those 3 key MTurk elements) and then create columns in the batch .CSV file (that we went over in module 1!) entitled 'logs' and 'demos.' Thus, whatever you end up assigning as the values to those elements can then be recorded and submitted to the site in this way.
						$(document).ready(function(){

							$("#mturk_form").hide();

							document.getElementById("assignmentId").value=gup("assignmentId", document.referrer);

							document.getElementById("hitId").value=gup("hitId", document.referrer);

							document.getElementById("workerId").value=gup("workerId", document.referrer);


								if (document.getElementById("assignmentId").value == "" || document.getElementById("assignmentId").value=="ASSIGNMENT_ID_NOT_AVAILABLE"){

									$("#instruction").text("Please accept HIT first");

									$("#myButton").hide();

								}

								else{

									$("#myButton").click(function(){

										switch(curStage){

											case 0:

												basicPopup("WordStroop_Practice.html");

												break;

											case 1:

												basicPopup("Demographics.html");

												break;

											case 2:

												basicPopup("WordStroop.html");

												break;

										}

									});

									updateMainMenu(0);

								}

						});

						</script>

						</head>

						<body>

							<table>

								<tr>

									<td>

										<p id="instruction" style="font-family: arial; font-size: 40px">Click the button to start practice</p>

										<button id="myButton" style="font-family: arial; font-size: 30px">Click</button>

										<form id="mturk_form" method="POST" action="https://workersandbox.mturk.com/mturk/externalSubmit">

											<input type="hidden" id="assignmentId" name="assignmentId" value="">

											<input type="hidden" id="hitId" name="hitId" value="">

											<input type="hidden" id="workerId" name="workerId" value="">

											<input type="hidden" id="logs" name="logs" value="">

											<input type="hidden" id="demos" name="demos" value="">

											<p style="font-size: 30px">Click to submit data to MTurk</p>

											<input id="submitButton" style="font-size: 30px" type="submit" name="Finish" value="Submit">

										</form>

									</td>

								</tr>

							</table>

						</body>

						</html>
Voila, here's that menu code in full.
						<!DOCTYPE html>

						<html>

						<head>

						<link rel="stylesheet" href="WordStroop.css" type="text/css" charset="utf-8">

						<script type="text/javascript" src="jquery-1.7.1.js"></script>

						<script type="text/javascript">

						var curStage = 0;


						function basicPopup(url){

							popupWindow = window.open(url, "popupWindow");

						}


						function gup(name, tmpURL){

							var regexS = "[\\?&]"+name+"=([^&#]*)";

							var regex = new RegExp(regexS);

							var results = regex.exec(tmpURL);

							if (results == null){

								return "";

							}

							else{

								return results[1];

							}

						}


						function updateMainMenu(expStage){

							switch(expStage){

								case 0:

									$("#instruction").show();

									$("#myButton").show();

									break;

								case 1:

									curStage = expStage;

									$("#instruction").text("Click button to fill out a demographic survey");

									break;

								case 2:

									curStage = expStage;

									$("#instruction").text("Click button to start main task");

									break;

								case 3:

									curStage = expStage;

									$("#instruction").hide();

									$("#myButton").hide();

									$("#mturk_form").show();

									break;

							}

						}


						$(document).ready(function(){

							$("#mturk_form").hide();

							document.getElementById("assignmentId").value=gup("assignmentId", document.referrer);

							document.getElementById("hitId").value=gup("hitId", document.referrer);

							document.getElementById("workerId").value=gup("workerId", document.referrer);


								if (document.getElementById("assignmentId").value == "" || document.getElementById("assignmentId").value=="ASSIGNMENT_ID_NOT_AVAILABLE"){

									$("#instruction").text("Please accept HIT first");

									$("#myButton").hide();

								}

								else{

									$("#myButton").click(function(){

										switch(curStage){

											case 0:

												basicPopup("WordStroop_Practice.html");

												break;

											case 1:

												basicPopup("Demographics.html");

												break;

											case 2:

												basicPopup("WordStroop.html");

												break;

										}

									});

									updateMainMenu(0);

								}

						});

						</script>

						</head>

						<body>

							<table>

								<tr>

									<td>

										<p id="instruction" style="font-family: arial; font-size: 40px">Click the button to start practice</p>

										<button id="myButton" style="font-family: arial; font-size: 30px">Click</button>

										<form id="mturk_form" method="POST" action="https://workersandbox.mturk.com/mturk/externalSubmit">

											<input type="hidden" id="assignmentId" name="assignmentId" value="">

											<input type="hidden" id="hitId" name="hitId" value="">

											<input type="hidden" id="workerId" name="workerId" value="">

											<input type="hidden" id="logs" name="logs" value="">

											<input type="hidden" id="demos" name="demos" value="">

											<p style="font-size: 30px">Click to submit data to MTurk</p>

											<input id="submitButton" style="font-size: 30px" type="submit" name="Finish" value="Submit">

										</form>

									</td>

								</tr>

							</table>

						</body>

						</html>
OK, great! So you now have seen how to use the developer site as a way of checking out whether your data looks the way you want (via this form submission), and you've seen a way on how to navigate through completely different tasks.
Remember that this CSS file - as loaded in, like the practice demos above - is pretty basic and primarily serves to ensure that the text is center aligned for the "table" elements, the background is grey (not white), and everything else has no margin, padding, or border automatically. In other words, this is a pretty bare bones demo for an Experiment. If you were to run an Experiment, you'd probably want to have prioritize the User Experience more.
OK, so this Menu file tells us to load the practice task, then the demographics, then the task files. What do each of these look like?
Here's the demograhpics task. At the top, we define an empty array to put the data into and we define what happens when the user clicks to submit their data. It basically then assigns the first row in the array to whatever the value is for the gender question, then the age question, then the ethnicity and race questions. Then it's joins these elements together with a semi-colon within the data array, assigns that value to the demos HTML element in the menu file (opener.window.document refers to the menu file, since it was used to open the current webpage/document). It then updates the menu page so that you'd move onto the main task and then closes out this pop up page.
Next, we see the actual demographic questions that participants are asked, as defined in the HTML. If you remember from Module 2, it may not be the best to use a drop-down option for Gender here, because that means that you have to pre-define all options for Gender. This Demographic question only allows for Male, Female, and Do Not Wish to Reply, which is what is listed on the National Institutes of Health demographics form. However, as you might be aware, a number of folks do not identify as male or female, but as nonbinary. Moreover, this question confounds gender with sex (male/female is typically actually associated with sex and woman/man with gender - see this workbook from Sari Van Anders' lab). After that, there is an input element for age, drop-downs for ethnicity and race per the NIH form. The option values are what are coded into the HTML element and what gets assigned to data[0], data[1], etc.
						<!DOCTYPE html>

						<html>

						<head>

						<script type="text/javascript" src="jquery-3.1.1.js"></script>

						$(document).ready(function(){

							var data = [[""]];

							$("#submitButton").click(function(){

								var e = document.getElementById("gender");

								data[0] = e.options[e.selectedIndex].value;


								data[1] = document.getElementById("age").value;


								e = document.getElementById("ethnicity");

								data[2] = e.options[e.selectedIndex].value;


								e = document.getElementById("race");

								data[3] = e.options[e.selectedIndex].value;


								//alert(data.join(";"));

								$("#demos", opener.window.document).val(data.join(";"));

								opener.updateMainMenu(2);

								JavaScript:window.close();

							});

						});

						</script>

						</head>

						<body>

							<p> <b> Please take a few minutes to answer the demographic questions below:</b></p>

							<p> <b> Gender: </b> </p>

							<select id="gender">

								<option value="F">Female</option>

								<option value="M">Male</option>

								<option value="NA">Do not wish to reply</option>

							</select>


							<p><b> Age: (leave blank if you do not wish to reply)</b></p>

							<input id="age" name="Age" value=""></input>


							<p><b> Ethnicity:</b></p>

							<select id="ethnicity">

								<option value="HL">Hispanic/Latino</option>

								<option value="NHL">Non-Hispanic/Latino</option>

								<option value="NA">Do not wish to reply</option>

							</select>


							<p><b>Race: </b></p>

							<select id="race">

								<option value="AI">American Indian/Alaska Native</option>

								<option value="A">Asian</option>

								<option value="NH">Native Hawaiian/Other Pacific Islander</option>

								<option value="AA">African American/Black</option>

								<option value="W">Caucasian/White</option>

								<option value="M">Multiracial</option>

								<option value="O">Other</option>

								<option value="NA">Do not wish to reply</option>

							</select>

							<br>

							<button id="submitButton">Submit</button>

						</body>

						</html>
OK, now that we've gotten the demographics, we're onto the final task page from the menu page. The following shows you a way around using the canvas - using pure HTML instead for presenting the stimuli in the practice task. I'll present the practice task before the main task, mostly as a contrast for you.
OK, let's look at this code little by little. First up, like we did in the earlier demos, we define the variables - here, indicating the colors and word to be presented via numbers that will be given meaning via conditional statement below. We define variables that will indicate particular timepoints we're interested in, like onset. And we'll define a blank array that we'll want to drop the data into. Finally, we've also defined a timeoutHandle and a checkResponse variable - these are going to function exactly as you might think, a way to keep track of time relative to the response and whether a participant responds in time.
Then we define the runTrial function. We've essentially set up a counter now, where i starts at 0 and as long as it's less than the number of trials we want to run (trialNum), we'll keep running through this runTrial function. We increment through the word matrix based on the trial number that we're currently on (i = 0, so trial #1). It goes to the first number in "word", which is 1, and if it's 1, that means that the s HTML element will be the text "RED". In the second part, we see that the first element of the color matrix is 1, and if the value is 1, we see that the CSS for the HTML element specifies the red color. At the bottom, it makes sure that the HTML element is shown *after* defining how the element should look, and then we see "new Date.()", which will create a timepoint in the code. This is essentially to help us mark when exactly a stimulus is shown on screen. If we want to see how quickly participants respond, then we'll need to know *when* what they respond to is shown on screen. We also set the checkResponse variable to true, ensuring that we want to allow responses *only* while this variable is on screen. We then define the timeoutHandle variable, which says that the next "call" for this function is to the function showITI, and that occurs after 1000 ms (meaning a participant would have 1000 ms to see this word on screen and respond before something else is shown). And we also see the end of the conditional for the runTrial function, where if you've exceeded the number of trials that we should show (trialNum), it then will change the text to white and 20 pixels and it joins together what is input in the data array with the s element. We already saw one of the rows for the data array contains "presentation" style information - "P: color, word" - telling us what was on screen. So when people finish this (fake) practice experiment, it will show them their data on screen as well as an html element - endPractice - that we will see is a button.
						<!DOCTYPE html>

						<html>

						<head>

						<link rel="stylesheet" href="WordStroop.css" type="text/css" charset="utf-8">

						<script type="text/javascript" src="jquery-1.7.1.js"></script>

						<script type="text/javascript">


						$(document).ready(function(){

							var trialNum = 9;

							var color = [1,2,3,1,2,3,1,2,3];

							var word = [1,1,1,2,2,2,3,3,3];

							var i = 0;


							var runStart;

							var logCounter = 0;

							var onset;

							var data = [[""]];

							var d1 = new Date();

							$("#endPractice").hide();


							var checkResponse = true;

							var timeoutHandle = null;


							function runTrial(){

								if (i < trialNum){

									switch(word[i]){

										case 1:

											$("#s").text("RED");

											break;

										case 2:

											$("#s").text("BLUE");

											break;

										case 3:

											$("#s").text("YELLOW");

											break;

									}


									switch(color[i]){

										case 1:

											$("#s").css("color", "red");

											break;

										case 2:

											$("#s").css("color", "blue");

											break;

										case 3:

											$("#s").css("color", "yellow");

											break;

									}

									$("#s").show();

									checkResponse = true;


									d1 = new Date();

									onset = d1.getTime() - runStart;

									data[logCounter] = ["P:", onset, color[i], word[i]];

									logCounter++;


									timeoutHandle = setTimeout(showITI, 1000);

									i++;

								}

								else{

									$("#s").css("font-size", "20px");

									$("#s").css("color", "white");

									$("#s").text(data.join(";"));

									$("#s").show();

									$("#endPractice").show();

								}

							}
OK, let's look at the next section. So we already know that runTrial goes to this showITI function, where we hide the s HTML element (the stimulus on screen) and we run this 'blank screen' for 2000 ms before going to the noResponseFeedback function. We then disable a participant's way of responding in the noresponseFeedback function by defining checkResponse as false, and we tell participants that we got no response from them. The other function I haven't mentioned yet is showFeedback, and that's because we should look at the event listener that's defined - body.keypress. So, whenever there is a keyPress, it checks to see if checkResponse = true (i.e., the time when we want participants to respond). If true, it clears the timeout. It sets checkResponse to false, so we won't record another response. It checks the key that was pressed, creates a new timepoint, and then indicates what key was pressed as well as what time it was pressed it. (You could define reaction time by taking this time at the response and subtracting it from the time at which the stimulus was presented). Because we've cleared the "timeoutHandle", this actually means that the setTimeout for the original runTrial function is cleared - it doesn't have to run for all 1000 ms. In short, this is a way of making response-specific timing. Instead of waiting for the full 1000 ms, it will only show on screen as long as it takes you to respond... and if you don't respond within the 1000 ms timeline, you get that noresponseFeedback. (If you wanted to make a fixed trial time, you would not clear the timeout, and you would not define a function within your event listener). And so, if you do make a response, you can also see, we define whether the answer - the key pressed - is correct. We then show participants the showFeedback function and indicate in that function whether the response is Correct or not. Notably, both showFeedback and noresponseFeedback go to 'showITI2' next, and that function goes to runTrial after 2000 ms. So the timeline for this task so far is 1000 ms color-word (or shorter) - 2000 ms blank screen (which may not show if you responded earlier, so technically participants have 1000 ms to *see* the color-word and up to 3000 ms to actually respond) - then either feedback or no feedback - then a real blank screen for 2000 ms before the next trial.
						function showITI(){

								$("#s").hide();

								timeoutHandle = setTimeout(noResponseFeedback, 2000);

							}


							function showFeedback(isCorrect){

								$("#s").show();

								$("#s").css("color", "white");

								if (isCorrect){

									$("#s").text("Correct");

								}

								else{

									$("#s").text("Incorrect");

								}

								setTimeout(showITI2, 1000);

							}


							function noResponseFeedback(){

								checkResponse = false;

								$("#s").show();

								$("#s").css("color", "white");

								$("#s").text("No response");

								setTimeout(showITI2, 1000);

							}


							function showITI2(){

								$("#s").hide();

								setTimeout(runTrial, 2000);

							}


							$("body").keypress(function(event){

								if (checkResponse){

									clearTimeout(timeoutHandle);

									checkResponse = false;

									var key = String.fromCharCode(event.which);

									d1 = new Date();

									data[logCounter] = ["R:", key, d1.getTime() - runStart];

									logCounter++;


									var ans = key[0] - '0';

									if (color[i - 1] == ans){

										showFeedback(true);

									}

									else{

										showFeedback(false);

									}

								}

							});
OK, time for the last section of this code. How does this task actually start? Well, with the countdown function that I mentioned to you earlier! once the countdown is complete, it will mark the time this run started, and it will initiate the runTrial function. And you start the countdown by clicking the "start" HTML element, which is a button... and you end this practice task by clicking the endPractice button, which if you remember will show only when we've already gone through all the iterations of the runTrial function. There, it will update the menu page, and it will then close the current pop up page.
						function countDown(time){

								if (time > 0){

									$("#s").text('' + time);

									setTimeout(function(){countDown(time - 1)}, 1000);

								}

								else{

									d1 = new Date();

									runStart = d1.getTime();

									runTrial();

								}

							}


							$("#start").click(function() {

								$("#start").hide();

								countDown(3);

							});


							$("#endPractice").click(function(){

								opener.updateMainMenu(1);

								JavaScript:window.close();

							});

						});


						</script>

						</head>

						<body>

							<table>

								<tr>

									<td>

										<p id="s" style="font-family: arial; font-size:60px">RED=1, BLUE=2,	YELLOW=3</p>

										<button id="start">Click to start</button>

										<button id="endPractice" style="font-family: arial; font-size: 20px">Click to end practice</button>

									</td>

								</tr>

							</table>

						</body>

						</html>
Wow, so we went through the demographics and practice task! And this was one *not* using the canvas API, but specifically using a combination of HTML and CSS instead to present something on screen. But, here's the code in full now.
						<!DOCTYPE html>

						<html>

						<head>

						<link rel="stylesheet" href="WordStroop.css" type="text/css" charset="utf-8">

						<script type="text/javascript" src="jquery-1.7.1.js"></script>

						<script type="text/javascript">


						$(document).ready(function(){

							var trialNum = 9;

							var color = [1,2,3,1,2,3,1,2,3];

							var word = [1,1,1,2,2,2,3,3,3];

							var i = 0;


							var runStart;

							var logCounter = 0;

							var onset;

							var data = [[""]];

							var d1 = new Date();

							$("#endPractice").hide();


							var checkResponse = true;

							var timeoutHandle = null;


							function runTrial(){

								if (i < trialNum){

									switch(word[i]){

										case 1:

											$("#s").text("RED");

											break;

										case 2:

											$("#s").text("BLUE");

											break;

										case 3:

											$("#s").text("YELLOW");

											break;

									}


									switch(color[i]){

										case 1:

											$("#s").css("color", "red");

											break;

										case 2:

											$("#s").css("color", "blue");

											break;

										case 3:

											$("#s").css("color", "yellow");

											break;

									}

									$("#s").show();

									checkResponse = true;


									d1 = new Date();

									onset = d1.getTime() - runStart;

									data[logCounter] = ["P:", onset, color[i], word[i]];

									logCounter++;


									timeoutHandle = setTimeout(showITI, 1000);

									i++;

								}

								else{

									$("#s").css("font-size", "20px");

									$("#s").css("color", "white");

									$("#s").text(data.join(";"));

									$("#s").show();

									$("#endPractice").show();

								}

							}


							function showITI(){

								$("#s").hide();

								timeoutHandle = setTimeout(noResponseFeedback, 2000);

							}


							function showFeedback(isCorrect){

								$("#s").show();

								$("#s").css("color", "white");

								if (isCorrect){

									$("#s").text("Correct");

								}

								else{

									$("#s").text("Incorrect");

								}

								setTimeout(showITI2, 1000);

							}


							function noResponseFeedback(){

								checkResponse = false;

								$("#s").show();

								$("#s").css("color", "white");

								$("#s").text("No response");

								setTimeout(showITI2, 1000);

							}


							function showITI2(){

								$("#s").hide();

								setTimeout(runTrial, 2000);

							}


							$("body").keypress(function(event){

								if (checkResponse){

									clearTimeout(timeoutHandle);

									checkResponse = false;

									var key = String.fromCharCode(event.which);

									d1 = new Date();

									data[logCounter] = ["R:", key, d1.getTime() - runStart];

									logCounter++;


									var ans = key[0] - '0';

									if (color[i - 1] == ans){

										showFeedback(true);

									}

									else{

										showFeedback(false);

									}

								}

							});


							function countDown(time){

								if (time > 0){

									$("#s").text('' + time);

									setTimeout(function(){countDown(time - 1)}, 1000);

								}

								else{

									d1 = new Date();

									runStart = d1.getTime();

									runTrial();

								}

							}


							$("#start").click(function() {

								$("#start").hide();

								countDown(3);

							});


							$("#endPractice").click(function(){

								opener.updateMainMenu(1);

								JavaScript:window.close();

							});

						});


						</script>

						</head>

						<body>

							<table>

								<tr>

									<td>

										<p id="s" style="font-family: arial; font-size:60px">RED=1, BLUE=2,	YELLOW=3</p>

										<button id="start">Click to start</button>

										<button id="endPractice" style="font-family: arial; font-size: 20px">Click to end practice</button>

									</td>

								</tr>

							</table>

						</body>

						</html>
OK, what does the main task look like? It's very similar to the practice task. Can you spot the differences?
						<!DOCTYPE html>

						<html>

						<head>

						<link rel="stylesheet" href="WordStroop.css" type="text/css" charset="utf-8">

						<script type="text/javascript" src="jquery-1.7.1.js"></script>

						<script type="text/javascript">


						$(document).ready(function(){

							var trialNum = 9;

							var color = [1,2,3,1,2,3,1,2,3];

							var word = [1,1,1,2,2,2,3,3,3];

							var i = 0;


							var runStart;

							var logCounter = 0;

							var onset;

							var data = [[""]];

							var d1 = new Date();


							function runTrial(){

								if (i < trialNum){

									switch(word[i]){

										case 1:

											$("#s").text("RED");

											break;

										case 2:

											$("#s").text("BLUE");

											break;

										case 3:

											$("#s").text("YELLOW");

											break;

									}


									switch(color[i]){

										case 1:

											$("#s").css("color", "red");

											break;

										case 2:

											$("#s").css("color", "blue");

											break;

										case 3:

											$("#s").css("color", "yellow");

											break;

									}

									$("#s").show();


									d1 = new Date();

									onset = d1.getTime() - runStart;

									data[logCounter] = ["P:", onset, color[i], word[i]];

									logCounter++;


									setTimeout(showITI, 1000);

									i++;

								}

								else{

									$("#s").css("font-size", "20px");

									$("#s").css("color", "white");

									$("#s").text(data.join(";"));

									$("#s").show();

									$("#logs", opener.window.document).val(data.join(";"));

									opener.updateMainMenu(3);

									Javascript:window.close();

								}

							}


							function showITI(){

								$("#s").hide();

								setTimeout(runTrial, 2000);

							}


							$("body").keypress(function(event){

								var key = String.fromCharCode(event.which);

								d1 = new Date();

								data[logCounter] = ["R:", key, d1.getTime() - runStart];

								logCounter++;

							});


							function countDown(time){

								if (time > 0){

									$("#s").text('' + time);

									setTimeout(function(){countDown(time - 1)}, 1000);

								}

								else{

									d1 = new Date();

									runStart = d1.getTime();

									runTrial();

								}

							}


							$("#start").click(function() {

								$("#start").hide();

								countDown(3);

							});

						});

						</script>

						</head>

						<body>

							<table>

								<tr>

									<td>

										<p id="s" style="font-family: arial; font-size:60px">RED=1, BLUE=2,	YELLOW=3</p>

										<button id="start">Click to start</button>

									</td>

								</tr>

							</table>

						</body>

						</html>
Hopefully that's given you an idea of how you can combine a bunch of different tasks together to create your full experiment and how you might record data, even if your lab doesn't have a specific server!
Basic Stroop task demo, II
The following code comes from Dr. Nick Brosowsky's Stroop Task Demo. Nick codes his tasks so that there are separate HTML and JS files, whereas the example I showed you above just defined most things in the HTML file directly.
Here's the index or Menu file. It still has the same structure - definig the author, the title of the page, the CSS files to reference, conditionals in case someone has JavaScript disabled, and showing the consent form. (Can you guess how the consent is shown in the previous example? ... Yes, it is just another item in the menu file - the first updateMainMenu(0) link, before going to the practice, if you wanted to expand on that code). OK, so then he defines whether you can see something on screen based on whether you clicked to consent to the task or not. If you consent, it then opens the task HTML file within the same browser (_self). So, then, let's go take a look at what that task file looks like.
						<!DOCTYPE html>

						<html dir="ltr" lang="en-US">

						<head>

							<meta http-equiv="content-type" content="text/html; charset=utf-8" />

							<meta name="N.P. Brosowsky" content="Typing Game" />

							<meta name="viewport" content="width=device-width, initial-scale=1" />

							<!-- Stylesheets

							============================================= -->

							<link rel="stylesheet" href="css/tachyons.min.css" type="text/css" />

							<link rel="stylesheet" href="css/index-style.css" type="text/css" />

							<!--- Javascript on page load

							============================================= -->

							<script type="text/javascript">

							</script>

							<!-- Document Title

							============================================= -->

							<title>Typing Game</title>

						</head>

						<body>

							<noscript>

								<p>Javascript has been disabled in your browser.</p<

								<p>In order to complete this study, you must enable JavaScript.</p<

								<p>Here are <a href="https://www.enable-javascript.com/"<instructions on how to enable JavaScript in your web browser>/a>.</p>

							</noscript>

							<div id='info-consent-letter' style="width: 80%; margin: auto">

								<p><b>Title of research study:</b> Assessing Adaptive Control via Trial-Unique Stimuli</p>

								<p><b>Key Information</b></p>

								<p>This research study is conducted by Dr. Tobias Egner of the Center for Cognitive Neuroscience at Duke University. Its purpose is to investigate the ease in which people switch between tasks. </p>

								<p><strong>IMPORTANT: This experiment requires that you respond to sounds. It will require speakers or headphones to complete.</strong></p>


								<p><b>Procedure</b>In this experiment, you will be asked to identify competing stimuli (e.g. images and words) on the computer screen. Once you are finished with the task, you will also be asked to fill out a few questions about your demographics. If any questions make you uncomfortable, feel free to skip it, but please try to answer as many of the questions as you can.</p>


								<p>Specifically, you will be identifying the color of a word, while ignoring what that word says. (e.g., <span style="color:red">BLUE</span>, <span style="color:blue">YELLOW</span>). You will respond by pressing a key on the keyboard.  There will be 400 trials. The entire experiment should take less than 20 minutes. You will be compensated $2.75 for your participation.</p>


								<p><b>Benefits and Risks:</b< We know of no risks or benefits to you for participating in this research study. The potential benefits of this research lie in the knowledge that will be acquired. </p>


								<p><b>Confidentiality</b> Our records will include the demographic information you report to us (your age, gender, etc.) as well as your task performance data. We employ a participant code system to ensure that this information is not directly linked to your name or consent form. The consent and demographic forms as well as the de-identified performance data will be stored in a secure location. All data will be kept for at least six years or as long as is required by Duke University or any journal that may publish these findings. If a report of this study is published, or the results are presented at a professional conference, only group results will be reported. However, your data, with direct identifiers removed, may be used for future studies and/or shared with other researchers. The audio recordings of your voice will not be shared.</p>


								<p><b>Compensation and Participation</b<For participating in this study, you will earn $2.75. We will screen your responses prior to compensation. If you do not complete the task, or we think that you completed it to an unsatisfactory standard (i.e. you do not follow the instructions), you will not be compensated. There will be 400 trials. The entire experiment should take less than 20 minutes.</p>


								<p><b>Contact</b<any questions about your rights as a research subject, you may contact the Human Subjects Protection at campusirb@duke.edu.</p>

								<hr>

								<p>Please click to indicate your consent to participate in the study.</p>

								<p><b>Protocol:</b>#</p>

							<div id='decline-to-participate'>

								<p>You have declined to participate at this time.</p>

								<p>If you change your mind, simply reload this webpage.</p>

							</div>

							<button id='no-consent-btn' class='consent-btn' style="display: inline; visibility: visible">I do not agree to participate</button>

							<button id='yes-consent-btn' class='consent-btn' style="display: inline; visibility: visible"><b>I agree to participate</b></button>

							</div>

							<!-- Javascript before page load

							============================================== -->

							<!-- custom JS -->

							<script>

								document.querySelector("#info-consent-letter").style.display = "block"

								document.querySelector("#info-consent-letter").style.visibility = "visible"

								document.querySelector("#no-consent-btn").addEventListener("click",

									function() {

										document.querySelector("#info-consent-letter").style.display = "none";

										document.querySelector("#decline-to-participate").style.display = "block";

										document.querySelector("#decline-to-participate").style.visibility = "visible";

										document.querySelector("#no-consent-btn").style.display = "none";

										document.querySelector("#yes-consent-btn").style.display = "none";

									});

								document.querySelector("#yes-consent-btn").addEventListener("click", function() {

									window.open("task.html?" + window.location.search.slice(1) , "_self");

								});

							</script>

						</body>
The index file links to the task file below. You can see that it follows basically the same structure as the index file, in terms of defining the author, the title, the CSS sheets... and then it has a div for the "main-display", the JS libraries to bring in (eventTimer - Nick's alternate to setTimeout; record_data.js, create_stroop_trials.js, and run_stroop.js.) This file is pretty short... so let's look at these specific JS files.
						<!DOCTYPE html>

						<html dir="ltr" lang="en-US">

						<head>

							<meta http-equiv="content-type" content="text/html; charset=utf-8" />

							<meta name="N.P. Brosowsky" content="Typing Game" />

							<meta name="viewport" content="width=device-width, initial-scale=1" />

							<!-- Stylesheets

							============================================= -->

							<link rel="stylesheet" href="css/tachyons.min.css" type="text/css" />

							<link rel="stylesheet" href="css/index-style.css" type="text/css" />

							<!--- Javascript on page load

							============================================= -->

							<script type="text/javascript">

							</script>

							<!-- Document Title

							============================================= -->

							<title>Typing Game</title>

						</head>

						<body>

						<body class="bg-black">

							<div id="main-display" class="full-display flex items-center justify-center fs-normal helvetica bg-black white" style="display: none"></div>


							<!-- Javascript before page load

							============================================== -->


							<!-- external JS -->


							<!-- common JS -->

							<script type="text/javascript" src="js/eventTimer.js"></script>


							<!-- custom JS -->

							<script type="text/javascript" src="js/record_data.js"></script>

							<script type="text/javascript" src="js/create_stroop_trials.js"></script>

							<script type="text/javascript" src="js/run_stroop.js"></script>

							<script type="text/javascript">

								// start stroop

								init_stroop();

							</script>


						</body>

						</html>
This is the create_stroop_trials.js external file referred to above. We can see that Nick refers to the shuffle function that we mentioned earlier, that he also defines the variable trial_array as part of this function. He has a generic function to repeat stimuli, he then says we're going to have 48 trials, and defines red, blue, green, and yellow at the colors & color-words he's interested in. Then we get into actually making the stimulus array - we say, as long as the counter is less than the length of the array that has the stim_set, run this second for loop; in that second loop, we have the same condition. It then uses the "push" method within JavaScript to add elements to the end of 2 separate arrays: con_stims (i.e., congruent, when RED is presented in red) and inc_stims (i.e., incongruent, when RED is presented in another color besides red). And then after that's done, Nick calls on his repeated function to repeat the elements within con_stimes three times, and then again to populate it out to the number of trials, with an equal number between incongruent and congruent stimuli (N_trials/2). Then, these two arrays are concatenated together, and shuffled for a single array with all the color-word stimuli and their color/word pairings. He then creates an object-oriented array in temp_array by taking the current stimuli in that all_stimuli array, defining the trial number it is (the key being trial and its value n+1), the word presented, the color it's presented in, whether the color-word matches the color it's presented in (congruency), and what the participant should say (answer). In essence, this is a more complicated way of defining what should be presented on screen than you saw in the last Stroop demo, where they were just manually defined.
						// creates an array of stroop trials

						let trial_array = function () {


							/* generic function to shuffle an array */

							function shuffle(array) {

								var tmp, current, top = array.length;

								if (top)

									while (--top) {

										current = Math.floor(Math.random() * (top + 1));

										tmp = array[current];

										array[current] = array[top];

										array[top] = tmp;

									}


								return array;

							}


							/* generic function to repeat an array */

							const makeRepeated = (arr, repeats) => [].concat(...Array.from({

								length: repeats

							}, () => arr));


							////////////////////////////////////////////////////////////


							let N_trials = 48

							let temp_array = []


							// stimulus set

							// each color name with hex code

							let stim_set = [["#e41a1c", "red"], ["#1f78b4", "blue"], ["#4daf4a", "green"], ["#ffff33", "yellow"]]


							let con_stims = []

							let inc_stims = []


							for (i = 0; i < stim_set.length; i++) {

								for (ii = 0; ii < stim_set.length; ii++) {

									if (stim_set[i] == stim_set[ii]) {

										con_stims.push([stim_set[i], stim_set[ii]])

									}


									if (stim_set[i] != stim_set[ii]) {

										inc_stims.push([stim_set[i], stim_set[ii]])

									}

								}

							}


							// make equal con/inc trials

							con_stims = makeRepeated(con_stims, 3)


							// make enough for N_trials

							con_stims = makeRepeated(con_stims, (N_trials / 2) / con_stims.length)

							inc_stims = makeRepeated(inc_stims, (N_trials / 2) / inc_stims.length)


							// add them all together and randomize order

							all_trials = shuffle(con_stims.concat(inc_stims))


							for (n = 0; n < N_trials; n++) {

								// take one from array

								let current_stim = all_trials.pop()


								temp_array.push({

									subject: sub_code,

									trial: n + 1,

									word: current_stim[0][1],

									color: current_stim[1][0],

									congruency: (current_stim[0][1] == current_stim[1][1] ? "con" : "inc"),

									answer: current_stim[1][1][0]

								})

							}


							console.log(temp_array)

							return temp_array

						}()
Now, let's look at the other JavaScript files. This is the run_stroop.js external file referred to above. As I linked to earlier, Nick uses eventTimer instead of setTimeout and includes a conditional here to check to make sure eventTimer is actually loaded in and included properly within the code; if it's not, it refers to setTimeout instead. Then, like with all the other demos I've shown so far, he defines the global variables like the trial counter and a variable to determine when you can actually respond. Then he's initialized the display for the experiment by showing that HTML element we saw earlier in the task file, ensuring that he's also not listening yet for the keydown element, and then also calling the instructions function below. That instructions function hides the HTML element where the actual content would be shown until after he defines what *should be shown*. I.e., then he's defined the HTML element for the instructions. He includes a NEXT button to keep reading. If they click, it will then go to the second page of the instructions. Then that second instructions function is very similar to this first, but basically a page to show us that hey, when you press the next button, you'll start the task. One of the nicer things about how Nick has his task coded is that each section is very clearly *one* thing, and you can see how he's melded css with the HTML, given all the classes that are assigned to the content display.
						// I use a custom timer called "eventTimer", but this code checks that it is loaded

						// fallback to vanilla timers if eventTimer is not loaded...

						// you could replace all eventTimer.setTimeout with window.setTimeout and everything would still work


						if (typeof eventTimer == 'undefined') {

							//console.log("no eventTimer found... using JS setTimeout/Interval")

							var eventTimer = {};

							eventTimer.setTimeout = function (fun, time) {

								window.setTimeout(fun, time)

							}

							eventTimer.setInterval = function (fun, time) {

								window.setInterval(fun, time)

							}

						}


						/////// global variables ////////////

						let allow_keys = false // when true keypresses trigger function

						let trial_counter = 0  // tracks current trial


						///// initialize the display for experiment ///////////

						let init_stroop = function () {

							// add event listener for the on_keypress function

							document.addEventListener("keydown", on_keypress, false)


							// create content display within the main-display div

							document.querySelector("#main-display").style.display = "flex"

							document.querySelector("#main-display").innerHTML = `<div class="content-display flex flex-column justify-center lh-copy" style="text-align: left"></div>`


							// call instruction function

							instructions_pg1();

						}


						//////// INSTRUCTIONS /////////////////////

						let instructions_pg1 = function () {

							document.querySelector(".content-display").style.visibility = "hidden"


							document.querySelector(".content-display").innerHTML =

								`<h3>Instructions</h3>

										<div>

											<p>Your primary task will be to identify the color of the font as quickly and as accurately as possible.</p>

											<p>On every trial you will see a color-word in a colored font (e.g., <span style="color: #e41a1c">BLUE</span>, <span style="color:#ffff33">YELLOW</span>, <span style="color:#1f78b4">BLUE</span>). </p>

											<p>Your task is to indicate the color of the font (ignoring what the word says). You will use the keyboard to respond by pressing "b" for blue, "g" for green, "r" for red and "y" for yellow.</p>

											<p>For example, if you were presented <span style="color: #1f78b4">RED</span>, you would respond by pressing "b" for blue.</p>

											<p>If you were presented <span style="color: #4daf4a">GREEN</span>, you would respond by pressing "g" for green.</p>

										</div>

									<div class="flex flex-row" style="">

										<a id="dyn-bttn" class="bttn b-right f6 link dim ph3 pv2 mb2 dib white bg-gray" href="#0">NEXT</a>

									</div>`


							// can only set onclick after a button has been created

							document.querySelector("#dyn-bttn").setAttribute("onClick", "javascript: instructions_pg2();")

							document.querySelector(".content-display").style.visibility = "visible"

						}


						let instructions_pg2 = function () {

							document.querySelector(".content-display").style.visibility = "hidden"


							document.querySelector(".content-display").innerHTML =

								`<h3>Instructions</h3>

										<div>

											<p>That's it!</p>

											<p>When you are ready to begin, press start</p>

										</div>

									<div class="flex flex-row" style="">

										<a id="dyn-bttn" class="bttn b-right f6 link dim ph3 pv2 mb2 dib white bg-gray" href="#0">NEXT</a>

									</div>`


							// can only set onclick after a button has been created

							document.querySelector("#dyn-bttn").setAttribute("onClick", "javascript: start_task();")

							document.querySelector(".content-display").style.visibility = "visible"


						}
OK, now that we've looked at the instructions within this run JS file, let's look at the Stroop task functions. When the task is initialized (when someone presses the button shown on the screen after the 2nd instructions page), he then does this start_task function that fixes what the actual main display will look like. Then he runs the fixate function. It shows the stimulus HTML element as a grey + (fixation sign). It lasts for 1000 ms before running the post_fixate function, which makes the stimulus HTML blank and lasts for 500 ms before calling the stimulus function. In the stimulus function, he defines the time at which the stimulus is shown on screen, then changes the necessary elements - like the color the color-word is presented in, presenting the color-word in upper case (toUpperCase()) and the specific word that had been defined in the array before. He allows the participant to respond by chagning allow_keys to true. Now, to understand what happens next, you have to go down to where the event listener actually is. It's on_keyPress and you can see that it checks what key was pressed. Like with our previous example, nothing will happen if the key is pressed and they're not supposed to be pressing keys, but if it's during the stimulus time, we'll look to see whether they've pressed the task-specific keys, define their reaction time (time at which something is shown on screen relative to when you actually responded), and then run the end_trial function. There, we increase the trial counter and if we're still under the number of trials we're supposed to run, go to the pre_fixate function (a blank screen) for 500 ms before rerunning the entire cycle again. And when we are past the number of trials, in the end_trial function, it goes to submit the data and open up a feedback HTML document. The submit data JS is what's below!
						//////////////// stroop task functions /////////////////////

						let start_task = function () {

							// setup the display for stroop task

							document.querySelector("#main-display").innerHTML = `

										  <div class="content-display flex items-center" >

											<div class="stimulus-display">

												<p id="stimulus" style="min-height: 82px;"></p>

											</div>

										  </div>`


							fixate();


						};


						let pre_fixate = function () {

							// blank screen before fixation

							document.querySelector("#stimulus").innerHTML = ""


							timer = eventTimer.setTimeout(fixate, 500)

						}


						let fixate = function () {

							// display fixation

							document.querySelector("#stimulus").style.color = "grey"

							document.querySelector("#stimulus").innerHTML = "+"


							timer = eventTimer.setTimeout(post_fixate, 1000)

						}


						let post_fixate = function () {

							// blank screen after fixation

							document.querySelector("#stimulus").innerHTML = ""


							timer = eventTimer.setTimeout(stimulus, 500)

						}


						let stimulus = function () {

							// save time when the trial started

							trial_array[trial_counter].time_start = window.performance.now();


							let div = document.querySelector("#stimulus")

							div.style.visibility = "hidden"


							// change color to trial color

							div.style.color = trial_array[trial_counter].color


							// insert trial stimulus word into div

							div.innerHTML = trial_array[trial_counter].word.toUpperCase();


							div.style.visibility = "visible"


							// allow keyboard responses & wait for response

							allow_keys = true;

						}


						let end_trial = function () {

							// increase trial counter

							trial_counter++


							// if there are no more trials end experiment

							if (trial_counter > trial_array.length - 1) {

								end_exp();

								return

							}


							// else cue next trial

							pre_fixate();

						}


						let end_exp = function (){

							// typically you would submit the data through php which would automatically trigger the feedback html

							//submit_data();


							// but since the php won't post properly without a server I'll just trigger the html

							 window.open("feedback-letter.html", "_self");

						}


						/////////// on keypress event // added as event listener on init /////////////////////////

						let on_keypress = function (event) {

							let code = event.which || event.keyCode || 0

							let key = event.key


							key_time = window.performance.now();


							// do nothing if allow_keys is false

							if (allow_keys == false) {

								return;

							}


							// submit a response if current key one of the response keys

							if (code == 82 | code == 66 | code == 71 | code == 89) {

								// don't allow anymore keypresses

								allow_keys = false;


								// record response data

								trial_array[trial_counter].response = key;

								trial_array[trial_counter].reaction_time = key_time - trial_array[trial_counter].time_start

								trial_array[trial_counter].time_end = key_time


								end_trial();

							}

						};
Now let's take a look at the code in full!
						// I use a custom timer called "eventTimer", but this code checks that it is loaded

						// fallback to vanilla timers if eventTimer is not loaded...

						// you could replace all eventTimer.setTimeout with window.setTimeout and everything would still work


						if (typeof eventTimer == 'undefined') {

							//console.log("no eventTimer found... using JS setTimeout/Interval")

							var eventTimer = {};

							eventTimer.setTimeout = function (fun, time) {

								window.setTimeout(fun, time)

							}

							eventTimer.setInterval = function (fun, time) {

								window.setInterval(fun, time)

							}

						}


						/////// global variables ////////////

						let allow_keys = false // when true keypresses trigger function

						let trial_counter = 0  // tracks current trial


						///// initialize the display for experiment ///////////

						let init_stroop = function () {

							// add event listener for the on_keypress function

							document.addEventListener("keydown", on_keypress, false)


							// create content display within the main-display div

							document.querySelector("#main-display").style.display = "flex"

							document.querySelector("#main-display").innerHTML = `<div class="content-display flex flex-column justify-center lh-copy" style="text-align: left"></div>`


							// call instruction function

							instructions_pg1();

						}


						//////// INSTRUCTIONS /////////////////////

						let instructions_pg1 = function () {

							document.querySelector(".content-display").style.visibility = "hidden"


							document.querySelector(".content-display").innerHTML =

								`<h3>Instructions</h3>

										<div>

											<p>Your primary task will be to identify the color of the font as quickly and as accurately as possible.</p>

											<p>On every trial you will see a color-word in a colored font (e.g., <span style="color: #e41a1c">BLUE</span>, <span style="color:#ffff33">YELLOW</span>, <span style="color:#1f78b4">BLUE</span>). </p>

											<p>Your task is to indicate the color of the font (ignoring what the word says). You will use the keyboard to respond by pressing "b" for blue, "g" for green, "r" for red and "y" for yellow.</p>

											<p>For example, if you were presented <span style="color: #1f78b4">RED</span>, you would respond by pressing "b" for blue.</p>

											<p>If you were presented <span style="color: #4daf4a">GREEN</span>, you would respond by pressing "g" for green.</p>

										</div>

									<div class="flex flex-row" style="">

										<a id="dyn-bttn" class="bttn b-right f6 link dim ph3 pv2 mb2 dib white bg-gray" href="#0">NEXT</a>

									</div>`


							// can only set onclick after a button has been created

							document.querySelector("#dyn-bttn").setAttribute("onClick", "javascript: instructions_pg2();")

							document.querySelector(".content-display").style.visibility = "visible"

						}


						let instructions_pg2 = function () {

							document.querySelector(".content-display").style.visibility = "hidden"


							document.querySelector(".content-display").innerHTML =

								`<h3>Instructions</h3>

										<div>

											<p>That's it!</p>

											<p>When you are ready to begin, press start</p>

										</div>

									<div class="flex flex-row" style="">

										<a id="dyn-bttn" class="bttn b-right f6 link dim ph3 pv2 mb2 dib white bg-gray" href="#0">NEXT</a>

									</div>`


							// can only set onclick after a button has been created

							document.querySelector("#dyn-bttn").setAttribute("onClick", "javascript: start_task();")

							document.querySelector(".content-display").style.visibility = "visible"


						}


						//////////////// stroop task functions /////////////////////

						let start_task = function () {

							// setup the display for stroop task

							document.querySelector("#main-display").innerHTML = `

										  <div class="content-display flex items-center" >

											<div class="stimulus-display">

												<p id="stimulus" style="min-height: 82px;"></p>

											</div>

										  </div>`


							fixate();


						};


						let pre_fixate = function () {

							// blank screen before fixation

							document.querySelector("#stimulus").innerHTML = ""


							timer = eventTimer.setTimeout(fixate, 500)

						}


						let fixate = function () {

							// display fixation

							document.querySelector("#stimulus").style.color = "grey"

							document.querySelector("#stimulus").innerHTML = "+"


							timer = eventTimer.setTimeout(post_fixate, 1000)

						}


						let post_fixate = function () {

							// blank screen after fixation

							document.querySelector("#stimulus").innerHTML = ""


							timer = eventTimer.setTimeout(stimulus, 500)

						}


						let stimulus = function () {

							// save time when the trial started

							trial_array[trial_counter].time_start = window.performance.now();


							let div = document.querySelector("#stimulus")

							div.style.visibility = "hidden"


							// change color to trial color

							div.style.color = trial_array[trial_counter].color


							// insert trial stimulus word into div

							div.innerHTML = trial_array[trial_counter].word.toUpperCase();


							div.style.visibility = "visible"


							// allow keyboard responses & wait for response

							allow_keys = true;

						}


						let end_trial = function () {

							// increase trial counter

							trial_counter++


							// if there are no more trials end experiment

							if (trial_counter > trial_array.length - 1) {

								end_exp();

								return

							}


							// else cue next trial

							pre_fixate();

						}


						let end_exp = function (){

							// typically you would submit the data through php which would automatically trigger the feedback html

							//submit_data();


							// but since the php won't post properly without a server I'll just trigger the html

							 window.open("feedback-letter.html", "_self");

						}


						/////////// on keypress event // added as event listener on init /////////////////////////

						let on_keypress = function (event) {

							let code = event.which || event.keyCode || 0

							let key = event.key


							key_time = window.performance.now();


							// do nothing if allow_keys is false

							if (allow_keys == false) {

								return;

							}


							// submit a response if current key one of the response keys

							if (code == 82 | code == 66 | code == 71 | code == 89) {

								// don't allow anymore keypresses

								allow_keys = false;


								// record response data

								trial_array[trial_counter].response = key;

								trial_array[trial_counter].reaction_time = key_time - trial_array[trial_counter].time_start

								trial_array[trial_counter].time_end = key_time


								end_trial();

							}

						};
This is the record_data.js external file referred to above. Each person is assigned a random string (subcode) with 8 selected from 0-9 and a-z in upper and lower case. This is stored as the sscode, and when you submit data, it is sending the data to a lab-specific custom PHP file. It will indicate which study is run and the data array that we've already defined earlier. It converts the array to text via the array_to_text function, which adds delimiters between each row (new line) or column (,). This is akin to the earlier code where we did array.join(delimiter). Nick just writes this into an entire function, and it runs before the 'submit data' section of the sub_data function. There, it includes the values for the sscode, indicates the data array, and then submits to the PHP (which presumably creates its own task file on their server). You could still run this with the sandbox external submit instead of the server-side.php file and test this one out.
						// create a random subject code

						//set participant values

						function getRandomString(length, chars) {

							var result = '';

							for (var i = length; i > 0; --i) result += chars[Math.round(Math.random() * (chars.length - 1))];

							return result;

						}


						const sub_code = getRandomString(8, '0123456789abcdefghijklmnopqrstuvwxyzABCDEFGHIJKLMNOPQRSTUVWXYZ');


						sessionStorage.setItem("sscode", sub_code);


						// submits data to database using php code

						function submit_data() {

								let formHTML = [

									"<form id='sendtoPHP' method='post' action='server-side.php' style='display: none'>",

										"<input type='hidden' name='put-studyid-here' id = 'put-studyid-here' value = ''/>",

										"<input type='hidden' name='put-sscode-here' id = 'put-sscode-here' value = ''/>",

										"<input type='hidden' name='put-data-here' id = 'put-data-here' value = ''/>",

									"</form>"

									].join("\n")


							document.querySelector("body").innerHTML += formHTML


							// collect each task dataset

							let data = trial_array


							// convert array of objects to string

							data = array_to_text(data)


							// submit data

							document.getElementById('put-studyid-here').value = sub_code;

							document.getElementById('put-sscode-here').value = "demo-exp";

							document.getElementById('put-data-here').value = data;

							document.getElementById('sendtoPHP').submit();

						}


						// converts an array of objects to csv formatted text

						function array_to_text(args) {

							var result, ctr, keys, columnDelimiter, lineDelimiter, data;


							data = args || null;

							if (data == null || !data.length) {

								return null;

							}


							columnDelimiter = args.columnDelimiter || ',';

							lineDelimiter = args.lineDelimiter || '\n';


							keys = Object.keys(data[0]);


							result = '';

							result += keys.join(columnDelimiter);

							result += lineDelimiter;


							data.forEach(function (item) {

								ctr = 0;

								keys.forEach(function (key) {

									if (ctr > 0) result += columnDelimiter;


									result += '"' + item[key] + '"';

									ctr++;

								});

								result += lineDelimiter;

							});


							return result;

						}
Great! So now you've seen what it's like to have an experiment in separate JavaScript and HTML files, and this experiment solely used vanilla JS instead of jQuery (see how this one used document.getElementById whereas the above Experiment kept referring to elements like $("#") - that's one of the differences in whether you use the jQuery library versus JavaScript.) What about the CSS used in this Experiment? Here's the index-style css file. You can immediately see that for this demo, Nick has used way more CSS than was used in the other demo. But do you think all of these were used? Try to take a look for yourself and see whether this CSS refers to all the code I include above or if there's CSS referring to things that are in, e.g., the feedback HTML I haven't shown here.
						div,button{

						  display:none;

						  visibility:hidden;

						  font-family: Verdana, sans-serif;

						  font-size: 16px;

						}


						audio{display:none;}


						p,h1,h2,h3,h4,h5{color:#57585b;}


						body{

						  /*top right bottom left*/

						  /*padding: 40px 40px 0px 40px;*/

						  padding: 40px 100px 10px 100px;

						  background-color:#ffffff;

						}


						button{

						  /*top right bottom left*/

						  padding: 8px 12px 8px 12px;

						  text-transform:uppercase;

						  color:#57585b;

						}


						table {

							color:#57585b;

							font-family: Verdana, sans-serif;

							padding: 10px;

						}


						caption {padding: 10px;}


						tr, td {padding: 10px;}


						tr.slider-row {margin: 20px;}


						#stim-container{

						  position:fixed;

							top:50%;

							left:50%;

							margin:auto;

							transform: translate(-50%, -50%);

							font-size:62px;

							color:#57585b;

						}


						#vid-container{z-index: 200;}


						iframe{

						  width:640;

						  height:480;

						  display:none;

						  visibility: hidden;

						  position:fixed;

						  top:20%;

						  left:50%;

						  margin-left: auto;

						  margin-right: auto;

						  transform: translate(-50%,-50%);

						  pointer-events: none;

						  border: 1px solid black;

						}


						input[type=range] {

						  -webkit-appearance: none;

						  margin: 18px 0;

						  width: 100%;

						}

						input[type=range]:focus {

						  outline: none;

						}

						input[type=range]::-webkit-slider-runnable-track {

						  width: 100%;

						  height: 8.4px;

						  cursor: pointer;

						  animate: 0.2s;

						  background: #cccccc;

						}

						input[type=range]::-webkit-slider-thumb {

						  height: 30px;

						  width: 15px;

						  background: #57585b;

						  cursor: pointer;

						  -webkit-appearance: none;

						  margin-top: -14px;

						}

						input[type=range]:focus::-webkit-slider-runnable-track {

						  background: #cccccc;

						}

						input[type=range]::-moz-range-track {

						  width: 100%;

						  height: 8.4px;

						  cursor: pointer;

						  animate: 0.2s;

						  background: #cccccc;

						}

						input[type=range]::-moz-range-thumb {

						  height: 30px;

						  width: 15px;

						  background: #57585b;

						  cursor: pointer;

						}

						input[type=range]::-ms-track {

						  width: 100%;

						  height: 8.4px;

						  cursor: pointer;

						  animate: 0.2s;

						  background: transparent;

						  color: transparent;

						}

						input[type=range]::-ms-fill-lower {

						  background: #cccccc;

						}

						input[type=range]::-ms-fill-upper {

						  background: #cccccc;

						}

						input[type=range]::-ms-thumb {

						  height: 30px;

						  width: 15px;

						  border-radius: 3px;

						  background: #57585b;

						  cursor: pointer;

						}

						input[type=range]:focus::-ms-fill-lower {

						  background: #cccccc;

						}

						input[type=range]:focus::-ms-fill-upper {

						  background: #cccccc;

						}


						span{color: green;}


						input[type=radio]{

						  border:0px;

						  width:25px;

						  height:25px;

						  margin-top: 7px;

						  margin-bottom: 7px;

						}


						input[type='radio'],label{

						  font-size: 16px;

						  vertical-align:middle;

						  cursor: pointer;

						  font-family: Verdana, sans-serif;

						  color:#57585b;

						}


						ul {color:#57585b;}
Basic Stroop task demo, III
One last thing that I want you to do is take a look at Dr. Matthew Crump's Programming for Psychologists textbook, pages 147-159. This textbook *also* has a Basic Stroop task. For copyright reasons, I'm not going to copy/paste any parts of that code here, but it's useful to also compare how he codes THIS EXACT style of task too. Where does he differ relative to these last two demos?
What might you want to do for your own Experiments?
Finally, if you're looking for more coding examples, you can check out the folder within this repository for that purpose.
How does Qualtrics use JavaScript, HTML, CSS?
We've talked a lot about the user experience and how Qualtrics helps you achieve that... but what if you don't like what Qualtrics does? Well, you can actually change up their HTML, JavaScript, and CSS. For example, you can change their work at a high-level by going to "Look and Feel" and going to the Style tab. You can of course use their GUI, but you can also write your own CSS sheet and put that into "Style".
One thing that I've done in the past - with collaborators - is change the particular text on one of the questions. Specifically, I've changed the button with the "JavaScript" option on the consent form style question. I made it explicitly say that the participant is consenting when they click the button, instead of just leaving the button as a right arrow. This helps with the User Experience.
						Qualtrics.SurveyEngine.addOnload(function()

						{

							//change the button text

						var newName = 'Submit consent form';

						if ($('NextButton').nodeName == 'INPUT')

						{$('NextButton').setValue(newName);}

						else if ($('NextButtonText').nodeName == 'SPAN')

						{$('NextButtonText').innerHTML = newName;}

						else // next button is probably a button

						{$('NextButton').innerHTML = newName;}

						});


						Qualtrics.SurveyEngine.addOnReady(function()

						{

							/*Place your JavaScript here to run when the page is fully displayed*/


						});


						Qualtrics.SurveyEngine.addOnUnload(function()

						{

							/*Place your JavaScript here to run when the page is unloaded*/


						});
If you have a text box, you can modify the JavaScript to also include "placeholder" text so that a participant has some level of what to say in that question. This, like other comments, allows you to customize the survey platform with an eye for user experience. I've also directly modified the HTML so that I could include an i-frame in one survey. As with MTurk, there is a button that says 'Source' <> and allows you to modify HTML.
<div class="container"><iframe class="responsive-iframe" src="LINK HERE"></iframe></div>
(Notably, I also defined the max width to the current size of the screen so that the i-frame would be large enough for participants, given the particular link I had in mine.).
						Qualtrics.SurveyEngine.addOnload(function()

						{

							/*Place your JavaScript here to run when the page loads*/

							var w = window.innerWidth;

							jQuery(".Skin .SkinInner").css({"min-width": w});


						});


						Qualtrics.SurveyEngine.addOnReady(function()

						{

							/*Place your JavaScript here to run when the page is fully displayed*/


						});


						Qualtrics.SurveyEngine.addOnUnload(function()

						{

							/*Place your JavaScript here to run when the page is unloaded*/


						});
Make sure to try this out for yourself! One thing you might have noticed even from these examples is that Qualtrics has its own way of coding JavaScript, too, so you'd need to learn their specification a little more too.
How does MTurk use JavaScript, HTML, CSS?
Do you remember in Module 1 when we referred to the "Source" section of the "Design Layout" on Edit Project for requester MTurk? This source page is HTML, JavaScript, and CSS! You should be able to read this kind of code a lot easier now. What do you think this "New Project" is doing? What would it look like? One way to test out your skills is to see whether you can purely edit the MTurk HIT on the Source page rather than using the GUI itself.
						<!-- For help on using this template, see the blog post: https://blog.mturk.com/editing-the-survey-link-project-template-in-the-ui-7c75285105fb#.py7towsdx --><!-- HIT template: SurveyLink-v3.0 --><!-- The following snippet enables the 'responsive' behavior on smaller screens -->

						<meta content="width=device-width,initial-scale=1" name="viewport" />

						<section class="container" id="SurveyLink"><!-- Instructions -->

						<div class="row">

						<div class="col-xs-12 col-md-12">

						<div class="panel panel-primary"><!-- WARNING: the ids "collapseTrigger" and "instructionBody" are being used to enable expand/collapse feature --><a class="panel-heading" href="javascript:void(0);" id="collapseTrigger"><strong>Survey Link Instructions</strong> <span class="collapse-text">(Click to expand)</span> </a>

						<div class="panel-body" id="instructionBody">

						<p>We are conducting an academic survey about social networks. We need to understand your opinion about social networks. Select the link below to complete the survey. At the end of the survey, you will receive a code to paste into the box below to receive credit for taking our survey.</p>


						<p><strong>Make sure to leave this window open as you complete the survey. </strong> When you are finished, you will return to this page to paste the code into the box.</p>


						<p class="well well-sm"><strong><mark>Template note for Requesters</mark></strong> - To verify that Workers actually complete your survey, require each Worker to enter a <strong>unique</strong> survey completion code to your HIT. Consult with your survey service provider on how to generate this code at the end of your survey.</p>

						</div>

						</div>

						</div>

						</div>

						<!-- End Instructions --><!-- Survey Link Layout -->


						<div class="row" id="workContent">

						<div class="col-xs-12 col-md-6 col-md-offset-3"><!-- Content for Worker -->

						<table class="table table-condensed table-bordered">

							<colgroup>

								<col class="col-xs-4 col-md-4" />

								<col class="col-xs-8 col-md-8" />

							</colgroup>

							<tbody>

								<tr>

									<td><label>Survey link:</label></td>

									<td><a class="dont-break-out" href="http://[example.com/survey345.html]" target="_blank">http://example.com/survey345.html</a></td>

								</tr>

							</tbody>

						</table>

						<!-- End Content for Worker --><!-- Input from Worker -->


						<div class="form-group"><label for="surveycode">Provide the survey code here:</label> <input class="form-control" id="surveycode" name="surveycode" placeholder="e.g. 123456" required="" type="text" /></div>
						<!-- End input from Worker --></div>

						</div>

						<!-- End Survey Link Layout --></section>

						<!-- Please note that Bootstrap CSS/JS and JQuery are 3rd party libraries that may update their url/code at any time. Amazon Mechanical Turk (MTurk) is including these libraries as a default option for you, but is not responsible for any changes to the external libraries --><!-- External CSS references -->

						<link crossorigin="anonymous" href="https://maxcdn.bootstrapcdn.com/bootstrap/3.0.3/css/bootstrap.min.css" integrity="sha384-IS73LIqjtYesmURkDE9MXKbXqYA8rvKEp/ghicjem7Vc3mGRdQRptJSz60tvrB6+" rel="stylesheet" /><!-- Open internal style sheet -->

						<style type="text/css">#collapseTrigger{

						  color:#fff;

						  display: block;

						  text-decoration: none;

						}

						#submitButton{

						  white-space: normal;

						}

						.image{

						  margin-bottom: 15px;

						}

						/* CSS for breaking long words/urls */

						.dont-break-out {

						  overflow-wrap: break-word;

						  word-wrap: break-word;

						  -ms-word-break: break-all;

						  word-break: break-all;

						  word-break: break-word;

						  -ms-hyphens: auto;

						  -moz-hyphens: auto;

						  -webkit-hyphens: auto;

						  hyphens: auto;

						}

						</style>

						<!-- Close internal style sheet --><!-- External JS references --><script src="https://code.jquery.com/jquery-3.1.0.min.js"   integrity="sha256-cCueBR6CsyA4/9szpPfrX3s49M9vUU5BgtiJj06wt/s="   crossorigin="anonymous"></script><script src="https://maxcdn.bootstrapcdn.com/bootstrap/3.0.3/js/bootstrap.min.js" integrity="sha384-s1ITto93iSMDxlp/79qhWHi+LsIi9Gx6yL+cOKDuymvihkfol83TYbLbOw+W/wv4" crossorigin="anonymous"></script><
!-- Open internal javascript --><script>

						  $(document).ready(function() {

							// Instructions expand/collapse

							var content = $('#instructionBody');

							var trigger = $('#collapseTrigger');

							content.hide();

							$('.collapse-text').text('(Click to expand)');

							trigger.click(function(){

							  content.toggle();

							  var isVisible = content.is(':visible');

							  if(isVisible){

								$('.collapse-text').text('(Click to collapse)');

							  }else{

								$('.collapse-text').text('(Click to expand)');

							  }

							});

							// end expand/collapse

						  });

						</script><!-- Close internal javascript -->
Applied Exercises
If you want to "explore" on your own, let me suggest opening the JavaScript Developer Console on this site. Then edit whatever HTML you'd like and see what happens - live - to the site itself. What does each CSS styling correspond to? What does each element correspond to? What happens if you add more JavaScript to the site? One of the best ways to learn how to code is to take something that already exists and mess with it until you see what your changes do. Then you'll have a framework to work with when you are coding on your own.
Find one of your favorite websites and open the Developer console. For example, why not take a look at the Mozilla Developer site for HTML? It's beautifully styled, with a clear hierarchy of information and tables to define particular elements. You can learn more about all the possible HTML elements while looking at how they've coded the structure of the site and how their CSS has styled the site with an almost magazine-like modern, clean look. Poke around and see how they've defined everything.
Create a sample pre-screen HIT on MTurk, applying what you learned from Module 1, that is coded in the HTML/source interface with CSS styling, applying what you learned from Module 3, and that uses basic survey design principles, applying what you learned from Module 2, to assess participant demographics.
Download the PageFocus html file and test out whether you can get this script to work. Does it accurately record when you've left your browser to click on another browser? Add in an input that allows participants to explain what they navigated to. Remove inputs that are extraneous and not necessary to understand the purpose of the script. How might you apply this to your own Experiment?
Please remember to evaluate the subsection with the Google Form below so this can be improved in the future (you can find the results from the Google Form here).
Test Yourself:
Continue Learning:
- Program a basic task-switching experiment, with ten trials per block and 2 blocks. Have participants switch between categorizing numbers as odd/even and images as outdoors/indoors. No need for randomization, just build the stimuli matrices, timelines or callbacks, etc.
- Program a basic personal webpage that can navigate from an about page to a research page.
- Program an experiment that displays images, program an experiment that displays text, and program a survey-style study, like the demographics and BIS-BAS Likert survey shown in Module 2.
- Read through the code examples, figure out what each line of code is doing, and comment the script. Test out the script to see whether your comments correctly mark what each line of code is doing.
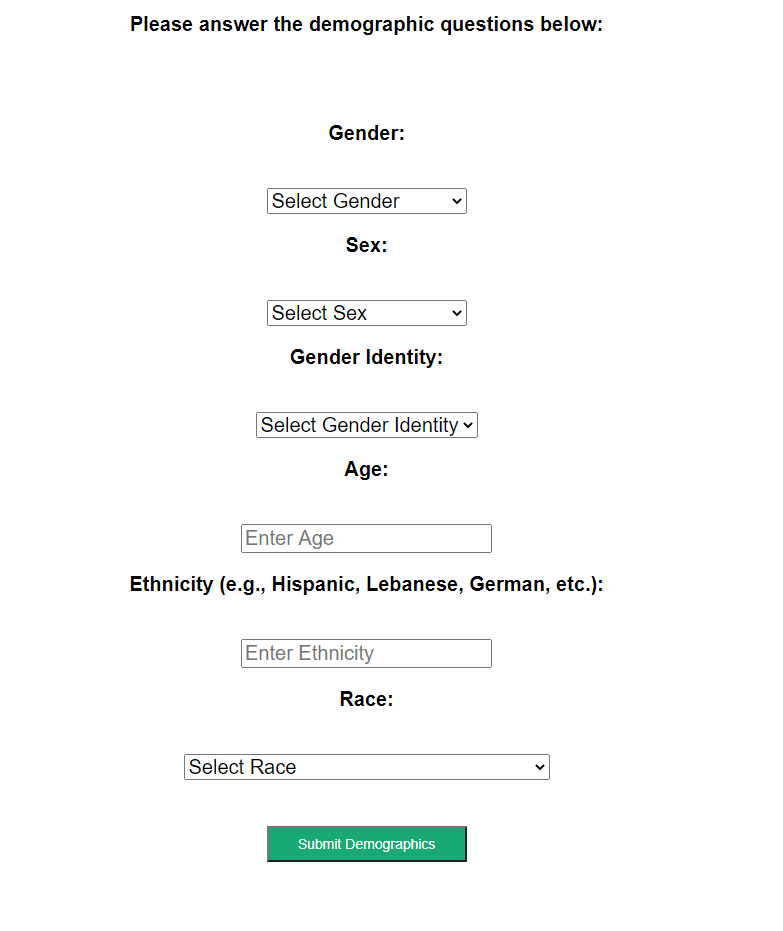
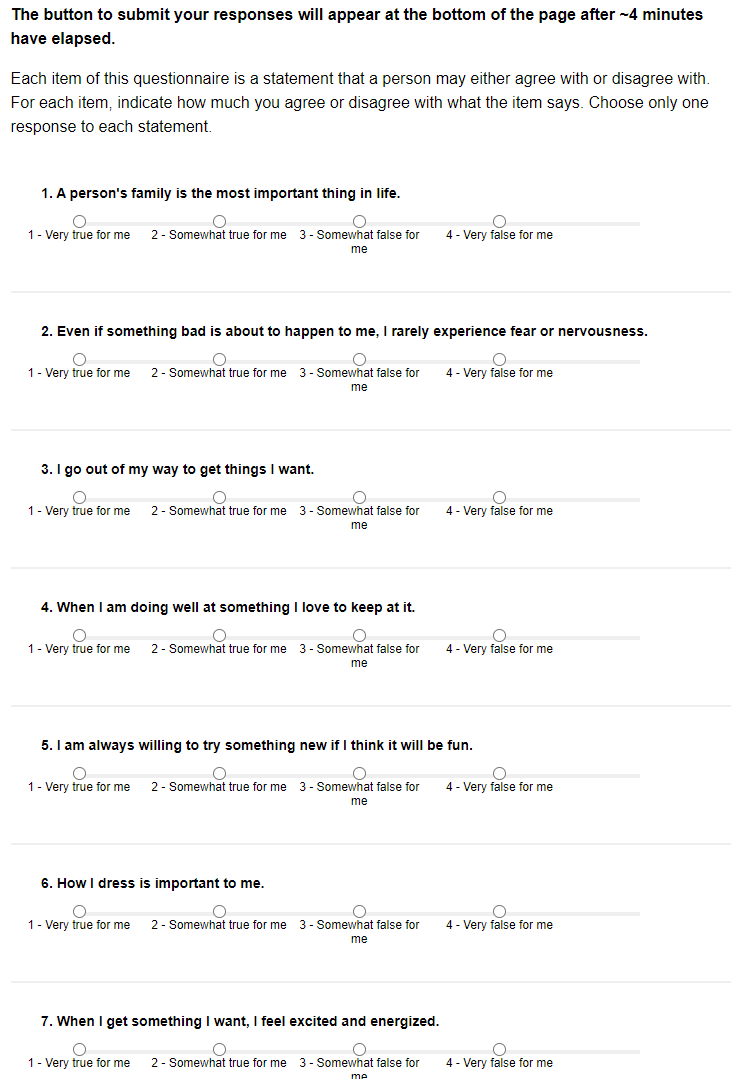